Breakfast

Vegan Carrot Cake Biscuits with Maple Cashew Butter

IMG_2630.jpg

Who says you can’t have cake for breakfast, or something pretty close.

Carrot cake is one of my favorite cake flavors and biscuits are hands down my favoite bread.

So mix the two together, and you have absolute breakfast perfection!

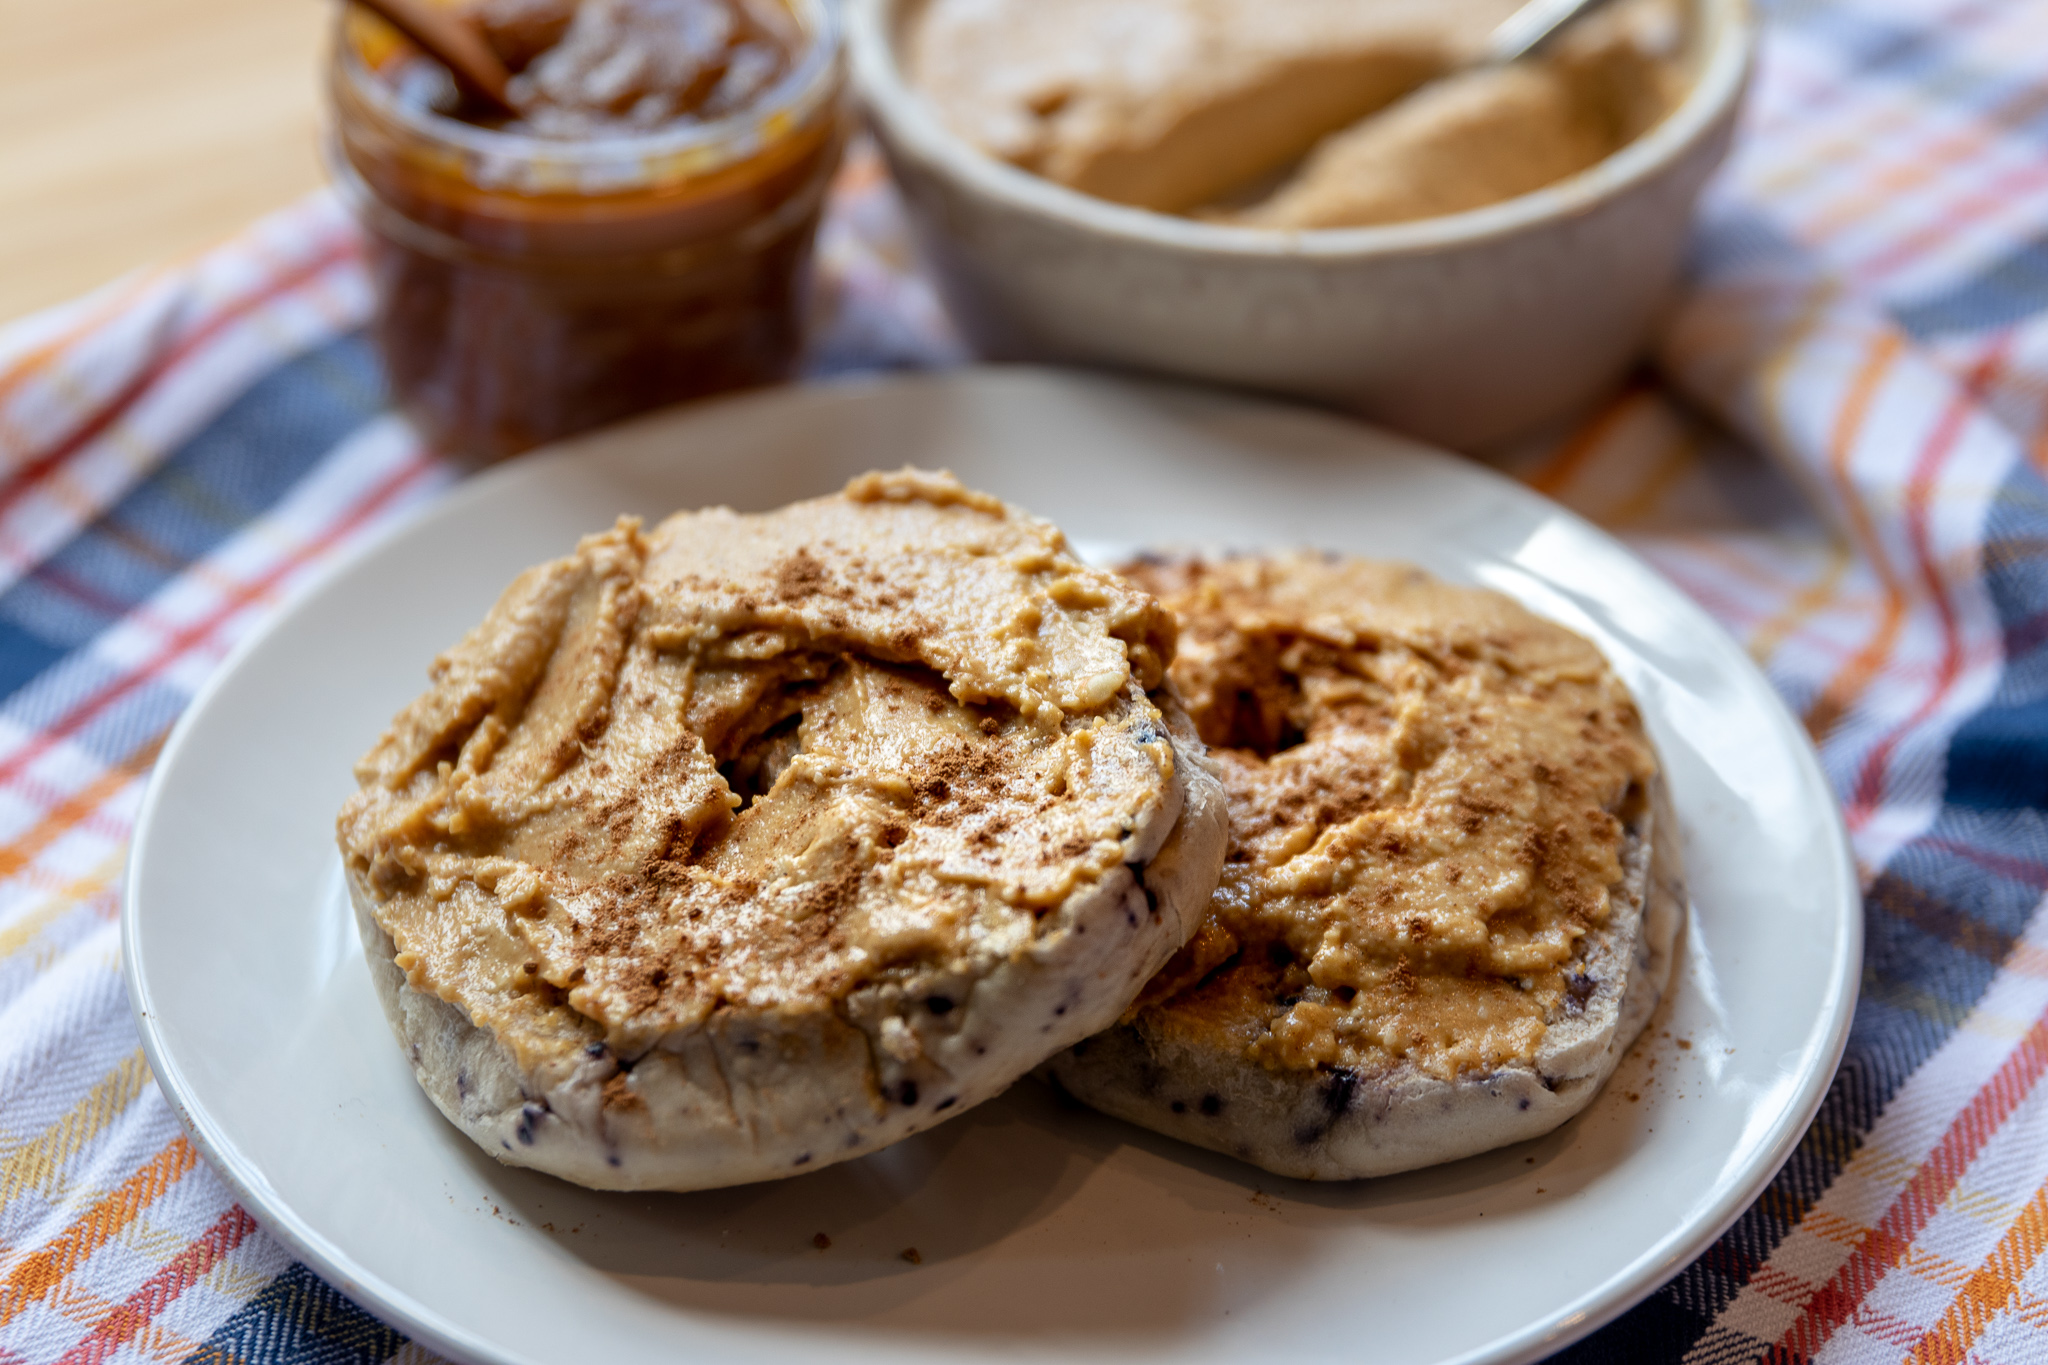
These vegan carrot cake biscuits are light and fluffy, packed full of healthy carrots and walnuts. They are just the right amount of sweet and even better topped with our quick and easy Maple Cinnamon Cashew Butter!

These little beauties also make a tasty dessert or late afternoon snack. But is there ever a wrong time to eat a biscuit? I don’t think so!


INGREDIENTS:

  • 4 cups all purpose flour

  • 1 tablespoon baking powder

  • 1/2 teaspoon salt

  • 1/2 cup granulated sugar

  • 1/2 cup plant based milk

  • 1 teaspoon vinegar

  • 2 cups grated carrots

  • 1/2 cup chopped walnuts, or raisins

  • 1/4 cup vegan butter

  • 2 teaspoons cinnamon

  • 1/2 teaspoon nutmeg

  • 1 teaspoon vanilla extract


Maple Cinnamon Cashew Butter:

  • 3/4 cups cashews

  • 2 tablespoons maple syrup

  • 2 tablepsoons coconut oil

  • 1 to 2 teaspoons cinnamon

  • pinch of salt


INSTRUCTIONS:

Preheat oven to 450 degrees.

  1. In a large bowl, combine flour, baking powder, salt, and sugar. Whisk well.

  2. Add the butter to the bowl and using your hands, break up the butter into rice size pieces, mixing it into the flour.

  3. Mix the grated carrots and nuts into the flour mixture.

  4. Add the 1 teaspoon of vinegar to a glass then pour the milk over it. Let It sit for a few minutes until the milk begins to curdle. (you are basically making butter milk)

  5. Pour the milk into the bowl of flour and gently mix, using your hands. You just want to get the milk and flour incorporated into a dough. You do not want to over mix. The less you work the dough, the lighter and fluffier the biscuits will be. If they dough still seems a little dry, you can add another splash or two of milk. If it seems too wet, just sprinkle will some extra flour. Biscuits are forgiving and easy in this way.

  6. Turn the dough onto a floured surface and pat it out into a 3/4 to 1 inch thick oval. Cut biscuits using a biscuit cutter or the rim of a glass.

  7. Place biscuits on a parchment lined baking sheet and bake on the top rack of the oven for 10-12 minutes. The biscuits should begin to brown on the tops.

  8. Allow the biscuits to cool for a minute before serving or serve at room temperature. Store leftovers in sealed bag or airtight container at room temperature. These biscuits also freeze well. Just pop them in a freezer bag and thaw to serve.

  9. Maple Cinnamon Cashew Butter: Cover cashews in water in a microwave safe container. Microwave on high for 3 minutes. Drain and rinse cashews. If you do not have a microwave, you can soak the cashews in hot water for about an hour.

  10. Place cashews in a high speed blender or food processor along with the remaining ingredients and process until smooth. You can use as is, on fresh baked biscuits, then store leftovers in an airtight container in the fridge. The butter will firm up once cold.

Yields about 10 - 12 biscuits depending on the size of cutter you use.

If you like this recipe, try these:

Fluffy Vegan Southern Biscuits

Classic Vegan Cranberry Scone

Spiced Apple and Pecan Stuffed Challah

IMG_2640.jpg

Vegan Maple Bacon Yeast Donuts

IMG_1847.jpg

INGREDIENTS:

The Donuts

  • 4 cups all purpose flour

  • 3/4 cups aquafaba

  • 1/2 cup plus 2 tablespoons melted vegan butter

  • 1/4 cup sugar

  • 2 and 1/4 teaspoon dry active yeast

  • 1 cup plus 2 tablespoons plant based milk

  • 1/2 teaspoon salt

  • 2-3 cups of oil for frying, I use grapeseed or peanut oil, but you could use whatever oil you normally fry with

The Glaze

  • 1 1/2 cups powdered sugar

  • 1/4 cup maple syrup

  • 1 teaspoon vanilla extract

  • a few splashes of plant based milk

  • Vegan coconut bacon

COOKING INSTRUCTIONS: 

  1. Heat milk in microwave for 30 - 45 seconds. You want it warm, but not boiling hot.

  2. Add the warm milk, yeast, and sugar to the bowl of your stand mixer. If you do not have a stand mixer, add the contents to a large bowl. Let sit for 5 minutes to activate the yeast.

  3. After 5 minutes add the aquafaba, and melted butter to the mix. Next add the flour, and salt, and mix for 5 minutes on medium speed if using the stand mixer. If not using a stand mixer, then mix the ingredients together well in a bowl, then transfer to a floured counter top, and kneed the dough by hand for 5 minutes. The consistency of the dough should be soft, but not sticky.

  4. After the dough has been kneaded, place it in a lightly greased bowl and cover with plastic wrap. Pop it in the oven. You are NOT turning the oven on, just leaving it there to rise. If your oven has a dough proof setting you can turn that on. Leave dough to rise for one hour, or until it has doubled in size.

  5. Once the dough has finished rising, transfer to a lightly floured countertop. I like to divide the dough in half and work it in two batches. It makes it easier to roll out. Roll out one half of the dough to about 1/4 inch thick. Using a 3 inch circle biscuit or cookie cutter (or donut cutter if you have one) begin cutting circles. You will need to find something small to cut the center out with. We used the lid to our vanilla extract. Roll back out the scrap dough and continue cutting. Repeat with other half of dough. You should have a total of 2 dozen donuts.

  6. Place donuts on cookies sheets, and let rest for about 15 - 20 minutes. They will become bigger as they rest.

  7. While they are resting, heat 2 - 3 inches of oil in a deep skillet or medium sized pot.

  8. Once oil is hot, begin adding the donuts to the oil, 2 or 3 at a time. Fry the donuts for about one minute on each side. If you don't have enough oil in the pan, and they are hitting the bottom, they will easily burn. So make sure to use enough oil!

  9. Allow donuts to cool on a wire cooling rack, placed on top of a paper-towel-lined cookie sheet.

  10. Once all donuts are done frying, mix all of the ingredients for the glaze. If you find the glaze too thick, you can always thin it with some more milk.

  11. Dip one side of the donut in the glaze and place back on the wire rack to allow the excess glaze to drip off. Sprinkle with coconut bacon while glaze is still wet

  12. It will only take a few minutes for the glaze to set, and for you to be stuffing your face with delicious glazed donut perfection!

Yields two dozen donuts

If you like this recipe, try these:

Vegan Glazed Yeast Donuts

Vegan Jelly Filled Donuts

IMG_1807.jpg

Apricot Jam

Apricot jam is as easy as chopping dried fruit, mixing it with sugar and water, and heating it until it has tuned to jam! It is always cheaper than buying it already made and only takes about half an hour. I love apricot jam in hamantaschen cookies,…

Apricot jam is as easy as chopping dried fruit, mixing it with sugar and water, and heating it until it has tuned to jam! It is always cheaper than buying it already made and only takes about half an hour. I love apricot jam in hamantaschen cookies, on toast, or as a cake filling. It also works well to sweeten sauces when making things like stir fry, and makes a great addition to a vegan cheese board. With so many uses, and with it taking so little time to whip up a batch of this deliciously easy jam, what are you waiting for?

INGREDIETS:

  • 1 cup dried apricots, chopped

  • 1 cup sugar

  • 2 cups water

  • 1 tablespoon lemon juice

  • pinch of salt

INSTRUCTION:

  1. Chop the apricots as finely as you can get them with a good, sharp knife.

  2. Add the apricots, and remaining ingredients to a medium sized sauce pan over medium heat.

  3. Once the water begins to simmer, reduce the heat to low.

  4. Allow the mixture to simmer for around 30 minutes, stirring regularly. The Apricots will begin to break down, the liquid will cook out, and you should begin to get a thick, and sticky jam that will stick to the back of a spoon without sliding off.

  5. Once the jam thickened, transfer to a mason jar and store in the fridge for several weeks.

The Jax Biscuit Sandwich

IMG_1743.jpg

Just outside of our neighborhood is the best vegan breakfast and lunch spot in our city! It is our family’s go to spot for an always quick and delicious meal.

One of my most favorite menu items is something called the Blisscuit!

It is an herb biscuit topped with vegan egg salad, sauerkraut, and avocado.

So naturally for all y’all that are not in Jacksonville FL and who can not visit the infamous, Southern Roots, we decided to create our own version of this delicious bite with a few changes.

We used our fluffy southern biscuit recipe,tofu egg salad, and quick dill sauerkraut to create what we call the Jax Biscuit Sandwich!

We make a really simple quick dil sauerkraut to top this biscuit with. All you need is some cabbage, dil, vinegar, salt, and a microwave. You will have kraut in minutes!! It will only get better with time but is good from the start!

Our vegan egg salad using tofu is one of my favorite quick lunches and something we make almost weekly. Try and find some black salt (kala namak) if you can. Its actually pink and might also be called Indian kala namak. It is sulfur salt so taste and smells strongly of eggs. Its perfect for any and all vegan “egg” dishes you make!

And although we think our biscuit is pretty darn good, and you should definitely make yourself one or five, if you ever find yourself in our river city, go by and try the real deal! You won’t be disappointed! We are forever grateful for the full bellies Southern Roots brings us and all the tasty inspiration!


Ingredtiens:

Vegan Tofu Egg Salad:

  • 1 cube extra firm organic tofu

  • 1 teaspoons turmeric

  • 1 teaspoon garlic powder

  • 1 teaspoon onion powder

  • 3 tablespoon diced pickles (plus a teaspoon of pickle juice)

  • 1/4 cup vegan mayo

  • 1 tablespoon yellow mustard (optional)

  • salt and pepper to taste


Instructions:

  1. Drain tofu and wrap in a clean kitchen towel or a few paper towels. Place a few cookbooks or a heavy pan on top and let sit for 10 - 15 minutes to press out the excess liquid from the tofu.

  2. Crumble tofu into a medium sized bowl using your hands or a fork. Mix in the remaining egg salad ingredients along with the tofu, and mix well. Adjust seasoning to taste.

  3. Cut biscuits in half and add a scoop of tofu egg salad, sauerkraut, and a few slices of avocado.

  4. Eat and be happy!

If you liked this recipe, try these:

Brown Bag “Chicken” Fried Seitan Biscuit

Vegan Deluxe Biscuits and Gravy

Vegan Banana Pudding Pancakes

IMG_1696.jpg

If you are even remotely southern, you have probably had classic banana pudding in your lifetime.

Sweet vanilla pudding, sliced bananas, vanilla wafter cookies, topped with the most perfect, light and fluffy, golden brown peeked meringue!

It’s a work of art and a thing of beauty. I dream about banana pudding at night. So what is one to do when they can’t wait for dessert? You turn your favorite dessert into breakfast, obviously!

So may I introduce you to the vegan banana pudding pancakes! Perfectly fluffy pancakes, vanilla pudding, bananas, crushed vegan vanilla wafers. and sweet aquafaba meringue! I can not think of a better way to start my day than with these pancakes!


INGREDIENTS:

For the pudding:

  • 3 1/2 cups diary free milk ( we used almond)

  • 1/4 cup tapioca or corn starch

  • 3/4 cups sugar

  • 1 teaspoon vanilla extract

  • pinch of salt

For the Pancakes:

  • 2 1/2 cups all purpose flour

  • 4 teaspoons baking powder

  • 1/2 teaspoon salt

  • 1 teaspoon vanila extract

  • 2 tablespoons melted butter

  • 2 tablespoons sugar

  • 2 1/2 cups non dairy milk


Instructions:

  1. Prepare the aquafaba meringue according to instructions and set aside

  2. Add the ingredients for the pudding to a medium/large sized pot. Whisk in the starch so there are no lumps, and heat the mixture over medium heat. Continue to stir the mixture for about 5 minutes or until it has thickened to thin pudding consistency. You don’t want the pudding too thick because you want to be able to drizzle it over the pancakes. Once pudding has thickened, remove from stove top and set aside.

  3. Whisk dry pancake ingredients together. Add in the wet ingredients and mix until there are no lumps.

  4. Heat a large skillet or griddle over medium heat. Add a teaspoon of butter or some spray oil to the pan. Once the pan is nice and hot, scoop out pancake batter using a 1/4 cup measuring cup. Do not over crowed the pan. When tiny bubbles form and pop in the batter, the pancakes are ready to flip. If you notice the pancakes are too dark or beginning to burn, reduce the heat on your stove. Repeat with remaining pancake batter.

  5. On a baking sheet, make stacks of pancakes 3-4 high. If you want you can spread a little pudding between each pancake in the stack. I think it makes them extra yummy, but you can also just wait and drizzle it on at the end. Scoop a large dollop of sweet aquafaba whip on top of each stack. Set oven to broil. Once the coils are red in the oven, place the pan inside and DO NOT TAKE YOUR EYES OFF OF THE PANCAKES FOR EVEN A SECOND!!!! You just want the meringue to brown at the peeks. it will go from beautiful golden brown, to inedible black char in a matter of seconds, so once the aquafaba has started to brown, remove the pan from the oven.

  6. Using a spatula, transfer pancakes to a plate. Drizzle each pancake stack with vanilla pudding, and top with sliced bananas and crushed cookies.

Serves 4-6


Vegan Deluxe Biscuits and Gravy

IMG_1539@0,5x.jpg

One of our favorite places to eat in Boone NC serves the best vegetarian biscuits and gravy!

Mushroom gravy, cheese, tomatoes and onions on top.

The combination of the hot gravy, melted cheese, and cold fresh veggies on top is just about perfect. So naturally I set out to create a vegan version of creative spin on a southern staple.

Don’t get me wrong, I still love a traditional plate of biscuits and “sausage” gravy, but this version is actually my go to!!

Also making homemade biscuits is really easy, so don’t be intimidated! Once you get the hang of it, I think you will want to make the alllllll the time!

So if you love biscuits and gravy ( and if you don’t, please explain this to me, I’m truly confused) then give this version try!

It might become your favorite version as well. And if you are ever in Boone NC, stop by the Hobnob!! They know what they are doing there!


Ingredients:

  • 1 batch Fluffy Southern Biscuits

  • 3 cups diced mushrooms

  • 1 small onion

  • 2 teaspoons vegan butter

  • 2 cups water

  • 2 teaspoons low sodium Better Than Bouillon

  • 1 teaspoon minced garlic

  • 4 tablespoons flour

  • 1 tablespoons tomato paste

  • 1 teaspoon dried thyme

  • pepper to taste

  • optional toppings:

  • diced tomatoes

  • vegan cheddar shreds

  • diced green onions


Instructions:

  1. Bake biscuits according to recipe

  2. In a medium sized skillet, melt 2 teaspoons of butter. Add the onion, garlic, and mushrooms and allow to cook until onions are translucent.

  3. Sprinkle the flour on top of the veggies and let cook for about a minute.

  4. Whisk togher the water, better than bouillon, and tomato paste and pour into pan.

  5. Add the spices and continue whisking until the gravy begins to thicken.

  6. Once gravy has thickened, allow to simmer for a few minutes.

  7. If adding cheddar shreds, place biscuits in an iron skillet or casserole dish. Cover in gravy and sprinkle with cheese. Turn oven to broil and leave the pan in the oven just long enough for the cheese to melt and get bubbly. Do not take your eyes off the biscuits while they are in the oven. They will burn VERY QUICKLY while on broil if you do not watch them.

  8. Once cheese is melted, remove biscuits from the oven, and sprinkle with diced onions and tomatoes to serve.

IMG_1532.jpg

Vegan Chocolate, Coconut, Caramel Pancakes (The Samoas)

IMG_1483.jpg

Once again when Girl Scout cookie season is in full swing, I am left craving my favorite cookie from days of old.

Although the Girl Scouts do offer some delicious vegan cookie options, none hold a candle in my opinion to the gooey, coconutty, chocolatey, Samoa!

Naturally we needed to think outside the box and get creative, so we took all that goodness and turned it into a pancake!

These perfectly fluffy vegan pancakes are covered in vegan chocolate syrup, caramel sauce, sweet aquafaba whip and toasted coconut. I mean come on!! These things are amazing!

Don’t worry, if you feel guilty eating these for breakfast, just make them for dessert or brunch. These vegan Samoa pancakes are a thing of beauty and really do help take your mind off of the legendary forbidden cookie.

And if you haven’t tried some of the Girl Scouts vegan cookies, give them a whirl, they really are good. I mean, I will never turn down a thin mint!


INGREDIENTS:

  • 1 1/4 cups all purpose flour

  • 2 tablespoons white sugar (If vegan, not plant based, make sure the brand you use is in fact vegan, not all white sugars are. I use Florida Crystals)

  • 2 teaspoons baking powder

  • 1/4 teaspoon salt

  • 1/2 teaspoon cinnamon

  • 1/2 teaspoon vanilla extract

  • 1 1/4 cup plant based milk

  • 1 tablespoon melted vegan butter

  • 1 cup vegan chocolate chips or chopped dark chocolate, divided in half

  • 2 teaspoons coconut oil, or vegan butter for the chocolate sauce

  • 1/2 cup shredded coconut, toasted

Sweet Aquafaba Whip: (you could also use canned vegan whip cream)

  • liquid from 1 can of chickpeas

  • 3/4 cups sugar

  • 1/3 teaspoon cream of tarter

Easy Vegan No Cook Caramel:

  • 1/2 cup dried dates

  • 1/4 cup canned coconut cream

  • 1/3 cup maple syrup

  • pinch of salt

  • 1/4 teaspoon vanilla extract


COOKING INSTRUCTIONS:

  1. For the Sweet Aquafaba whip: Add sugar and chickpea liquid to a microwave safe container. Microwave for thirty seconds at a time, stirring each time until the sugar is dissolved. Add all of the ingredients to a stand mixer and mix for about 10 minutes until stiff peaks form and the whip is glossy. You can also do this in a large bowl with an electric hand mixer. It takes a good bit longer for aquafaba whip cream than it does basic aquafaba because of the sugar. Trust me when I say it’s worth the effort. It is like a marshmallowy/whip creamy perfect cloud of magic. I highly suggest trying a batch. You may never go back to coconut whip cream!

  2. For the Caramel: Add the ingredients for the caramel to a food processor or blender. You may have trouble getting it to process in your blender because it is a small volume of ingredients. If you do not have a food processor, I suggest doubling the ingredients so you have enough volume that your blender will break it down. Let’s be real, I’m sure you can find plenty of ways to use up the extra! Store caramel in the fridge 1 - 2 weeks.

  3. For the Pancakes: Whisk all dry ingredients in a large bowl.

  4. Add in the melted butter, plant based milk, vanilla, and stir well.

  5. Heat a large skillet on medium heat. Add a teaspoon of vegan butter or spray the pan with cooking oil. Using a 1/4 cup measuring cup, scoop out batter into the skillet, 2 or 3 pancakes at time. Sprinkle each pancake with some of the chocolate chips or chopped chocolate. You will only use half of the chocolate for pancakes.

  6. Let pancakes cook until tiny bubbles begin to form and pop, once this happens they are ready to flip. Cook on the other side for another minute or two, until cooked through.

  7. Repeat, adding more butter or oil to the pan as needed, until all batter is used.

  8. Take the other half of the chocolate that you reserved, along with the teaspoons of coconut oil or vegan butter in a microwave safe bowl, and microwave for 30 seconds. Stir well and repeat microwaving at 30 second intervals time until chocolate has melted.

  9. Add coconut to a skillet and heat over medium heat, stirring continuously until the coconut begins to brown. Remove coconut from the pan once it is toasted.

  10. Stack 3 - 4 pancakes on a plate, topping with sweet aquafaba whip and coconut. Drizzle with chocolate sauce and camel to serve.

Serves 3 - 4. but the pancake batter can be easily doubled!


IMG_1488.jpg

Easy Homemade Vegan Bagels

IMG_1379.jpg

Warm, chewy on the outside, soft on the inside, fresh, homemade bagels! Yes, Yes, and YES!

Seriously, y'all, fresh homemade bagels are so easy to make, plus you get to top them with whatever you want!

Vegan cheese, sesame seeds, Trader Joe’s everything bagel seasoning, raisins, cinnamon, jalapeños, chocolate chips…whatever y’all want! I normally let each of my kids pick a flavor and try to accommodate. Everyone loves homemade bagel day in your house.

Bagels freeze really well, so make yourself a double batch on the weekend, and next week’s breakfast just got a lot easier, and a whole lot more tasty!

If you don’t believe me, I have left photo proof of our two year old digging into a fresh everything bagel that she slyly snatched as we were trying to photograph them. I mean she just did the thing the rest of us wanted to do. But who can blame her.

They are that good! And if y’all can’t do gluten, don’t worry! Our friends over at Not That Kind of Vegan took this recipe and turned it gluten free, so go check out their recipe !! Now everyone can have their bagel and eat it too!!

And if you are feeling super extra, you can give making your own easy homemade cream cheese a try. Super easy, cheaper than store bought and soooo good!!! We made ours with tofu and cashews to give it the perfect texture and taste!! And if you are feeling really super duper extra, you can make a quick batch of carrot lox to top it all off with!

IMG_7105.jpg

Ingredients:

  • 4 cups all purpose flour

  • 1 tablespoon dry active yeast

  • 1 and 1/2 cups warm water

  • 1 tablespoon white sugar

  • 3 teaspoons salt

  • optional toppings: everything bagel seasoning, sesame seeds, salt, poppy seeds, shredded cheese, or anything else you can think of!

Boiling liquid:

  • Enough water to fill a large pot

  • 2 teaspoons baking soda

IMG_1352.jpg

Instructions:

  1. In a large bowl add water, yeast, and 1 tablespoon of sugar. You want the water warm but not too hot. It needs to be around 100 degrees. Much hotter and it will kill the yeast. I just use hot water from the tap. Let the mixture sit for about 10 minutes until it is nice and foamy.

  2. Add the yeast mixture along with the remaining ingredients to a stand mixer. You can either use the paddle attachment to get everything mixed up, or mix it by hand before attaching the dough hook. Allow the dough to knead on medium speed for about 10 minutes. It needs to knead for this long! I promise. If you do not have a stand mixer then you can mix the ingredients by hand and knead for about 15 minutes. Baking and a workout at the same time! Heck yes! Look at you burning those bagel calories before you even eat one!

  3. Pull off a piece of dough and stretch it. You want it to make a “windowpane” that you can see through, but does not rip. That’s when you are done kneading!

  4. Place dough in large bowl and cover with plastic wrap or a damp kitchen towel. Allow dough to rise for about an hour. It will grow but not quite double in size.

  5. Once dough has risen, divide into 8 equal pieces. Form a ball with each piece and poke a hole in the middle using your finger. Stretch the ring of dough out a bit and place on a parchment lined baking sheet.

  6. Preheat your oven to 375 degrees.

  7. Bring a large pot of water to a boil. Once boiling, add 2 teaspoons of baking soda. Add 1 or 2 bagels at a time and allow to boil on each side for about 45 seconds. Remove the bagel from the water and place back on the parchment lined baking sheet.

  8. Sprinkle bagel with desired toppings while the bagel are still wet and the toppings will stick.

  9. Bake bagels for 25 - 30 minutes. You can brush the bagels with a 1/2 cup whipped aquafaba mixed with 2 tablespoons of maple syrup, or melted vegan butter. This just helps the bagels brown. You do not have to brush them with anything.

  10. Allow bagels to cool on a the baking pan before storing in an airtight container at room temperature.

  11. Serve with vegan cream cheese, carrot lox, or even our delicious vegan egg salad

You can freeze the bagels for up to a few months. You can also split the dough into 16 pieces if you want smaller bagels.

IMG_1357.jpg
IMG_1363.jpg

Vegan Chocolate Caramel and Coconut Smoothie (The Samoa)

Raise your hand if you have ever had a Samoa Girl Scout cookie. If you have, you probably know what all the hype is about. Gooey Caramel, Chocolate, and toasted coconut perfection. Sadly, Samoas are not one of the Girls Scout’s vegan cookie offering…

Raise your hand if you have ever had a Samoa Girl Scout cookie. If you have, you probably know what all the hype is about. Gooey Caramel, Chocolate, and toasted coconut perfection. Sadly, Samoas are not one of the Girls Scout’s vegan cookie offerings. No worries, Y’all! I think I have just the thing for you! This smoothie is far healthier than a cookie, but taste just as good in my opinion. It has it all!! Chocolate, coconut, and caramel all blended up creamy smooth and so delicious. What it doesn't have is refined sugar, and 100% less guilt than a cookie! Also you can have this for breakfast and not spend your day drowning in regret! WIN WIN WIN! Oh, and the caramel sauce is raw and you will probably find 100 different ways to use it, too! So don’t worry the leftovers, you will thank me later when you are dipping an apple into it ,and again not feeling one ounce of remorse! So blend yourself up a Vegan Samoa Smoothie and walk right past that cookie table those adorable girls have set up in front of your local grocery store, never looking back (OR run back and grab a box of the some of their vegan cookies because after all they are adorable, and its super hard to say no!)

Ingredients:

  • 2 frozen bananas

  • 1/4 cup dark chocolate cocoa powder

  • 1 and 1/2 cups coconut or almond milk

  • 2 cups ice ( you can use less if you don’t like a super thick smoothie)

  • 1/4 cup shredded unsweetened coconut

  • A handful of spinach (I keep a bag in the freezer for shakes and smoothies)

Easy Vegan No Cook Caramel:

  • 1/2 cup dried dates

  • 1/4 cup canned coconut cream

  • 1/3 cup maple syrup

  • pinch of salt

  • 1/4 teaspoon vanilla extract

Instructions:

  1. Peel and freeze 2 bananas. If you do no have a high speed blender like a Vitamix or Ninja, then I suggest slicing the bananas before freezing. A regular blender may have trouble breaking down a whole frozen banana. We normally just toss our bananas that are on the verge of going bad into the freezer so we do not waste them, and so we have them on hand for smoothies and nice cream.

  2. Add the ingredients for the caramel to a food processor or blender. You may have trouble getting it to process in your blender because it is a small volume of ingredients. If you do not have a food processor I suggest doubling the ingredients so you have enough volume that your blender will break it down. Lets be real, I’m sure you can find plenty of ways to use up the extra!! Store caramel in the fridge 1-2 weeks

  3. Toss frozen bananas and remaining shake ingredients into you blender. I have mentioned in other smoothie recipes that I keep bags of mixed greens or spinach in my freezer just for smoothies. It helps make the smoothie nice and cold, and my greens don’t go bad before I can use them! Blend on high until everything is nice and smooth.

  4. To serve, pour smoothies into glasses, top with more shredded coconut (I like to toast mine if I have time) and drizzle with caramel sauce!

makes 2 large smoothies

If you liked this recipe, try these:

Chocolate Peanut Butter Smoothie, The Run-DMC

Orange Creamsicle Smoothie

Sweet Potato Pie Smoothie

Chocolate Coconut Caramel Samoa Pancakes

Lavender Vanilla Vegan Coffee Creamer

Once the weather starts getting a little warm, I abandon all affection for wintery, spicy recipes, and quickly move into craving light, springy food and drink. This includes all things lavender, and lavender coffee drinks are no exception. If you ha…

Once the weather starts getting a little warm, I abandon all affection for wintery, spicy recipes, and quickly move into craving light, springy food and drink. This includes all things lavender, and lavender coffee drinks are no exception. If you have never had a lavender latte or other lavender flavored drink, I can not urge you enough to give it a try. They are light and fragrant, and this recipe is just sweet enough without being over powering. You can find dried culinary lavender at many grocery stores, allowing you to get your lavender coffee fix quickly, and affordably while you patiently wait on spring!

Ingredients:

  • 1/2 cup cashews, plus water for soaking

  • 1 1/2 cups water

  • 2-3 teaspoons dried culinary lavender

  • 3-4 tablespoons agave

  • 1 teaspoon vanilla extract

Instructions:

  1. Cover cashews in water in a microwave safe container and microwave on high for 3 minutes. You can also soak them in hot water for a few hours if you prefer.

  2. Drain soaked cashews and add them, along with the remaining ingredients, to a high speed blender. Blend on high until completely smooth, and there are no more bits of cashew.

  3. Store in an airtight container in the fridge for up to one week. Shake well before each use.

Vegan Chocolate Peanut Butter Smoothie (The Run- DMC, cause its tricky)

I am normally not a huge fan of hiding veggies from my kids or husbands in the food I make, but smoothies are an exception! I love beets! Raw, roasted, pickled, I love them. My family, not so much. So if I can sneak these nutrient dense, vitamin ric…

I am normally not a huge fan of hiding veggies from my kids or husbands in the food I make, but smoothies are an exception! I love beets! Raw, roasted, pickled, I love them. My family, not so much. So if I can sneak these nutrient dense, vitamin rich veggies into a shake without them knowing, I will do it every time ( cause I’m tricky like that!) And I promise they always drink this one and are none the wiser!. This smoothie is sweet, nutty, chocolaty goodness, and a healthy way to start you or your families day! And if you now have “It’s Tricky” stuck in you head for the rest of the day, you are most welcome. I’m right there singing along with you.

Ingredients:

  • 1 banana

  • 1/4 cup dark chocolate cocoa powder

  • 3 heaping tablespoons peanut butter

  • 1 big handful of fresh or frozen spinach (I buy a bag of fresh and toss the whole bag in the freezer for smoothies, works great!)

  • 1/4- 1/2 a small red beet, peeled and quartered

  • 1 - 1 1/2 cups plant based milk

  • 1-1 1/2 cups ice

  • 1/2 teaspoon vanilla extract (optional)

  • 1-2 scoops vanilla or chocolate protein powder (optional)

Instructions:

  1. Place all ingredients into a high speed blender. I have a vitamix so it breaks down the beet really well and really quickly. If you have a regular ol blender, no problem, just cut the beet into smaller cubes so your blender can handle it. Blend on high until completely smooth. You can add more ice or milk if the smoothie seems too thin or too thick for your liking. I used a whole small beet. I suggest if you are not a fan of beets, start by adding a quarter or half of a small beet at first. Its a great way to sneak in extra vitamins and nutrients and you really can not even tell it’s there!

Serving size: 2 large glasses or 3-4 small

If you liked this recipe, try these:

Orange Creamsicle Smoothie

Chocolate Caramel and Coconut smoothie, The Samoa

Sweet Potato Pie Smoothie

Orange Creamsicle Smoothie

How lucky we are that citrus season falls during cold and flu season! Fresh, plentiful, citrus is normally widely available and extra affordable during the winter months, making it easy to get all that vitamin C you need to fight off those winter ti…

How lucky we are that citrus season falls during cold and flu season! Fresh, plentiful, citrus is normally widely available and extra affordable during the winter months, making it easy to get all that vitamin C you need to fight off those winter time germs. I love fresh oranges, and living in Florida they are especially plentiful this time of year. So what’s a girl to do other than try think up new, and tasty ways to use up all of these oranges. We drop a whole orange into this smoothie getting all of the benefits of the fruit without all of the extra sugar you can get using bottled orange juice. You can also easily add a scoop of your favorite vegan protein powder for an extra kick of morning protein! So if you love orange creamsicle as much as I do, then this smoothy is definitely one you need to try!! Cheers to bright, healthy, citrus filled mornings!!

Ingredients:

  • 1 large navel orange

  • 1 and 1/2 cups almond or coconut milk

  • 1 and 1/2 cups ice

  • 1/4 cups raw cashews or almonds

  • 3 or 4 date, or you can use a few teaspoons of agave to sweeten

  • 1/2 teaspoon vanila extract

  • optional: 1 scoop vanilla vegan protein powder

Instructions:

  1. Peel the orange and cut into quarters.

  2. Add the orange and all of the remaining ingredients to a blender, and process on high until creamy and smooth. For a thicker smoothie, you can add another half cup of ice.

Serves 2

If you liked this recipe, try these:

Chocolate Peanut Butter Smoothie, The Run-DMC

Chocolate Caramel and Coconut smoothie, The Samoa

Sweet Potato Pie Smoothie

Orange Creamsicle Pancakes

Vegan Orange Creamsicle Pancakes

IMG_0398-2.jpg

We have 4 kids, so we eat a lot of pancakess in this house. That said, I am always trying to think up new toppings to keep it interesting.

I am not a huge fan of maple syrup on my pancakes so fruit is normally a go to. I also LOVE orange creamsicle flavored anything, so it seemed like a natural answer to my most recent pancake breakfast ponderings!

Ringing in the new year, I am also making a conscience effort to cut as much refined sugar from our diets as I can.

So these pancakes are not only delicious but also pretty healthy! If you have never made a sweet tofu ricotta, I promise you will probably be surprised and delighted by just how tasty it is!

Winter time is also citrus season where we live, and its cara cara orange season! I love using up those beautiful pinkish red, flavorful oranges any way I can! Seriously, if you have never eaten this particular orange, go, search, find them and buy them all! They are soooo delicious!

So whip up a batch of these low sugar, protein packed vegan pancakes and let me know what you think!


INGREDIENTS:

The Pancakes

  • 2 tablespoons agave nectar

  • 3/4 cups white flour

  • 3/4 cups whole wheat or spelt four

  • 2 teaspoons baking powder

  • 1/4 teaspoon salt

  • 1/2 teaspoon cinnamon

  • 1/2 teaspoon vanilla extract

  • 1 1/4 cups plant based milk

  • 1 tablespoon melted vegan butter or coconut oil

  • sliced almonds for garnish ( do not add to the pancake mix)

Orange Syrup

  • 2 large seedless oranges ( I used cara cara navel oranges)

  • 1 cup water

  • 3 tablespoons agave nectar

Sweet Vanilla Ricotta

  • 1 block firm tofu

  • 3 tablespoons maple syrup

  • Juice from 1/2 lemon

  • 1 teaspoon vanilla extract

  • pinch of salt

  • 1 teaspoon cinnamon


COOKING INSTRUCTIONS:

  1. FOR THE ORANGE SYRUP: Peel oranges. Cut oranges into quarters and place in a high speed blender or food processor. Process until the oranges are liquified. In a medium sized pot add the orange, water, and agave. Heat on medium heat, whisking often for about 20 minutes, until the mixture begins to thicken and seems sticky. Set aside to cool.

  2. FOR THE PANCAKES: Whisk all dry ingredients in a large bowl.

  3. Add in the melted butter, plant based milk, vanilla, and stir well.

  4. Heat a large skillet on medium heat. Add a teaspoon of vegan butter or spray the pan with cooking oil. Using a 1/4 cup measuring cup, scoop out batter into the skillet, 2 or 3 pancakes at time.

  5. Let pancakes cook until tiny bubbles begin to form and pop, once this happens they are ready to flip. Cook on the other side for another minute or two, until cooked through.

  6. Repeat, adding more butter or oil to the pan as needed, until all batter is used.

  7. FOR THE RICOTTA: Add all of the ricotta ingredients to a hight speed blender or food processor and blend until the mixture is completely smooth. Taste for sweetness. You can add more maple syrup if it is not sweet enough for you.

  8. Top pancakes with a scoop of vanilla ricotta, drizzle with the oranges syrup, and sprinkle with sliced almonds to serve.


Serves 3 - 4. The pancake recipe can easily be doubled to serve more. The ricotta and syrup will serve more and will not need to be doubled.

Vegan Jelly Filled Donuts

IMG_0234.jpg

Jelly donuts are almost just as easy to make a regular glazed donuts.

The only extra ingredient you need is the jelly.

Our family makes jelly donuts every year for Hanukkah, and I often think to myself that I should really make them more often, because they are so delicious! You can use whatever jelly or jam you like, just make sure the consistency is smooth enough to pipe into the donuts.

We often pick blueberries in the summer and freeze several bags. I particularly like making a quick blueberry jam with the frozen berries for these donuts. I love using the fruits of our labor (literally) throughout the year!

No matter what jam you decide to use, homemade or store-bought, you really can’t go wrong with these vegan jelly filled donuts!


INGREDIENTS:

The Donuts

  • 4 cups all purpose flour

  • 3/4 cups aquafaba (whipped. click link for easy recipe)

  • 1/2 cup plus 2 tablespoons melted vegan butter

  • 1/4 cup sugar

  • 2 and 1/4 teaspoon dry active yeast

  • 1 cup plus 2 tablespoons plant based milk

  • 1/2 teaspoon salt

  • 1 cup store bought or homemade jelly or jam. If you are using a jam, just pop it into your blender for a few seconds to make sure the chunks of fruit become smooth. Otherwise it will not pipe easily into the donuts

  • 3-4 cups of oil for frying, I use grape seed but you could use whatever oil you normally fry with

The Glaze

  • 3 cups powdered sugar

  • 1/4 cup melted vegan butter

  • 1 teaspoon vanilla extract

  • 1/2 cup plant based milk, give or take


COOKING INSTRUCTIONS:

  1. Heat milk in microwave for 30 - 45 seconds. You want it warm, but not boiling hot.

  2. Add the warm milk, yeast, and sugar to the bowl of your stand mixer. If you do not have a stand mixer, add the contents to a large bowl. Let sit for 5 minutes to activate the yeast.

  3. After 5 minutes add the aquafaba, and melted butter to the mix. Next add the flour, and salt, and mix for 5 minutes on medium speed if using the stand mixer. If not using a stand mixer, then mix the ingredients together well in a bowl, then transfer to a floured counter top, and kneed the dough by hand for 5 minutes. The consistency of the dough should be soft, but not sticky.

  4. After the dough has been kneaded, place it in a lightly greased bowl and cover with plastic wrap. Pop it in the oven. You are NOT turning the oven on, just leaving it there to rise. If your oven has a dough proof setting you can turn that on. Leave dough to rise for one hour, or until it has doubled in size.

  5. Once the dough has finished rising, transfer to a lightly floured countertop. I like to divide the dough in half and work it in two batches. It makes it easier to roll out. Roll out one half of the dough to about 1/4- 1/2 inch thick. Using a 3 inch circle biscuit or cookie cutter (or donut cutter if you have one) begin cutting circles. Repeat with other half of dough. You should have a total of about 2 dozen donuts.

  6. Place donuts on cookies sheets, and let rest for about 15 - 20 minutes. They will become bigger as they rest.

  7. While they are resting, heat 2 - 3 inches of oil in a deep skillet or medium sized pot.

  8. Once oil is hot, begin adding the donuts to the oil, 2 or 3 at a time. Fry the donuts for about 20 second on each side then flip. Repeat one more time. This helps them cook though and not burn. If you don't have enough oil in the pan, and they are hitting the bottom, they will easily burn. So make sure to use enough oil!

  9. Allow donuts to cool on a wire cooling rack, placed on top of a paper-towel-lined cookie sheet. Once donuts are cooled, use a chop stick or skewer to poke a hole into the donut on one side. You can kind of turn the chop stick or skewer inside the donut to widen the hole. This is making room for the jelly. You want to make sure you have created enough room for a good amount of filling .

  10. Once all donuts are done frying, mix all of the ingredients for the glaze. If you find the glaze too thick, you can always thin it with some more milk.

  11. Dip one side of the donut in the glaze and place back on the wire rack to allow the excess glaze to drip off.

  12. Once the glaze has set, fill a piping bag, set with a jelly tip or larger frosting tip, with the jelly. Begin piping the jelly into the holes you made in the donuts with the chop stick. Once all the donuts are filled with jelly, you can serve as is, or sprinkle with powdered sugar.

IMG_0222.jpg

Sweet Potato Pie Smoothie

This is one of my go to smoothies, especially during the fall. This sweet potato smoothie is sweet, healthy, filling, and tastes like a pumpkin, or sweet potato pie! You can bake up the potatoes over the weekend for a quick and easy weekday breakfas…

This is one of my go to smoothies, especially during the fall. This sweet potato smoothie is sweet, healthy, filling, and tastes like a pumpkin, or sweet potato pie! You can bake up the potatoes over the weekend for a quick and easy weekday breakfast smoothie. Even my kids love this one. You can double or triple the recipe if making it for the family!

Ingredients:

  • 1 baked sweet potato

  • 1 1/2 cups plant based milk

  • 1/2 -1 cup ice

  • a few shakes of cinnamon

  • 2 dried dates, or 1 tablespoon maple syrup

  • optional: 1 scoop of vegan protein powder

  • optional: 1/4 teaspoon vanilla extract

Instructions:

  1. Peel baked sweet potato, Add it along with remaining ingredients to a blender and process until completely smooth. You can start with a half cup of ice and add more according to your preference. Top with a few shakes of extra cinnamon.

You can easily double the recipe if making multiple smoothies at one time. I often just bake up a half dozen sweet potatoes over the weekend and keep them in the fridge for smoothies throughout the week.

Pumpkin Spice Cashew Creamer

IMG_9427.jpg

I drink my coffee black 99% of the time.

The only time I don’t is if I am craving a chai latte or a pumpkin spice latter.

I know, I know, how basic of me. But what can I say… I’ve been basic before it was even a thing.

That’s cause I’m not in my 20s and I can remember when Starbucks came out with their PSL. Thats right y’all, the year was 2003 and they apparently were pioneers in introducing a pumpkin flavored drink. The more you know….

Anyways what I don’t want to do is pay $7 for coffee like ever in my life. I am cheap and if I can just make it at home and make it vegan, thats a win.

This creamer is cheap. It will cost you less to make a whole batch to flavor a weeks worth of coffee than it would cost you to buy one and half grandes at Starbucks. Also the one at Starbucks is not vegan in the US.

Not to worry, now you can just make your own healthier version at home!! It takes just minutes and is super tasty! And if you happen to be out at a Starbucks and can't make a drink at home, Peta has a nice guide on what is and isn’t vegan at Starbucks. Just in case you are in a pinch.

So go forth and be as basic as you want. I don’t judge you. A PSL is delicious, plain and simple!


Ingredients:

  • 1/2 cup cashews

  • 1 and 1/2 cups water

  • 3 tablespoons maple syrup

  • 1 teaspoon vanilla extract

  • 2 teaspoons pumpkin pie spice


Instructions:

  1. Soak cashews in hot water for several hours, or cover in water in a microwave safe container, and microwave for 3 minutes.

  2. Add drained cashews, 1 and 1/2 cups of fresh water, and remaining ingredients to a high speed blender or food processor. Blend on high until the mixture is completely smooth.

  3. Store creamer in the fridge for up to a week in an airtight container. The creamer will separate as it settles in the fridge. This is normal, so just give it a good shake before using.

Pumpkin Spice Vegan Pop-Tarts

IMG_8501.jpg

I LOVE pop tarts! Love them. Over the years I have tried several variations of dough and filling.

I settled on this dough because the little bit of extra butter gives them a nice flakey crust, somewhere between a pop tart, and a toaster strudel.

I make all kinds of pop-tarts, but around September I am all in for all things pumpkin spice. I know, I know, she’s so “basic” or whatever the kids are saying these days. But y’all, I love pumpkin everything. Pumpkin pie being my all time fave, and these are a close second and an acceptable breakfast pie, if you will.

If you are in the “I hate all things pumpkin camp” I am baffled BUT accept your personal taste and can offer you other vegan pop- tart flavors on the site. I have chocolate, strawberry, and even lemon lavender. Something for maybe everyone?!

Just know that however you deiced to make them, they are surprising easy to make, and so good that you will probably want to just go ahead and make a double batch!

We have a family of 6 so these do not last!!! They keep well and will reheat nicely, too.

So if you have never made a homemade vegan pop-tart before, nows the time!


INGREDIENTS:

  • 1 cup whole wheat flour

  • 1 cup all purpose flour

  • 3/4 cup vegan butter

  • a pinch of salt

  • 3 - 4 tablespoons ice water

  • 3 tablespoons Pumpkin Butter

  • 1/4 cup powdered sugar

  • a drizzle of maple syrup

  • 1/4 teaspoon pumpkin pie spice


INSTRUCTIONS:

  1. Preheat oven to 350.

  2. Add both cups of flour, butter, and salt to a food processor and pulse until well combined.

  3. Add in the water, one tablespoon at a time until a soft dough has formed.

  4. Roll the dough out on a flour dusted, smooth surface to a 1/8 of an inch thick rectangle. You can trim up the edges with a sharp knife and save the scrap dough.

  5. Once the dough is trimmed and even, cut 3 inch by 5 inch rectangles from the dough, give or take. Be sure when you are calculating how many you can cut, to have a even number. Each pop tart needs 2 rectangles. Roll out any scrap dough and repeat the process.

  6. Scoop a teaspoon of pumpkin butter onto a rectangle, and smear it around a bit in the middle, carefully to not get too close to the edges.

  7. Top the pumpkin butter covered piece of dough with another rectangle of dough, and use a fork to press, and seal the edges. (for step by step pictures of the process, check out our Strawberry Pop-Tart recipe)

  8. Place pop tarts on a parchment lined baking sheet, or lightly spray one with cooking oil and bake for 20 - 25 minutes.

  9. While pop tarts are baking, mix together the powdered sugar with just a few drops of maple syrup, just enough to thin it out. Add the pumpkin pie spice and stir. If it is too thin, you can add a little more powdered sugar to thicken it back up. You want a spreadable consistency.

  10. Once pop tarts have cooled a bit, spread the icing and serve.

Yields 8 pop tarts.

IMG_8513.jpg

Pumpkin Spice Vegan Cream Cheese

IMG_8538.jpg

Once October hits (ok, ok, we all know its more like September) the pumpkin spice craze is upon us.

I am guilty of loving all things pumpkin and cream cheese is no exception.

Just the right amount of pumpkin spice and sweet maple syrup make this cream cheese a fall favorite, and staple in this house.

If you are not into bagels ( we may need to have a chat, because I truly just can’t understand anything but an intense love for any bread) then you can always spread some of this magic on some apple slices or graham crackers.

You could eat it right out of the bowl with a spoon and I wouldn’t judge you! If you do love bagels as much as I do, then check out our easy homemade bagel recipe.

I really can not think of a better breakfast this fall than a homemade cinnamon bagel with this delicious cream cheese all over it.


INGREDIENTS:

  • 1 cup unsalted cashews

  • 3 tablespoons canned pumpkin

  • 1/4 cup coconut cream ( from a can of full fat coconut milk)

  • 2 tablespoons refined coconut oil

  • 1 teaspoon lemon juice

  • 2 teaspoons pumpkin pie spice

  • pinch of salt

  • 2 tablespoons maple syrup


INSTRUCTIONS:

  1. Soak cashews overnight, or cover with water and microwave for three minutes. Drain water.

  2. Refrigerate one can of full fat coconut milk for a few hours. Once it is good and cold, the cream will separate from the liquid in the can. Open and use 1/4 cup of just the cream.

  3. Add cashews, coconut cream, and remaining ingredients in a high speed blender or food processor.

  4. Blend until the nuts are completely broken down, and the mixture is creamy smooth.

  5. Put the cream cheese in a shallow bowl, or a few ramekins, and refrigerate for several hours until the cream cheese sets.

If you like this recipe, try these:

Pumpkin Spice Vegan Cheese Ball

Pumpkin Butter

Pumpkin Spice Cashew Creamer

easy vegan cashew pumpkin spice cream cheese

Light and Fluffy Vegan Pancakes

Light and Fluffy Vegan Pancakes

Pancakes shouldn’t be rocker science, vegan or otherwise.

So why is it that I have made and eaten some really awful pancakes in my time?

When I was. a kid I thought Bisquick was the only way one made a pancake, because that was the only way we made them…that or frozen pancakes.

I remember once I moved out going and buying a box of Bisquick to make pancakes for my roommates and having to call my mom and ask her how to actually make them. Like why are they falling apart, what am I doing wrong…ITS JUST A PANCAKE. That was the day I learned you had to wait of the batter to bubble and those bubbles to pop before you could flip them. Thanks mom!

I have probably googled and made 100 different pancake recipes in my life, and two thirds of those recipes were mostly garbage. Too dense, not fluffy, too flat, too gummy and so on.

So why is it so hard to make a decent vegan pancake? Well, its really not, actually. And once you find a good recipe, take my advice and just stick to it!

A decent vegan pancake in my opinion is light, fluffy, and buttery. Not too sweet, and can hold an add in (blueberries, chocolate chips, nuts, and so on) no problem.

So here we are all these years later and I have, in my opinion, made a pretty darn good, and easy vegan pancake to meet all the above criteria. No Bisquick required.. You can sprinkle in a chocolate chips, or berries, you can top them, or just drowned them in melted butter and maple syrup.

This recipe is simple and works every time I have ever made them. Just make sure not to flip these vegan pancakes until you see tiny bubbles form and pop! Some wise motherly pancake advice form Joanie that I am sure others needed to hear, too.


INGREDIENTS:

  • 1 1/4 cups all purpose flour

  • 2 tablespoons white sugar (If vegan, not plant based, make sure the brand you use is in fact vegan, not all white sugars are. I use Florida Crystals)

  • 2 teaspoons baking powder

  • 1/4 teaspoon salt

  • 1/2 teaspoon cinnamon

  • 1/2 teaspoon vanilla extract

  • 1 1/4 cup plant based milk

  • 1 tablespoon melted vegan butter


COOKING INSTRUCTIONS:

  1. Whisk all dry ingredients in a large bowl.

  2. Add in the melted butter, plant based milk, vanilla, and stir well.

  3. Heat a large skillet on medium heat. Add a teaspoon of vegan butter or spray the pan with cooking oil. Using a 1/4 cup measuring cup, scoop out batter into the skillet, 2 or 3 pancakes at time.

  4. Let pancakes cook until tiny bubbles begin to form and pop, once this happens they are ready to flip. Cook on the other side for another minute or two, until cooked through.

  5. Repeat, adding more butter or oil to the pan as needed, until all batter is used.

Serves 3 - 4

Cinnamon Apple Vegan Pancakes with Candied Pecans

IMG_8007.jpg

INGREDIENTS:

Pancakes:

  • 1 1/4 cups all purpose flour

  • 2 tablespoons white sugar (Fl Crystals are vegan)

  • 2 teaspoons baking powder

  • 1/4 teaspoon salt

  • 1/2 teaspoon cinnamon

  • 1/2 teaspoon vanilla extract

  • 1 1/4 cup plant based milk

  • 1 tablespoon melted vegan butter

Apples:

  • 2-3 granny smith apples, peeled and thinly sliced

  • 2 teaspoons vegan butter

  • 2 tablespoons brown sugar

  • 1 tablespoon maple syrup

  • 1 teaspoon cinnamon

  • a pinch of salt

Candied Pecans:

  • 1/2 cup pecan halves

  • 1 1/2 teaspoons vegan butter

  • 1 tablespoon brown sugar

  • 1/4 teaspoon cinnamon

  • 1 teaspoon maple syrup

COOKING INSTRUCTIONS:

  1. For the apples, heat a small to medium skillet on medium heat and add butter. Once butter has melted, add apples, brown sugar, cinnamon, maple syrup, and salt and reduce heat to low. Allow apples to simmer, and soften while you prepare the pancakes, and pecans. Once apples are soft and a syrup has formed, this takes about 15 minutes, remove from heat and set aside.

  2. For the pecans, heat a small skillet on medium heat. Melt the butter, next adding the pecans, brown sugar, maple syrup, cinnamon, and salt. Lower the heat a bit and continue moving the pecans around the pan with a spoon while the sugar melts, and begins to get sticky. The nuts and sugar can burn quickly, so be sure to keep the pecans moving until the sugar becomes fully melted and looks like caramel. This can take between 5 and 10 minutes depending on the pan. Once pecans are done, pour them out onto a plastic cutting board or a piece of wax paper allowing them to cool, and the sugar to harden. Once they have cooled you can break them apart and into pieces.

  3. For the pancakes, whisk all dry ingredients in a large bowl.

  4. Add in the melted butter, and plant based milk and stir well.

  5. Heat a large skillet on medium heat. Add a 1/4- 1/2 teaspoon of vegan butter or spray the pan with cooking oil.

  6. Using a 1/4 cup measuring cup, scoop out batter into the skillet, 2 or 3 pancakes at time.

  7. Let pancakes cook until tiny bubbles begin to form and pop. Once this happens they are ready to flip. Cook on the other side for a few minutes, or until the pancakes seem cooked through.

  8. Repeat, adding more butter or oil to the pan as needed until all batter is used.

  9. Top finished pancakes with cinnamon apples, candied pecans, and maple syrup to serve.

serves 3-4, You can easily double the recipe for more servings