Spiced Apple and Pecan Stuffed Vegan Challah

IMG_9488.jpg

I have been baking and stuffing challah bread for what seems like forever.

This spiced apple and pecan stuffing has long been a favorite for fall, and the High Holidays.

This vegan challah bread is just as beautiful as it is delicious, and is sure to impress anyone who gets the privilege of tasting it.

Stuffed with fall spices apples, pecans and dates, this vegan challah is my favorite for Rosh Hashanah!

If you have never made challah, then by all means, you must! It’s not nearly as intimidating as it may seem, and the stuffing possibilities are endless!

Be sure to read the instructions on the challah very well. It is a common mistake to think you are measuring the liquid of the aquafaba, not the whipped product,  (the recipe states to measure the whipped product but it still tends to be an issue for people, and I am often asked) BUT you need to measure out THE WHIPPED PRODUCT in the recipe not the liquid before you have whipped it!!!

Making vegan challah is easier than most people think, and the whipped aquafaba in the recipe severs as an excellent egg replacer in a bread that normally has 3 to 4 eggs.

Braiding challah is also easier than you may think but practice will improve your braids over time. I made sure to link my favorite braiding link so you can learn all kinds of fancy challah braids, from 3 to 5 strands and even a round holiday braid!

So if you are looking for a vegan High Holiday Challah, or just a delicious vegan fall bread, this may just be what you are looking for!


Challah

Follow the recipe for my basic Challah Y'all, Vegan Challah. You will follow the instructions through the first rise, then follow the below instructions for stuffing and braiding.

Filling Ingredients:

  • 2 large green apples

  • 1 cup chopped peans

  • 1/3 cup chopped dates, or raisins

  • 1/4 cup brown sugar

  • 2 tablespoons granulated sugar

  • 2 teaspoons cinnamon

  • pinch of salt

  • 1 teaspoon ground ginger

  • 1/4 teaspoons nutmeg

  • 1 teaspoon vanilla extract

Instructions

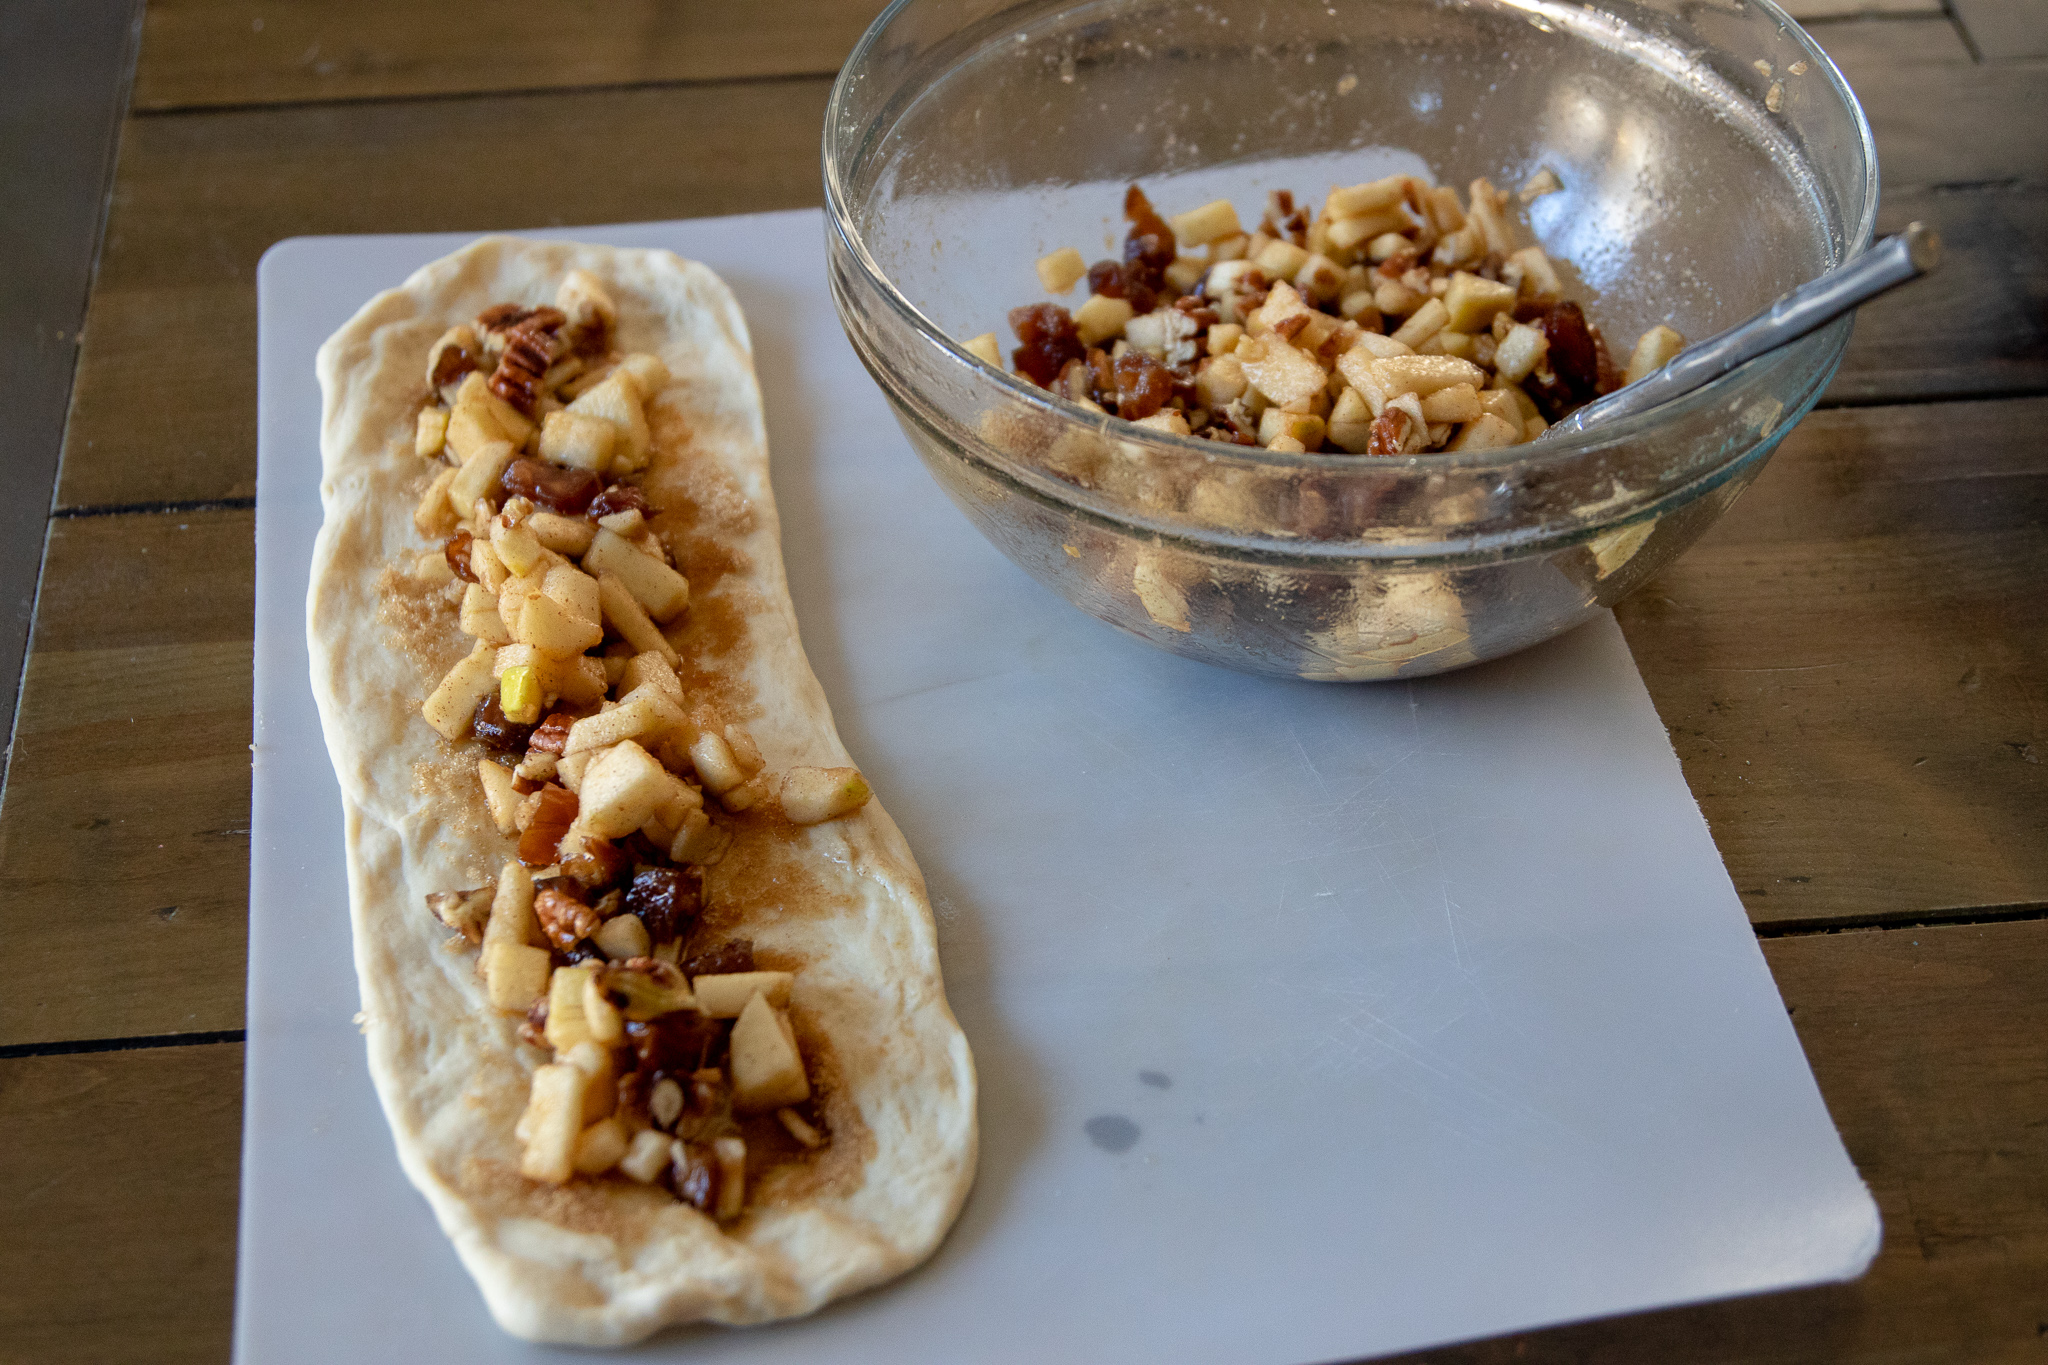
  1. Peel apples and finely dice them. You want pretty small pieces so they will fit in the challah braids, and cook through while baking. Next, chop pecans, and dates. Add fruit and nuts along with remaining filling ingredients into a bowl, and stir well.

  2. Once Challah has completed its first rise, remove from oven and separate dough in half. This recipe will yield 2 stuffed challah loaves.

  3. Cut each half into thirds. (each loaf will have three pieces of dough. Work with one loaf at a time, leaving the other three pieces of dough covered in a bowl until you are ready to use them)

  4. Take one piece of dough in you hand and begin to stretch it both length wise, and width wise and the same, time, letting gravity help with the length. You want the dough to be about 12 inches long, and maybe 4 inches wide. Once you have it stretched length wise, you can put it on a floured counter top and press it to get it the width stretched.

  5. Once your dough is the correct size, divide the apple filling in half. Then each half into thirds. This will give you 6 equal portions of filling for each strand of dough. Scoop a portion of filling into a row down the middle of a strand of dough. The filling will produce a liquid from the apples at the bottom of the bowl. Avoid scooping up any of this liquid with the filling. If the dough is wet it will not want to stick and seal. Now pull up the edges of the dough and pinch them together to seal the seam.

  6. Repeat with the other two strands.

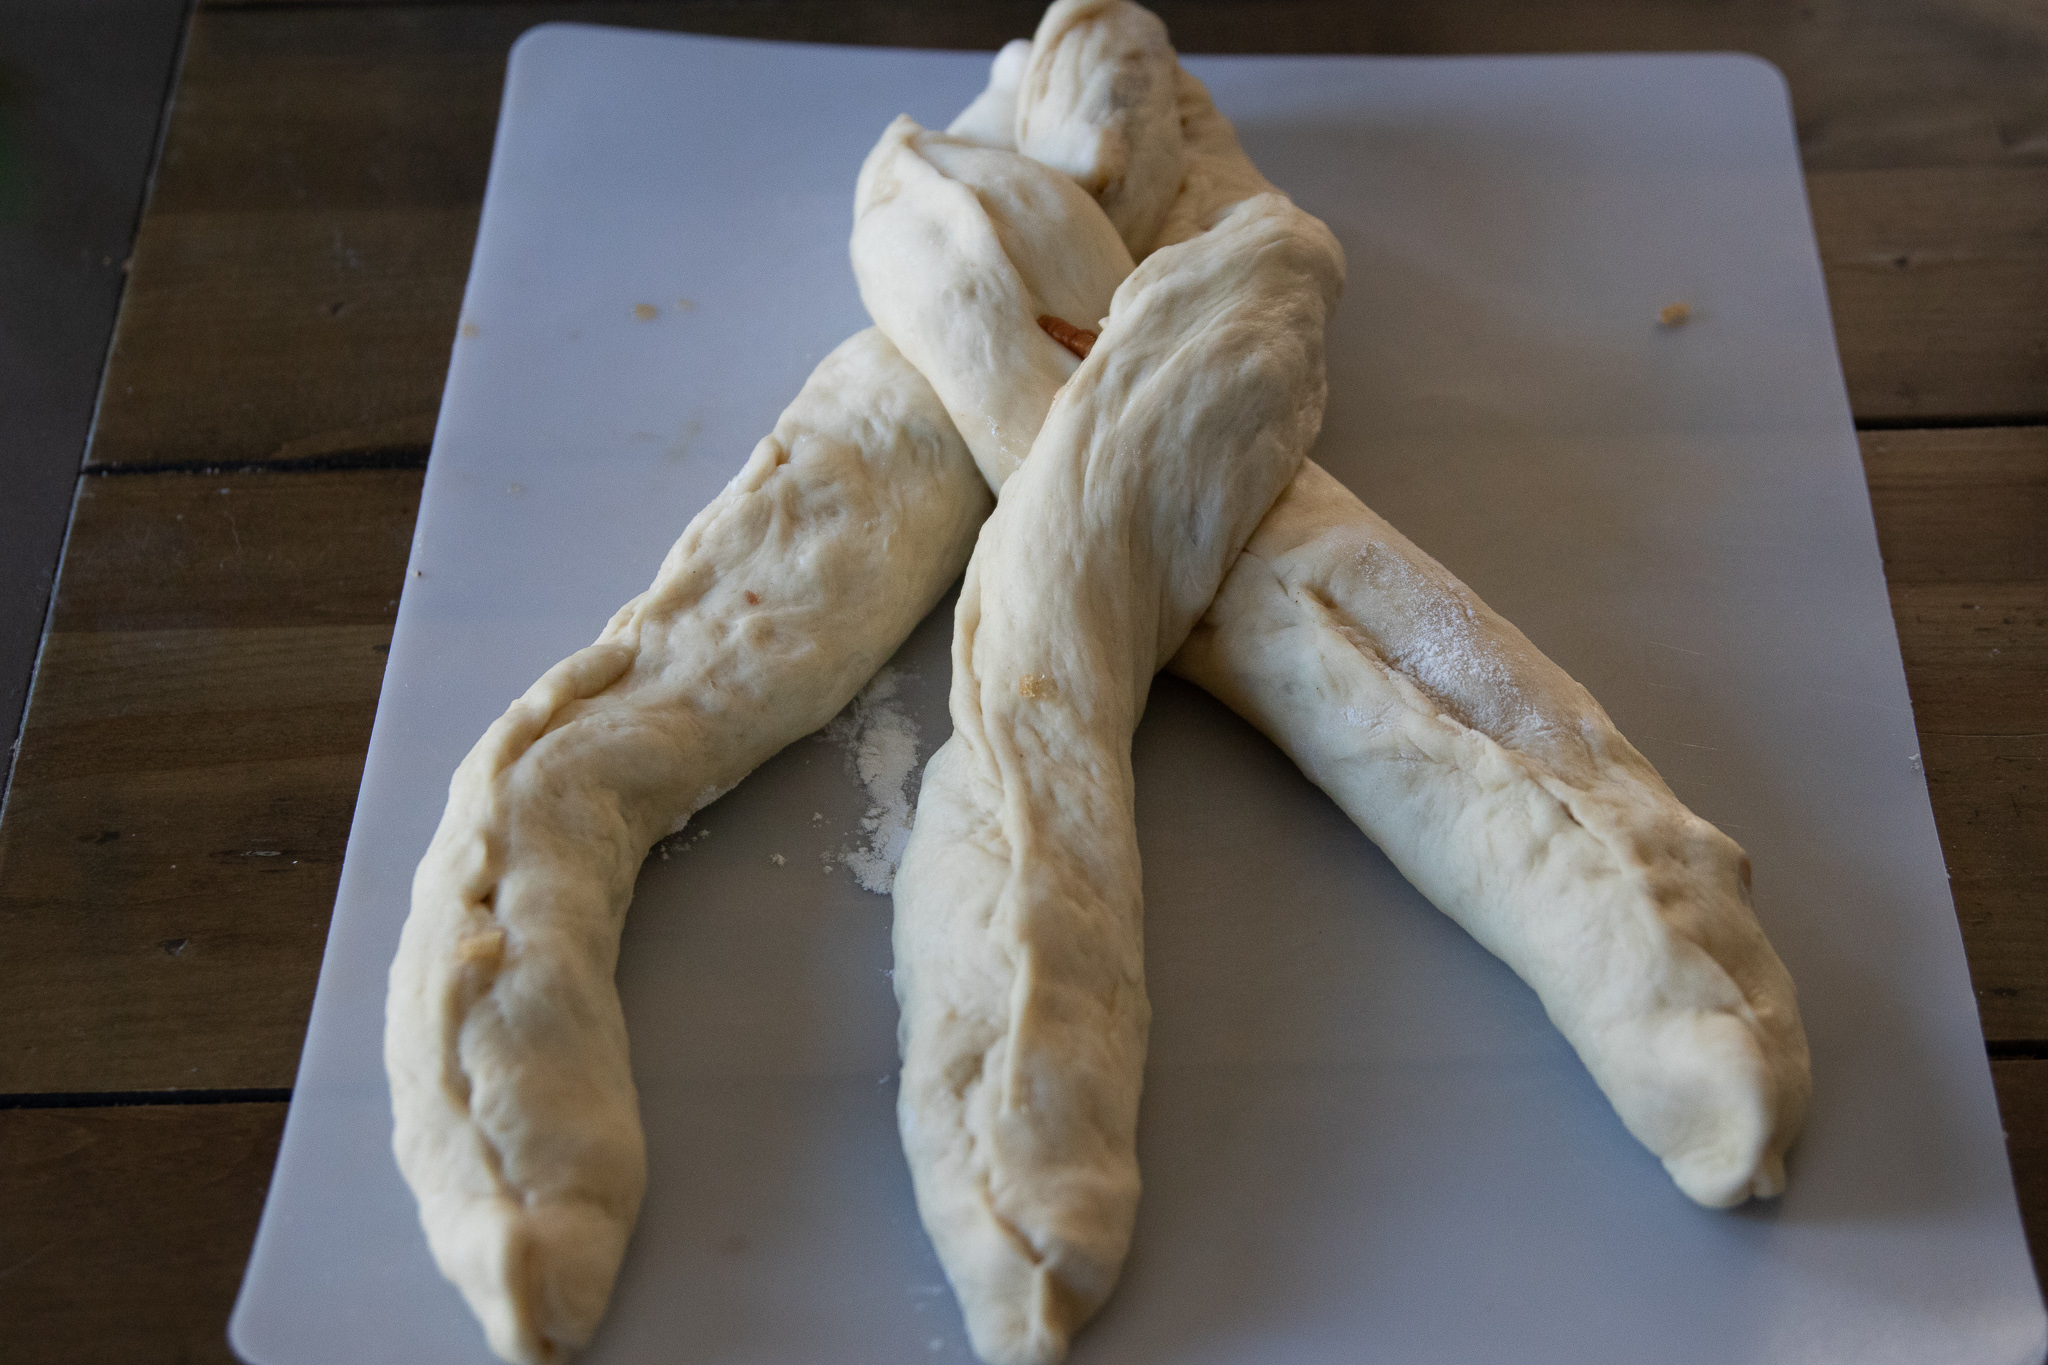
  7. Once all three strands are stuffed, and formed, carefully braid the three pieces together. If the seams begin to open, add a little flour to them and pinch them back and continue braiding. Tuck both ends of the loaf under when done braiding. Once again I will refer you to Tori Avey's challah braiding guide if you are unfamiliar with braiding challah! She does a fantastic job showing all the different ways to braid your bread, plus she has some really great recipes on her site.

  8. Repeat with the second loaf, and place both stuffed loaves on a baking sheet, and back in the oven to rise again for about 45 minutes. Once they have risen, remove from oven and pre-heat to 350.

  9. Brush tops of challah with some of your left over whipped aquafaba and sprinkle with a little sugar.

  10. Bake both loaves for about 35 - 45 minutes. You can tap the tops to see if they sound a little hallow. It is hard to tell when stuffed challahs are done when there are wet ingredients inside, so if they do not seem cooked through after 35 minutes, let them keep cooking for 5 - 10 more minutes.

  11. Remove challah from the oven, and allow to cool before cutting.

IMG_9457.jpg

Coconut Milk Pepper Jack

IMG_9451-2.jpg

Making vegan cheese is easier than most people think.

Especially cheeses using canned coconut milk and agar powder. Agar is a vegan gelatin that begins to set up a room temperature, so this cheese is super quick, and easy.

You can typically find agar powder at asian markets, or online. The addition of the chili peppers gives this cheese nice kick of flavor and spice, making it a nice alternative to traditional pepper jack.

So if you have never tried making your own vegan cheese, give it a go!! You will probably be surprised how easy and delicious it is!


INGREDIENTS:

  • 1 can of full fat coconut milk or cream

  • 2 tablespoon of lemon juice

  • 2 teaspoons miso paste

  • 1 teaspoons of salt

  • 1/4 cup nutritional yeast

  • 1/4 melted cup triple refined coconut oil

  • 2 tablespoons agar powder

  • 3 tablespoons arrow root or tapioca starch

  • 1 4oz can of green chilis

  • optional: 1/4 teaspoon cayenne pepper, or a splash of hot sauce for more heat


INSTRUCTIONS:

  1. In a food processor or high speed blender, add all of the ingredients EXCEPT the milk, agar, and chili peppers.

  2. Pulse a few times to mix everything up.

  3. Line a small bowl with a few paper towels, pour chilis into the bowl. The paper towels will absorb some of the liquid from the peppers. Set aside.

  4. Now add the milk and agar powder to a medium sauce pan, and bring to a boil. Reduce heat and simmer for about 2 minutes, until mixture thickens to the consistency of a thin pudding.

  5. Add the milk mixture to the ingredients in the food processor and mix for about a minute. The mixture will quickly begin to thicken as the agar begins to solidify at room temperature. Once everything is well mixed, add the chilis and just pulse a few times.

  6. Transfer to the mixture to a few ramekins or small bowls. You should be able to fill 2 or 3 small bowls.

  7. Allow the cheese to harden in the refrigerator uncovered for several hours.

  8. Once the cheese is set, store in an airtight container in the fridge for about a week.

Pumpkin Spice Cashew Creamer

IMG_9427.jpg

I drink my coffee black 99% of the time.

The only time I don’t is if I am craving a chai latte or a pumpkin spice latter.

I know, I know, how basic of me. But what can I say… I’ve been basic before it was even a thing.

That’s cause I’m not in my 20s and I can remember when Starbucks came out with their PSL. Thats right y’all, the year was 2003 and they apparently were pioneers in introducing a pumpkin flavored drink. The more you know….

Anyways what I don’t want to do is pay $7 for coffee like ever in my life. I am cheap and if I can just make it at home and make it vegan, thats a win.

This creamer is cheap. It will cost you less to make a whole batch to flavor a weeks worth of coffee than it would cost you to buy one and half grandes at Starbucks. Also the one at Starbucks is not vegan in the US.

Not to worry, now you can just make your own healthier version at home!! It takes just minutes and is super tasty! And if you happen to be out at a Starbucks and can't make a drink at home, Peta has a nice guide on what is and isn’t vegan at Starbucks. Just in case you are in a pinch.

So go forth and be as basic as you want. I don’t judge you. A PSL is delicious, plain and simple!


Ingredients:

  • 1/2 cup cashews

  • 1 and 1/2 cups water

  • 3 tablespoons maple syrup

  • 1 teaspoon vanilla extract

  • 2 teaspoons pumpkin pie spice


Instructions:

  1. Soak cashews in hot water for several hours, or cover in water in a microwave safe container, and microwave for 3 minutes.

  2. Add drained cashews, 1 and 1/2 cups of fresh water, and remaining ingredients to a high speed blender or food processor. Blend on high until the mixture is completely smooth.

  3. Store creamer in the fridge for up to a week in an airtight container. The creamer will separate as it settles in the fridge. This is normal, so just give it a good shake before using.

Vegan BBQ Cheddar Fries with Slaw

IMG_9328_small.jpg

If you know me at all, you know my love for fires. The worlds most perfect carb. The only way they could possibly be better is if you add cheese sauce.

I would eat them everyday and I am afraid to admit to you just how often I do eat them. I mean I air fry them half the time so that has to make it ok, right?!?!

Anyways, the only thing I love more than fries is loaded fries. Piled high with toppings and always some kind of cheese.

We make Bbq jackfruit pretty often because its cheap and easy. Dump two cans of jackfruit into a crock pot with some bbq sauce and leave it alone. Dinner when you get home that takes 5 minutes to prepare. We often have leftovers and once upon a time the leftovers yielded these glorious fries!!

Deliciously easy jackfruit bbq, easy vegan slaw, and the best vegan cheddar cheese sauce, ever. All piled high onto of homemade crispy fries!!

Remember if you don’t want to fry them in oil and own an air fryer, that will work just fine! I set mine to 400 degrees for about 10-15 minutes depending on how many fries I am making. I give the basket a little shake a time or two while they are cooking to help them not stick and to move them around a bit.

Also If you don’t feel like making them yourself you can just buy frozen! I won’t judge you. I have 3 bags of frozen Trader Joes fries in my freezer right this moment. Some days call for frozen foods. Thats all there is to it!

The cheese sauce is pretty easy to make and good on sooooo many things, if you happen to have any leftovers you can use it on lots and lots of stuff. It makes a tasty chip dip, its delicious on baked potatoes, in a quesadilla, on nachos, or even drizzled over chili!

So if you are looking for a new loaded fry and love bbq, look no further! These things are so good and pretty addictive. And if you eat fries more than twice a week, just know you are not alone in your love of the worlds most perfect carb.


Ingredients:

  • 4 - 6 russet potatoes

  • oil for frying

BBQ Jackfruit:

  • 2 cans jackfruit in brine

  • 1 bottle bbq sauce

Vegan Cheddar Cheese Sauce:

  • 1/2 cups cashews soaked overnight, or covered in water and microwaved for 3 minutes then drained

  • 1 cup water

  • 2 tablespoons corn starch or tapioca starch

  • 1 teaspoon light miso paste

  • 1/2 tablespoon apple cider vinegar

  • 2 tablespoons nutritional yeast

  • 1/2 teaspoon turmeric

  • 1 teaspoon smoke paprika

  • 1/2 teaspoon salt

The Slaw:

  • 14 oz bag of shredded cabbage

  • 1 carrot

  • 1/2 small yellow onion

  • 1/3 cup vegan mayo

  • 1-2 tablespoon apple cider vinegar

  • 2 tablespoons sugar

  • 1 teaspoon salt

  • 1/2 teaspoon pepper

  • optional, 1/4 cup chopped cilantro


Instructions:

  1. FOR THE BBQ JACKFRUIT; Drain both cans. Chop or shred the fruit. I find it easiest to just use my fingers to shred the jackfruit. Add the jackfruit and BBQ sauce to a crock pot on medium heat for 6 - 8 hours. You can also cook it on the stove top if you prefer. Just add jackfruit and BBQ sauce to a large pot and cook on medium/low heat for about an hour, stirring occasionally. The longer the BBQ cooks, the more flavorful and convincing it will be. I prefer the crockpot method for this reason, but it works fine to cook it on the stovetop.

  2. TO MAKE THE CHEESE SAUCE; Add all of the ingredients to a high speed blender or food processor, and blend until completely smooth.

  3. Transfer the cheese mixture to a medium pot and heat on medium/low heat, whisking continuously until the cheese begins to thicken to a queso consistency. If it gets too thick, you can add a little more water to thin it back out.

  4. FOR THE FRIES; Wash your potatoes and cut them into fries. Heat a few inches of oil in a deep skillet (I use a cast iron skillet) on medium heat. Once the oil is nice and hot, start adding small batches of the fries to the oil. Allow them to fry until nice and crisp, about 5 minutes. Once they are done frying, remove from oil and place on a wire cooking rack with some paper towels underneath. This will help them stay crispy while you finish frying the rest.

  5. FOR OVEN BAKING; Preheat oven to 400 degrees. Lightly coat fries in a few teaspoons of oil and place them on a cookie sheet lined with parchment paper. Make sure the fries are not over crowded. Sprinkle with salt and bake for about 15 minutes or until the fries seem crispy on one side. Take the cookie sheet out of the oven, and turn the fries with a spatula or a pair of metal tongs. Put the fries back in the oven for another 15 minutes, or until the fries seem fully crisp.

  6. FOR THE SLAW; Shred the carrot using a box grater and finely dice the onion. Add onion, carrot, and cabbage together in a bowl. In a smaller bowl combine remaining ingredients and mix well. Pour the wet mixture over the cabbage mixture and stir well.

  7. Top fries with BBQ jackfruit, cheddar sauce, and slaw to serve.


Serves 4 - 6.

If you like this recipe, try these

Southwest Black Beans and Cornbread

IMG_9356.jpg

Who doesn’t love a quick and easy weeknight dinner that will leave you full and satisfied?

A quick batch of vegan cornbread topped with some jazzed up canned beans, tomatoes, onions, avocado, and a tasty southwest dressing will become one of your new favorite simple dinners!

You can also replace the all purpose flour in the cornbread recipe with your favorite gluten free flour blend, making this a perfectly filling gluten free meal.

I love quick dinners that a filling, comforting, and inexpensive like this meal and pretty much everyone in the family happily eats this every time.

I just buy canned black beans and spice them up. If you are one of those people who have and love an instanpot, I assume you could cook up some dried black beans pretty quickly and just add the spices while they cook! You can also sub out the black beans for chickpeas or any other bean you may have on hand, as well.

Home cooked meals do not have to be overly complicated or expensive to be delicious, and beans and cornbread have never been so good!


INGREDIENTS:

  • 2 15 oz cans of black beans

  • 1 teaspoon smoked paprika

  • 1 teaspoon garlic powder

  • 1/2 teaspoon Low Sodium Better Than Bouillon

  • 1/2 cup water

  • Juice from 1 lime

  • 1 tomato

  • 1 avocado

  • 1/2 red onion

  • 1/4 cup chopped cilantro

  • 1 pan Perfect Vegan Cornbread

Southwest Dressing:

  • 1/2 cup vegan mayo

  • 1 tablespoon apple cider vinegar

  • 1 teaspoon dijon mustard

  • 1 teaspoon each, smoked paprika, garlic powder, onion powder

  • 1/2 teaspoon each, salt, and chili powder


Instrucitons:

  1. Prepare cornbread according to instructions, baking in a prepared 9x13 baking dish or jelly roll pan.

  2. Pour both cans of beans, liquid included, into a medium pot. Add paprika, garlic, bouillon, juice from half of the lime, and water. Heat on medium heat until the beans begin to boil. Lower heat, and let simmer for 15 minutes.

  3. Dice the tomato, onion, and avocado into a small dice. Mix the diced veggies, cilantro, and juice from 1/2 of the lime in a bowl, with a dash of salt.

  4. Mix all ingredients together for the southwest dressing in a small bowl or mason jar.

  5. To serve, cut cornbread into rectangles. Top a few pieces of cornbread with a scoop of black beans, some of the diced veggie mix, and a drizzle of southwest dressing.

serves 4-6

Jackfruit and Orzo Soup

If you are missing classic chicken and rice or chicken noodle soup, this recipe is for you! We use jackfruit to mimic the chicken and orzo in place of noodles or rice! This soup is savory, delicious, comforting, and so easy to throw together. Perfec…

If you are missing classic chicken and rice or chicken noodle soup, this recipe is for you! We use jackfruit to mimic the chicken and orzo in place of noodles or rice! This soup is savory, delicious, comforting, and so easy to throw together. Perfect for chilly weather, or for helping mend a cold or flu. It also will freeze really well, so go ahead a make a double batch and freeze half. That way the next time you are feeling under the weather, you can easily thaw and heat a batch of this classic comforting soup!

Ingredients:

  • 1 can jackfruit in brine

  • 2/3 cups dried orzo

  • 2 carrots, diced

  • 3 stalks of celery, diced

  • 1 small yellow onion, diced

  • 1 teaspoon minced garlic

  • 8 cups water

  • 2 teaspoons Reduced Sodium Better than Bouillon

  • 1 teaspoons dried thyme

  • 1-2 teaspoons dried dill

  • 1 teaspoon dried parsley

  • 1 teaspoons salt

  • pepper to taste

Instructions:

  1. In a large pot or dutch oven, heat a few teaspoons of oil over medium heat. Add onion, carrots, garlic, and celery, and allow to cook until the onions are translucent.

  2. Drain jackfruit, and roughly chop the pieces, or use your hands to shred them. Add to the pot, along with 2 teaspoons of Better than Bouillon. Sauté the jackfruit with the veggies, and the bouillon paste for a few minutes.

  3. Add the water, and remaining ingredients. Stir well, then educe heat to low, and simmer for 25 - 30 minutes.

  4. Serves 4 - 6.

Unstuffed Vegan Cabbage Rolls

IMG_9214@0,5x.jpg

Cabbage rolls are one of my favorite comfort meals, however they are not quick. That’s why I love this recipe for “unstuffed” cabbage rolls. It’s so much faster, and just as delicious, and comforting.

I seriously love cabbage rolls, but my kids are not huge fans so there is no way I am going to take all that time rolling them up if only a few people in the house are going to enjoy them. And seriously this taste just the same as the rolled version but WAY faster, and WAY easier!!!


This recipe makes a lot and freezes well, so it’s also perfect for meal prep, or even a pot luck.

I use Beyond rand meat, either the crumbles, 1 lb block of groud, or 4 thawed burgers. You can use any vegan ground you like, though.

So if you have 0 time to mess around with rolling cabbage rolls, but love them like I do, then this is the answer!! A super delicious, quick, and easy answer!


Ingredients:

  • 1 medium to large head of green cabbage; cored, and cut into strips

  • 1 bag meatless crumbles, or 4 Beyond Meat Burgers thawed

  • 1 large yellow onion, diced

  • 1 28 oz can crushed tomatoes

  • 1 14.5 oz can diced tomatoes

  • 2 tablespoons tomato paste

  • 2 cups cooked brown rice

  • 2 tablespoons brown sugar

  • 1/2 cup water

  • 1 teaspoon each dried thyme, dill, garlic powder, and salt

  • 2 teaspoons smoke paprika

  • pepper to taste

  • juice from 1 lemon

  • fresh, or dried parsley for garnish


Instructions:

  1. In a large, deep skillet, heat a few teaspoons of oil medium heat. Add diced onion, and meatless crumbles, or Beyond Burgers to the pan. Cook until the crumbles have cooked through.

  2. Next, add the cabbage, and water. Allow the cabbage to cook for about 5 minutes, just long enough for it to cook down a bit. Add the remaining ingredients, and give every thing a good stir.

  3. Once it begins to come to a simmer, reduce heat to low, and cover with a lid.

  4. Allow to cook for 30-35 minutes, stirring occassinsaly to keep anything from sticking to the bottom of the pan.

  5. Serve garnished with some fresh, or dried parsley.

This recipe will serve 6 - 8 people. If you are single, or a small family, you can easily freeze any leftovers portioned in freezer bags. I often freeze half for a quick week night dinner. Just leave out to thaw, and reheat in a pan on the stove top.

Smoky Vegan Tomato Bisque Soup

IMG_9013.jpg

Ingredients:

  • 1 28 oz can of crushed tomatoes

  • 1 14 oz can of diced or crushed tomatoes

  • 1/3 cup cashews soaked for several hours, or covered in water and microwaved for 3 minutes, then drained

  • 2/3 cups water

  • 1 cup water plus 1 teaspoon low sodium Better Than Bouillon, or 1 cup vegetable broth

  • 1 large yellow onion

  • 2 teaspoons minced garlic

  • 1 teaspoons dried thyme

  • 1/2-1 teaspoon smoked paprika

  • 1 teaspoon dried parsley

  • 1 teaspoon salt

  • pepper to taste

Instructions:

  1. Dice onion. Heat a small sauce pan on medium heat with a teaspoon of oil. Add the onion and garlic and saute until the onion is translucent.

  2. Add the onion, and both cans of tomatoes to a high speed blender, or food processor. Blend until the mixture is smooth. Transfer mixture to a large pot, or dutch oven.

  3. If using Better Than Bouillon, whisk it into the the 1 cup of water and add to the pot. If using vegetable broth, add it to the pot. Bring the pot to a boil, then reduce heat to a simmer.

  4. In the same blender or food processor you used for the tomatoes, (no need to even rinse) add the soaked and drained cashews, and the 2/3 cups of water. Blend until completely smooth. Add the cashew cream to the pot with the tomatoes.

  5. Add the seasonings, and stir. Allow soup to simmer for about 20 minutes, stirring occasionally.

  6. Serve garnished with fresh herbs, or vegan parmesan cheese.

serves 4-6

Smoky Lox Vegan Cheese Ball

IMG_9032-2.jpg

My all time favorite breakfast is a carrot loxbagel, with onions and capers.

So it only seemed natural to take all of those elements and turn them into an absolutely perfect cheese ball.

This cheese ball comes together quickly if you have a high speed blender or food processor. Its cashew based and super creamy and very convincing!

We added some Trader Joes Everything But the Bagel seasoning to give this cheese ball an extra loxy bagel kick. I have noticed lots of brands making this seasoning brand now, so you should not have any trouble finding it!

Serve this cheese ball with crackers, or veggies at a party, or smear it on a bagel for breakfast.

Either way, just try not to eat the whole thing at once.


Ingredients:

  • 1 cup cashews soaked over night, or microwaved 3 minutes, then drained

  • 1/2 cup refined coconut oil

  • 1/2 cup chopped carrot lox

  • 2 tablespoons capers, drained

  • 2 teaspoons light miso paste

  • 1/2 small onion

  • 1/4 cup nutritional yeast

  • 1 tablespoon apple cider vinegar

  • 1/2 teaspoon salt

  • 1 teaspoon liquid smoke

  • optional 2 teaspoons dulse flakes (seaweed flakes)

  • Extra strips of lox, or everything bagel seasoning for garnishing the tops of the cheese balls.


Instructions:

  1. Cut the onion into quarters, and pulse a few times in your high speed blender, or food processor.

  2. Now, add all of the ingredients, minus the lox and capers, to a food processor or high speed blender. Process until completely smooth. You will likely have to scrape the sides down a few times to get all the cashew bits blended.

  3. Add capers and pulse just a few times. Next, fold in the lox using a spoon. You don’t want to blend the lox.

  4. Line 2 small bowls, or ramekins, with a pieces of plastic wrap. You want a piece big enough that it will hang a good bit over the sides.

  5. If using lox to garnish, lay 4 or 5 strips across the bottom of the plastic wrapped bowls. If use everything bagel seasoning, sprinkle about a tablespoon into the bottom of the bowl.

  6. Divide the cheese mixture between the bowls. Take the pieces of plastic wrap that are hanging over the sides, pulling them up, twisting them together at the top.

  7. Put the cheese balls in the fridge for 3-4 hours to firm up before serving. Store leftover in fridge for up to 5 days.

Serve with cracker or veggies, or on a bagel

Savory Vegan Noodle Kugel

IMG_8785.jpg

If you have ever had kugel then you know…if you haven’t, then you should, asap!!

Kugel can be savory or sweet, but I have always preferred savory. This recipe is kind of a mash up of mac and cheese, and a casserole, with the perfect blend of onion, and spices.

It might be tricky to find eggless ribbon noodles, but they do exist. I always get them at my local grocery store. They sell a store brand eggless wide ribbon noodle and that is what you need for this recipe.

Normally kugel is egg heavy. So we have replaced the egg with a combination of whipped aquafaba and starch to help bind the vegan kugel, but also keep it light and a little fluffy.

We use a combination of tofus to make a pretty convincing vegan cottage cheese, and add some savory onion and spices to round the kugel out.

If you are in the sweet kugel camp, I can not help you out there. I have never been a fan, but I am sure you could adapt the base of this recipe to create a really tasty sweet kugel.

So if it’s your first time making a kugel, please leave me a comment, and let me know what ya think!! But I think you are gonna love it!


Ingredients:

  • 1 1/2 cups vegan cottage cheese

  • 1 1/2 cups vegan sour cream

  • 1 large yellow onion, finely chopped

  • 1 1/2 cups aquafaba whipped ( you are measuring the whipped product, not the liquid)

  • 1/4 cup corn or tapioca starch

  • 1/4 cup melted vegan butter

  • 16 oz bag of egg-less extra wide pasta ribbons

  • 2-3 teaspoons minced garlic

  • 1 teaspoon smoked paprika

  • esalt and pepper to taste


Instructions:

  1. Cook noodles to package instructions. Drain and set aside.

  2. Heat a small skillet on medium heat with a teaspoon of butter. Once the butter has melted, add the onions and sauté until they are soft and translucent.

  3. In a large bowl mix the cottage cheese, sour cream, aquafaba, starch, and butter. Next add in the onions, garlic, seasoning. Finally, fold in the cooked and drained noodles.

  4. Transfeter mixture to a 9x13 baking dish, and bake for 30-40 minutes.

  5. Garnish with fresh or dried parsley, and extra paprika. Serve warm or at room temperature.

Easy Vegan Cottage Cheese

Ingredients:

  • 1 package extra firm tofu

  • 1 package silken tofu

  • 2 tablespoons nutritional yeast

  • 1 teaspoon apple cider vinegar

  • juice from half a lemon

  • 1 teaspoon of salt

Instructions:

  1. Add the silken tofu, nutritional yeast, vinegar, lemon juice, and salt to a food processor or blender. Blend until the mixture is completely smooth.

  2. Crumble up the extra firm tofu, and fold into the creamy tofu mixture.

  3. Store in an airtight container in the fridge for up to one week.

Loaded Vegan Baked Potato Soup

I love this loaded baked potato soup because it is a quick, easy, and filling dinner if you are pressed for time. You could easily use leftover baked potatoes, or prep some baked potatoes over the weekend for an ever quicker weeknight dinner! Use wh…

I love this loaded baked potato soup because it is a quick, easy, and filling dinner if you are pressed for time. You could easily use leftover baked potatoes, or prep some baked potatoes over the weekend for an ever quicker weeknight dinner! Use whatever toppings you have on hand for this hearty, delicious soup, that will leave you full, and satisfied!

Ingredients:

  • 4-5 russet baking potatoes

  • 4 cups of plant based milk

  • 1/3 cup all purpose flour

  • 1 small yellow onion, finely diced

  • 2 cups water

  • 1/2 cup vegan sour cream

  • 2 teaspoons low sodium vegetable Better than Bouillon

  • 1/2 teaspoon black pepper

  • 3 tablespoons vegan butter

Optional Toppings:

  • chives, or diced green onions

  • vegan cheese shreds

  • coconut bacon

  • vegan sour cream

instructions:

  1. Wash potatoes. Pierce through each one a few times with a sharp knife. Place on a baking sheet, and bake at 400 degrees for 30 minutes, or until a knife will easily pierce through the potatoes. Remove from oven, slicing each potato open to allow to cool.

  2. Heat a large pot, or dutch oven on medium heat on your stove top. Add 1 tablespoon of butter, then add the onions, and cook until soft, and translucent.

  3. Add the other 2 tablespoons of butter allow to melt. Next, sprinkle the 1/3 cup of flour over the onions. Allow the flour to cook for a few minutes, and incorporate with the melted butter.

  4. Whisk in the milk, water, and Better Than Bouillon, and reduce heat to low. Let soup simmer, and thicken for about 15 minutes, stirring occasionally.

  5. Once the soup has thickened, scrape out the insides of the potatoes into the pot. Use the back of a wooden spoon to mash up the pieces of the potato a bit once in the pot.

  6. Stir in the sour cream, pepper, and extra salt if you think it needs it. Let simmer for another 10-15 minutes.

  7. Serve soup topped with diced green onions, more sour cream, vegan cheese shreds, or coconut bacon.

Serves 4-6

Easy Coconut Bacon

BACON! It seems to be that one food people miss when they go vegan, or plant based. I admittedly ate my fare share of turkey bacon back in the day, and have had my moments of missing that smokey, salty, crunchy element in certain recipe. Coconut bac…

BACON! It seems to be that one food people miss when they go vegan, or plant based. I admittedly ate my fare share of turkey bacon back in the day, and have had my moments of missing that smokey, salty, crunchy element in certain recipe. Coconut bacon is great for topping salads, grit bowls, soups, or adding to any recipe that calls for crispy bacon. It’s easy to make, and pretty tasty! Don’t skip out on the liquid smoke, though. It is the key ingredient in making this mock bacon taste like the real deal.

Ingredients:

  • 1 cup unsweetened shredded coconut or coconut chips

  • 2 tablespoons soy sauce or coconut aminos ( if you use coconut aminos add 1/2 teapsoon of salt)

  • 1 tablespoon maple syrup

  • 1/2 teaspoon smoked paprika

  • 1 teaspoon of liquid smoke

Instructions:

preheat oven to 350 degrees

  1. Mix coconut, and all other ingredients in a bowl.

  2. Spread coconut mixture onto a parchment lined cookie sheet, and bake for 5 mintues.

  3. Stir the coconut around on the pan, and continue baking for another 5 minutes or until the coconut is brown and crispy. Watch the coconut carefully to make sure it is not burning, as it can burn quickly.

  4. Allow to cool, and store in an airtight container in the fridge for up to one week.

Vegan Spinach and Artichoke Dip

Growing up, spinach and artichoke dip was my favorite dip, especially if it was served in a bread bowl!Growing up in the south, this dip was a staple at every baby shower, pot luck or holiday party.Luckily this classic dip is super easy to veganinze…

Growing up, spinach and artichoke dip was my favorite dip, especially if it was served in a bread bowl!

Growing up in the south, this dip was a staple at every baby shower, pot luck or holiday party.

Luckily this classic dip is super easy to veganinze, and once again you will likely fool just about anyone who tries it into thinking its not vegan at all.

We simply just replaced the regular mayo and cream cheese with our favorite vegan versions and kept the rest of the recipe pretty traditional, or make your own delicious homemade cream cheese . You can make your own bread bowl for buy whatever vegan bakery bread you like.

You can serve this dip in a bread bowl, or with a side of bread and veggies for dipping. No matter how you serve it, I promise you are gonna love it!


Ingredients:

  • 1 container of plain vegan cream cheese, or 8 oz of homemade cream cheese

  • 2 14 oz cans of artichoke hearts

  • 9 oz container of fresh baby spinach

  • 1 small/medium yellow onion

  • 1/4 cup vegan mayo

  • 2 teaspoons of minced garlic

  • juice from 1 lemon

  • 2 teaspoons all purpose seasoning ( I use Trader Joes 21 season salute)

  • 1 teaspoon of salt

  • 1/2 teaspoon pepper

  • OPTIONAL, 1 round loaf of vegan bread to use as a bread bowl


Instructions:

  1. Drain the artichoke hearts and chop them up a bit.

  2. Dice the onion and sauté in a medium pan with a teaspoon of oil until it becomes soft, and translucent.

  3. Place the spinach in a large microwave safe bowl, and microwave for 2-3 minutes, just long enough for the spinach wilt. Allow the spinach to cool, and place in a clean kitchen towel. Wring out the spinach in the towel to remove as much liquid as you can. Remove spinach form the towel, and chop it up a bit.

  4. In a large bowl combine spinach, artichokes, onion, and remaining ingredients. Stir well.

  5. Transfer mixture to a medium sized casserole dish, and bake for 25 to 30 minutes. You just want it to get nice, and bubbly hot.

  6. If you are serving the dip in a bread bowl, but the center out of the bread make a bowl for the dip. Save the scrap bread for dipping. Transfer dip to the bread bowl and serve with extra cut up bread, crackers, or veggies. Otherwise, serve in the dish you baked it in with bread, cracker, or veggies for dipping.

Perfect Vegan Cornbread

Nothing goes better with a hot bowl of soup, chili, or beans than some homemade cornbread. My mom has always used mayo in her cornbread in place of eggs, so swapping out for vegan mayo was an easy fix. Using oat milk will help you get a darker color…

Nothing goes better with a hot bowl of soup, chili, or beans than some homemade cornbread. My mom has always used mayo in her cornbread in place of eggs, so swapping out for vegan mayo was an easy fix. Using oat milk will help you get a darker color in vegan baked goods, but use whatever plant based milk you have on hand. You can easily bake these up in a muffin tin as well, if you prefer corn muffins to regular cornbread.

Ingredients:

  • 1 cup cornmeal

  • 1 cup all purpose flour

  • 2 teaspoons baking powder

  • 1 teaspoon salt

  • 1/4 cup sugar

  • 2 tablespoons melted vegan butter

  • 1/4 cup vegan mayo (the mayo acts as an egg replacer in this recipe)

  • 1 cup plant based milk

Cooking Instructions:

preheat oven to 425 degrees

  1. Mix together dry ingredient in a large bowl.

  2. Next, add in wet ingredients and mix well.

  3. Add a few teaspoons melted butter or oil to a small cast-iron skillet or baking pan before adding the batter. If using a cast iron skillet, place it in the oven as it preheats. Pouring the batter into a hot pan will help it form a nice crispy edge.

  4. Let cornbread bake for 20-25 minutes or until a toothpick poked in the middle comes out clean.

IMG_1034.jpg

Classic Vegan Sausage Balls

IMG_8572.jpg

Growing up in the south, sausage balls were a party staple.

Every baby shower, bridal shower, or family gathering had a tray of these tasty treats.

By simply swapping out the cheese and sausage in the original recipe for vegan versions, these yummy little bites will quickly become vegan party favorite!

Bisquick brand biscuit mix is in fact vegan! Hallelujah y’all, because that makes this recipe so super easy and what we always used in the original sausage ball recipe.

For the cheese you can use any vegan brand cheddar shreds you prefer or try your hand and making your own easy vegan cheddar cheese. I have almost 40 vegan cheese recipes on the site you can peruse! Even if you are up for making cheese for this recipe, trust me when I tell you homemade shreddable vegan cheese is so easy and affordable to make, that once you get brave enough to try your hand at it, you may never go back to buying store bought!

Fo the the sausage I like to use a package of lightlife Gimme lean, but you could also use something like the Beyond Brand links. You just cut away the casing and crumble up the sausage into the bisquick and cheese.

These vegan sausage balls make for a great snack, party appetizer, or even a nice side with a light dinner, or even as quick on the go breakfast. My kids beg me to make these all the time, so whenever we are craving them, we make a batch.

I really think these classic vegan sausage balls are perfect anytime and you don’t really need any excuse at all to make them other than you feel like it!!!!

Remember being vegan does not mean you have to give up the things you ate before you became vegan, you just have to learn how to substitute and make a few changes!!


Ingredients:

  • 2 cups Bisquick brand all purpose mix

  • 1 8oz bag of vegan cheddar shreds, or homemade cheddar

  • 1 14oz package vegan sausage (I used LightLife, Gimme lean), you can use homemade or even beyond links with the casings removed.

  • 1/4 - 1/3 cup water


Cooking Instructions:

Preheat oven to 350 degrees.

  1. In a large bowl, combine sausage, cheese, bisquick, and water.

  2. Mix up the ingredients using a large wooden spoon, or your hands. I find it much easier, and quicker to just use my hands to get it all mixed together.

  3. Once the mixture is ready, use a small cookie scoop or teaspoons to portion out the mixture. Roll the portions into balls, and place them on a parchment lined cookies sheet.

  4. Bake the sausage balls for 20 - 25 minutes. Let cool before serving.

Pumpkin Spice Vegan Cheese Ball

IMG_8556.jpg

Sweet vegan cheese ball you say?!? Well I say yes!

Even though most cheese balls are savory does not mean you can’t make them sweet.

The base is the same, the spices are just different. So why not think outside of the box and make some sweet versions for your next cheese board.

A sweet cheese ball is perfect for spreading on fruit, cookies, or sweet biscuits.

My all time favorite fall flavor is pumpkin spice and that includes in the form of a creamy sweet vegan cheese ball.

This cheese ball has the right amount of pumpkin pie spice, maple sweetness and of course pumpkin puree! We also gave it a little drizzle of maple icing because why not!

If you are serving a cheese board, or just need a quick fall dessert or snack, give this one a whirl. If you love all things pumpkin spice, I think you will LOVE this cheese ball.


INGREDIENTS:

  • 1 cup cashews soaked in hot water for a few hours or microwaved for 3 minutes then drained

  • 1/2 cup refined coconut oil

  • 1/4 cup canned pumpkin or pumpkin puree

  • 1 teaspoon vanilla extract

  • 3 tablespoons maple syrup or maple butter

  • 1/4 teaspoon salt

  • 1 teaspoon cinnamon

  • 1 teaspoon pumpkin pie spice

  • A few graham crackers (Nabisco brand is honey free)

Icing drizzle:

  • 1/4 cup powdered sugar

  • 1/2 teaspoon pumpkin pie spice

  • A few drops of maple syrup to thin out the icing


INSTRUCTIONS:

  1. Add all of the ingredients to a food processor, or high speed blender, and blend until the mixture becomes completely smooth.

  2. Crush the graham crackers into a fine crumb. I normally just put them in a zip lock bag use a rolling pin to crush them.

  3. Line 2 small bowls, or ramekins, with a pieces of plastic wrap. You want a piece big enough that it will hang a good bit over the sides. Sprinkle some of the crushed graham crackers on the bottom of the bowls.

  4. Divide mixture evenly into the bowls. Now take the plastic wrap hanging over the edges, bring together and twist to seal up the cheese. Allow to harden in the fridge for 3 - 4 hours to firm up.

  5. Once cheese is ready, whisk together the icing ingredients. If the mixute gets too thin, add some more powdered sugar.

  6. Remove both cheese balls from the bowls, and plastic wrap. Drizzle tops with icing.

  7. Put cheese balls in an airtight container and store in the fridge for up to 5 days.

    Serve with fruit or graham crackers

Pumpkin Spice Vegan Pop-Tarts

IMG_8501.jpg

I LOVE pop tarts! Love them. Over the years I have tried several variations of dough and filling.

I settled on this dough because the little bit of extra butter gives them a nice flakey crust, somewhere between a pop tart, and a toaster strudel.

I make all kinds of pop-tarts, but around September I am all in for all things pumpkin spice. I know, I know, she’s so “basic” or whatever the kids are saying these days. But y’all, I love pumpkin everything. Pumpkin pie being my all time fave, and these are a close second and an acceptable breakfast pie, if you will.

If you are in the “I hate all things pumpkin camp” I am baffled BUT accept your personal taste and can offer you other vegan pop- tart flavors on the site. I have chocolate, strawberry, and even lemon lavender. Something for maybe everyone?!

Just know that however you deiced to make them, they are surprising easy to make, and so good that you will probably want to just go ahead and make a double batch!

We have a family of 6 so these do not last!!! They keep well and will reheat nicely, too.

So if you have never made a homemade vegan pop-tart before, nows the time!


INGREDIENTS:

  • 1 cup whole wheat flour

  • 1 cup all purpose flour

  • 3/4 cup vegan butter

  • a pinch of salt

  • 3 - 4 tablespoons ice water

  • 3 tablespoons Pumpkin Butter

  • 1/4 cup powdered sugar

  • a drizzle of maple syrup

  • 1/4 teaspoon pumpkin pie spice


INSTRUCTIONS:

  1. Preheat oven to 350.

  2. Add both cups of flour, butter, and salt to a food processor and pulse until well combined.

  3. Add in the water, one tablespoon at a time until a soft dough has formed.

  4. Roll the dough out on a flour dusted, smooth surface to a 1/8 of an inch thick rectangle. You can trim up the edges with a sharp knife and save the scrap dough.

  5. Once the dough is trimmed and even, cut 3 inch by 5 inch rectangles from the dough, give or take. Be sure when you are calculating how many you can cut, to have a even number. Each pop tart needs 2 rectangles. Roll out any scrap dough and repeat the process.

  6. Scoop a teaspoon of pumpkin butter onto a rectangle, and smear it around a bit in the middle, carefully to not get too close to the edges.

  7. Top the pumpkin butter covered piece of dough with another rectangle of dough, and use a fork to press, and seal the edges. (for step by step pictures of the process, check out our Strawberry Pop-Tart recipe)

  8. Place pop tarts on a parchment lined baking sheet, or lightly spray one with cooking oil and bake for 20 - 25 minutes.

  9. While pop tarts are baking, mix together the powdered sugar with just a few drops of maple syrup, just enough to thin it out. Add the pumpkin pie spice and stir. If it is too thin, you can add a little more powdered sugar to thicken it back up. You want a spreadable consistency.

  10. Once pop tarts have cooled a bit, spread the icing and serve.

Yields 8 pop tarts.

IMG_8513.jpg

Pumpkin Butter

IMG_8530.jpg

INGREDIENTS:

  • 1 15oz can of pumpkin 
  • 1/2 cup brown sugar
  • 1/4 cup water
  • 2 teaspoons pumpkin pie spice 
  • 2- 3 tablespoons maple syrup

COOKING INSTRUCTIONS:

  1. Add all ingredients to a medium sized pot, and whisk together. 

  2. Turn pot on med/low heat and allow pumpkin butter to simmer for about 30 minutes, stirring regularly. The Pumpkin butter will begin to thicken a bit as some of the liquid cooks out, and the sugars melt. 

  3. Once finished, store in mason jars, or an air tight container in the fridge. 

Southwest Salad with Crispy Potatoes

IMG_8382.jpg

INGREDIENTS:

  • 1 head romain lettuce
  • 1 small bag mixed greens
  • 1 tomato
  • 1 cucumber
  • 1 avocado 
  • 1/2 - 1 yellow or red bell pepper
  • 1/2 cup crispy french fried onions (most brands are vegan, but be sure to check)
  • 2 medium to large red potatoes 
  • 1 can black beans, drained and rinsed

Southwest Dressimg

  • 1/2 cup vegan mayo
  • 1 tablespoon apple cider vinegar
  • 1 teaspoon dijon mustard
  • 1 teaspoon each, smoked paprika, garlic powder, onion powder
  • 1/2 teaspoon each, salt, and chili powder 

InstrucTions:

  1. Wash potatoes but don't peel them. Dice into cubes. Heat a medium sized skillet on medium heat with a few teaspoons of oil. Add the potatoes and a few shakes of salt, and cook until they begin to brown, and crisp. This takes anywhere between 10 and 15 minutes, depending on the pan you use. I have learned over time that they will cook, and crisp much faster in a cast iron skillet. Once potatoes are done, set aside.
  2. Wash and chop all of the veggies, and lettuce.
  3. In a large salad bowl, toss the lettuce, chopped veggies, rinsed black beans, crispy onions, and potatoes.
  4. In a small bowl, combine all of the ingredients for the dressing, and stir well.
  5. Serve salad topped with southwest dressing.

serves 4-6