Desserts

Vegan Chocolate Bourbon Pecan Pie Cake

Vegan Chocolate Bourbon Pecan Pie Cake

Ever find yourself in a situation where you are torn between eating or baking a pie or cake.? Like you want a flakey, buttery pie, with a gooey center, but you also are craving a delicious, moist, fluffy cake? Well it may not be the answer to world peace, but we have certainly solved the cake or pie conundrum.

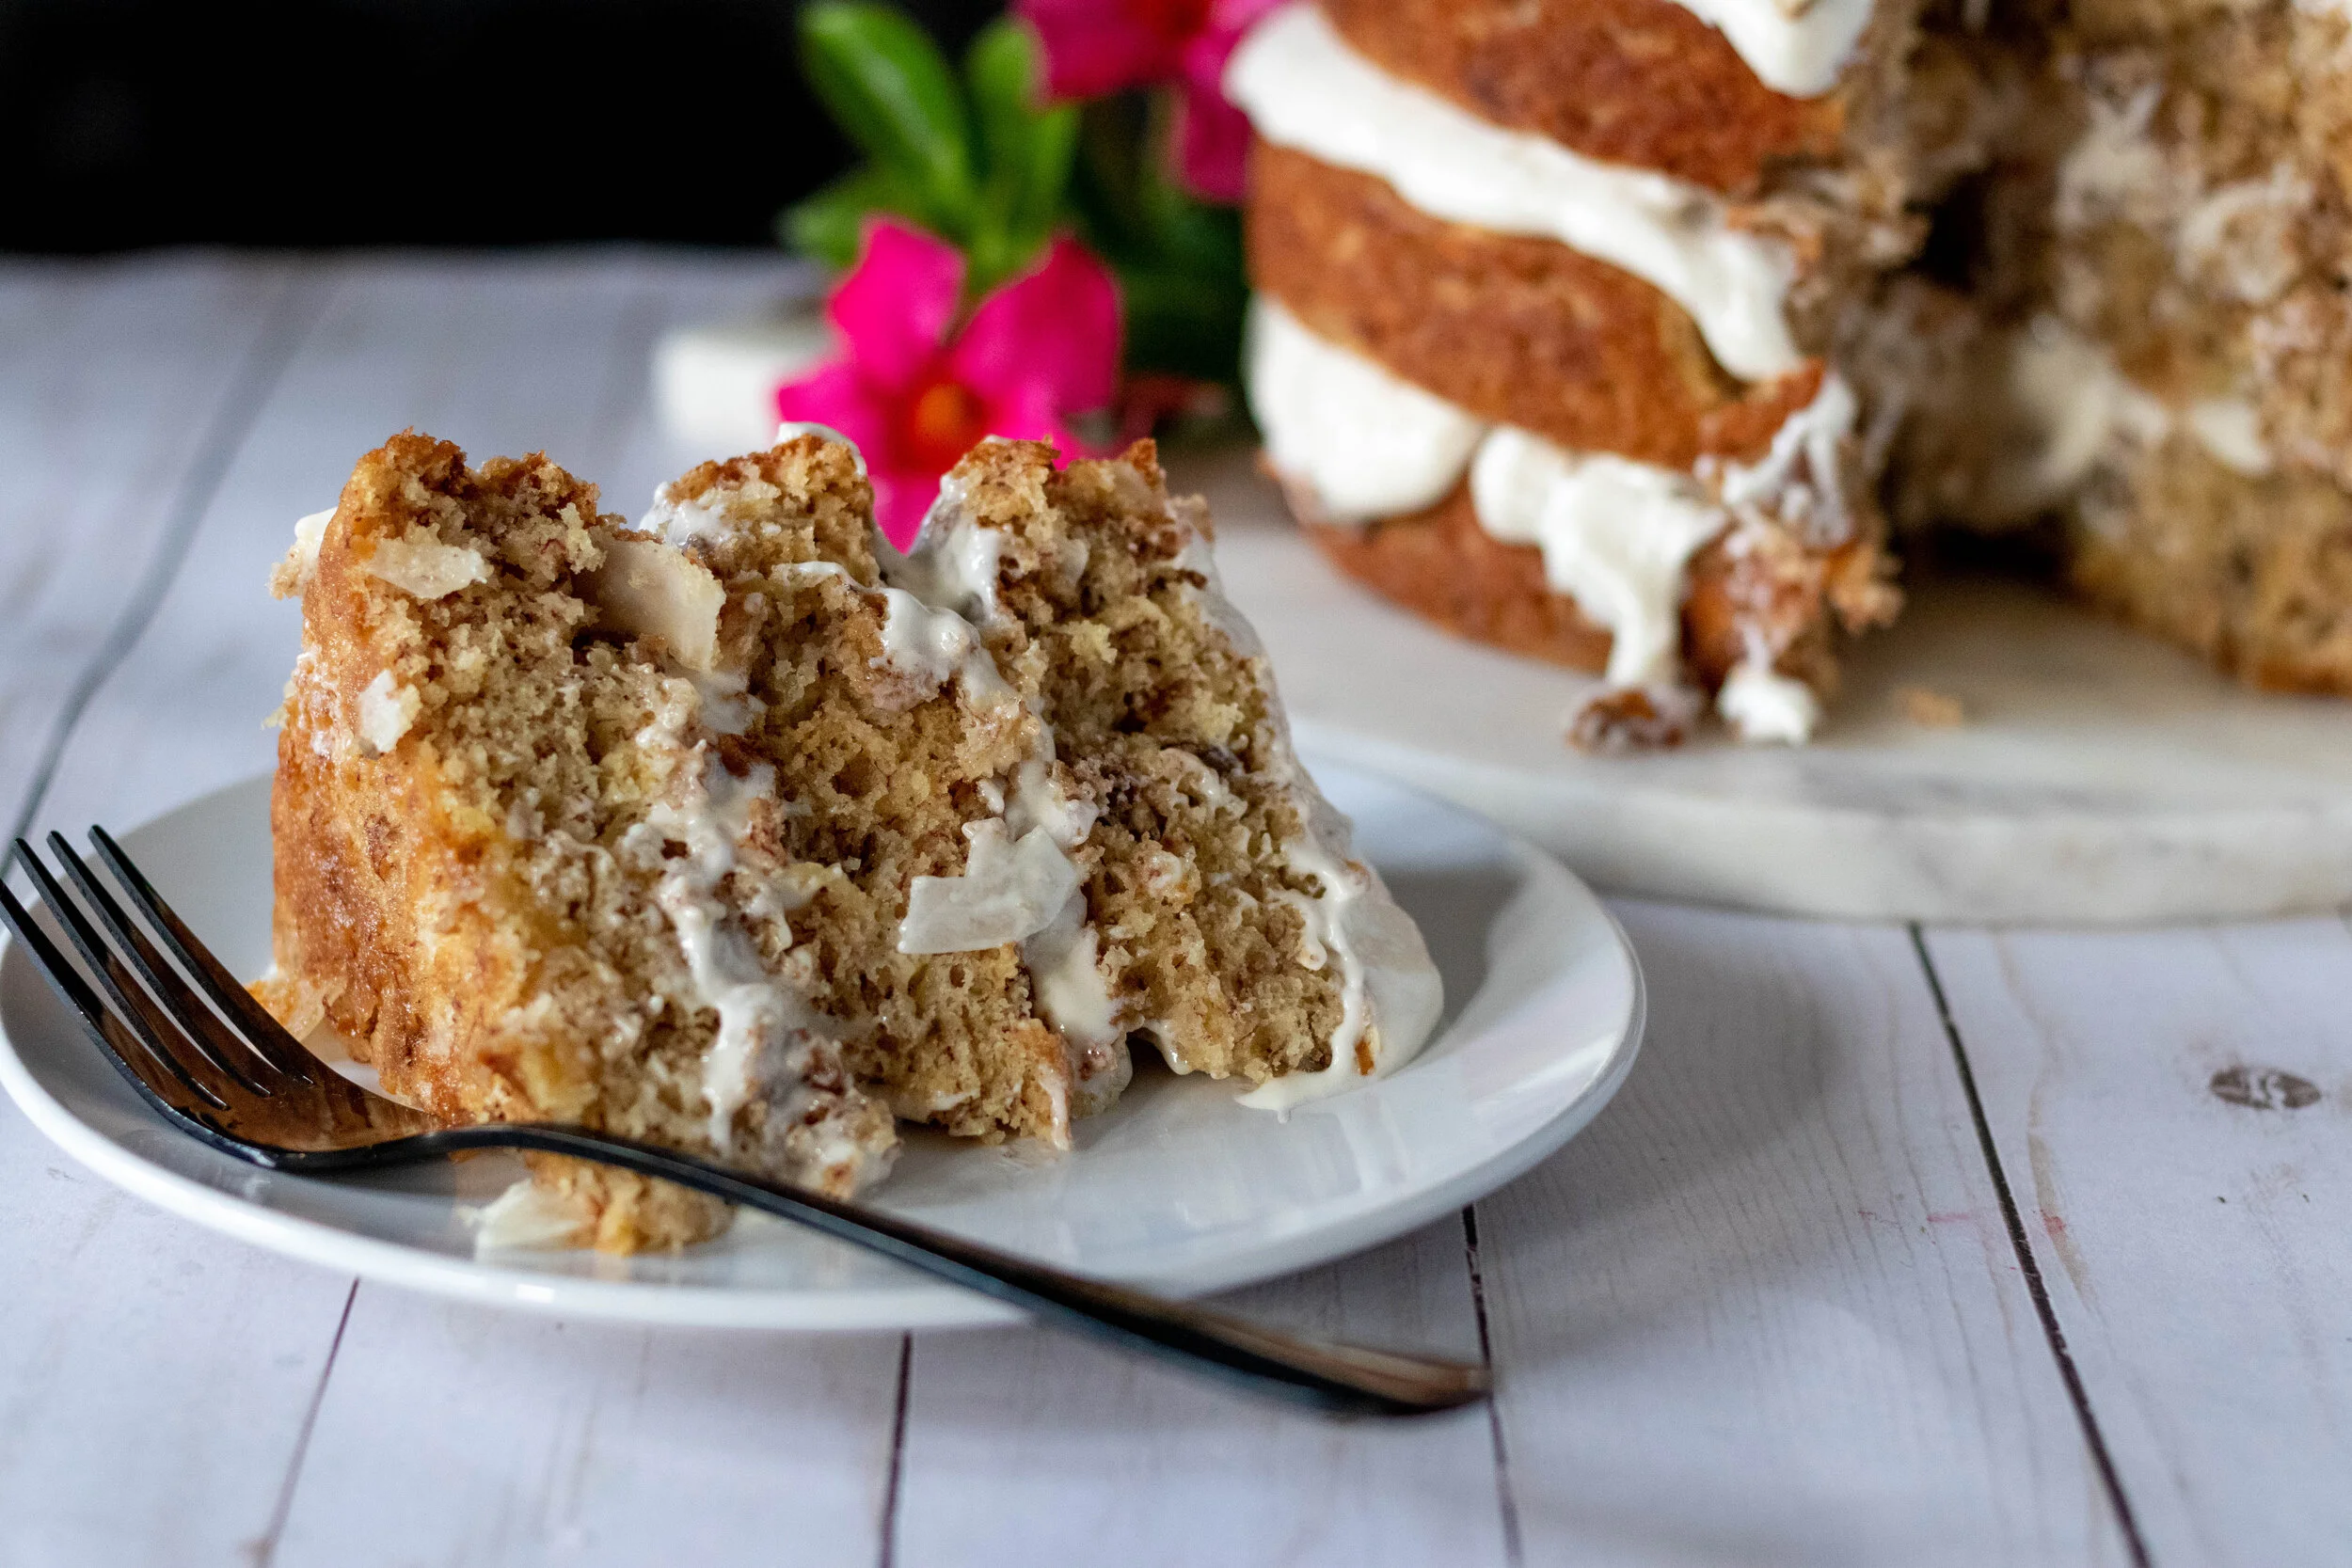
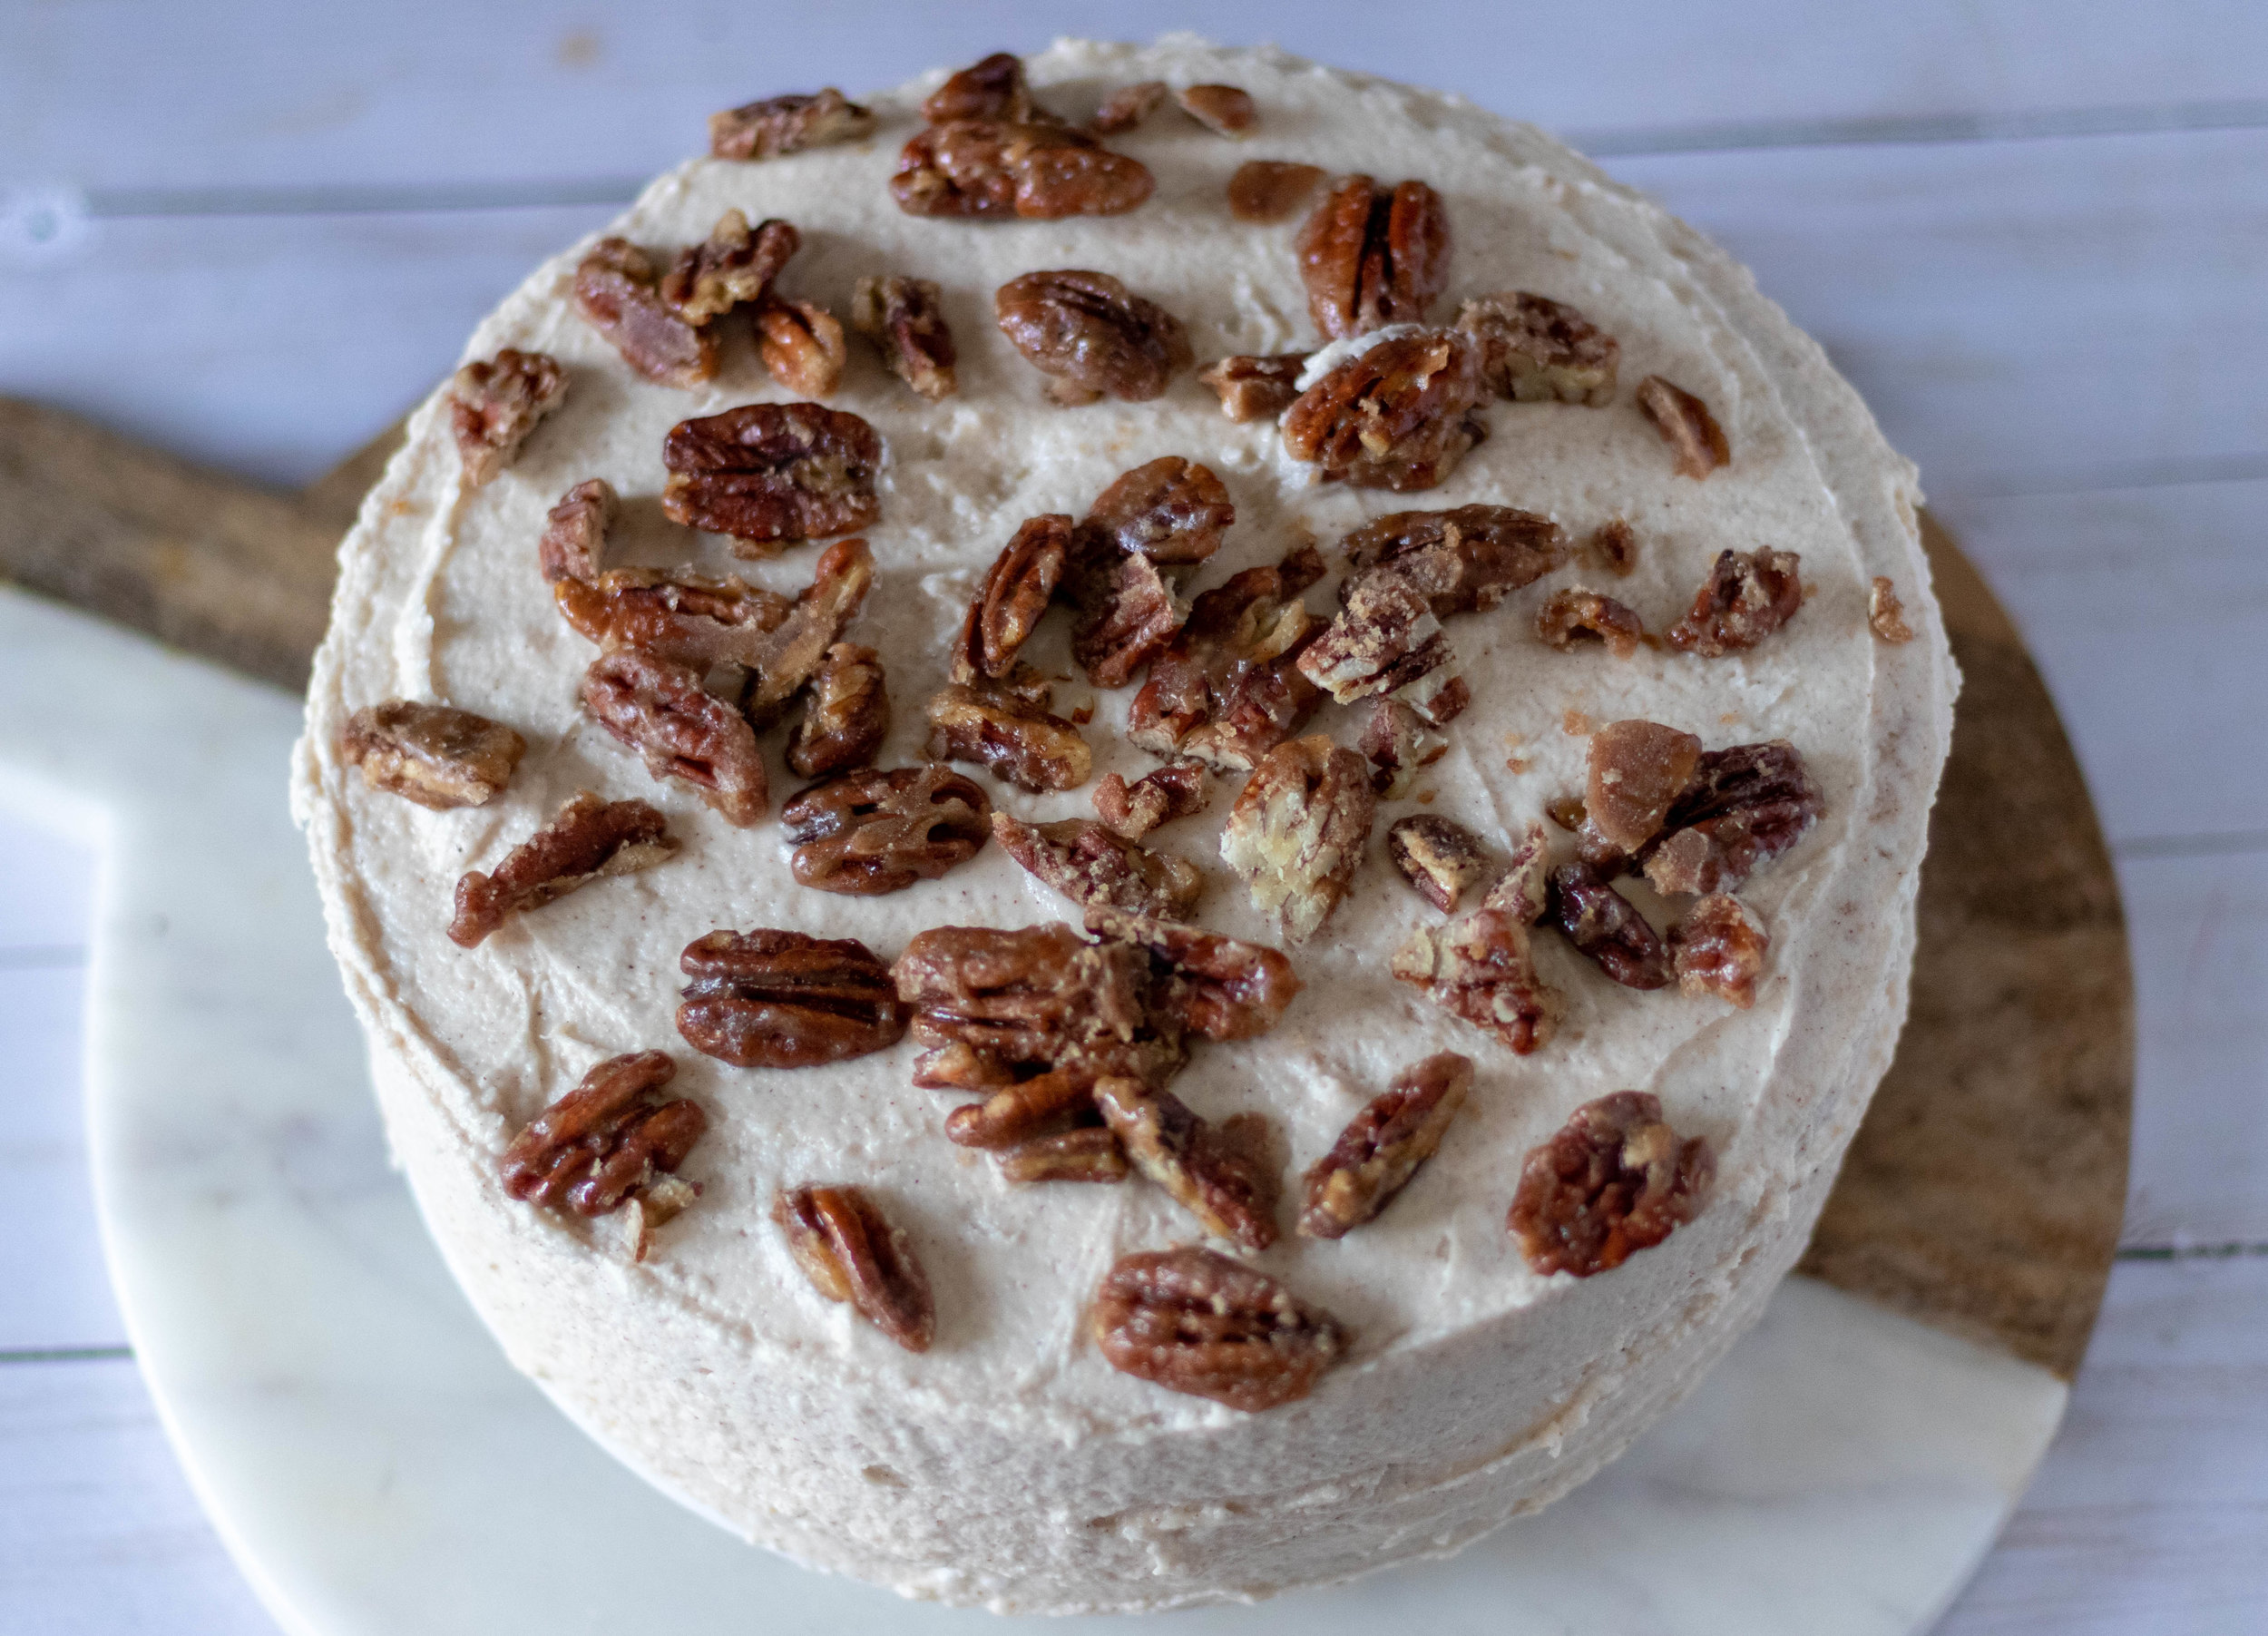
You see, we simply baked a pie, then nestled it inside of a cake. On the outside this just looks like your run of the mill, homemade cake, but once you cut into it, you quickly realize there is a delicious and expected hidden surprise. Inside of this perfect vegan chocolate cake, is an even more perfect chocolate bourbon pecan pie! Don’t pass out! I know how amazing this is! I truly do!

Once upon a time when we were not vegan, and watched a lot of Food Network late at night, my husband and I saw a guy dropping pies into all kinds of cakes. MULTI TIERED PIE FILLED CAKES. Y’all, I don’t have that kind of time on my hands but I can 100% pull off one single layer of pie cake. After watching this magic go down on TV we went right to the kitchen and baked our first pie cake for a pot luck for my husband’s work. It was a hit!

Then like most things, I forgot all about it. Until the other day when I remembered, like 10 years later, but thank the good lord I did. The first time we just bought a pecan pie from the grocery store. Sadly vegan pies are not a dime dozen at most local grocery stores, so our amazing pie baking daughter baked up a delicious mini chocolate bourbon pecan pie. It is seriously one of the best things ever all by itself, but its mind blowing inside of my favorite chocolate cake recipe, iced with vegan vanilla bourbon butter cream!!

I guarantee if you roll into a holiday party, or any party for that matter with this cake, you will be everyone’s favorite person, at least for the day!! Now you never have to toil over whether to bake a cake or pie, because now, you can just bake them both all rolled into one.

Lets all take a moment to reflect on this reality, and to give a big round of applause to whoever that dude was on the Food network that originally created the amazing madness! And get ready for like a million hugs and high fives once everyone realized there is a pie in that cake!


INGREDIENTS:

You will need an 8 inch diameter, deep cake pan, and a 6 inch pie pan

CHOCOLATE BOURBON PECAN PIE:

  • 1 store bought vegan pie dough

  • 1 1/4 cups chopped pecans

  • 3 tablespoons coconut oil

  • 1/2 cup plus 2 tablespoons maple syrup

  • 1/3 cup brown sugar

  • 3 tablespoons all purpose flour

  • 1 tablespoon dark cocoa powder

  • 2 tablespoons bourbon

  • 1/4 teaspoon salt

  • 1/3 cup water

  • 1 teaspoon vanilla extract

CHOCOLATE CAKE:

  • 2 cups all purpose flour

  • 2 cups granulated sugar

  • 3/4 cup dark cocoa powder

  • 1 1/2 cups whipped aquafaba (chickpea liquid that has been whipped with cream of tarter resembling whipped egg whites)

  • 1 teaspoon baking soda

  • 3 teaspoons baking powder

  • 1 teaspoons salt

  • 1/2 cup neutral oil (I use Grape seed oil)

  • 1 cup brewed coffee

  • 1 cup plant based milk (I like oat milk for baking) plus 1 teaspoon apple cider vinegar

  • 1 teaspoon vanilla extract

BOURBON BUTTERCREAM:

  • 1/4 cup vegan butter

  • 1/4 cup vegan shortening

  • 1 teaspoons vanilla extract

  • 2 tablespoons bourbon

  • 3ish cups powdered sugar

  • pinch of salt

vegan-chocolate-bourbon-pie-cake-filling.jpg
vegan-chocolate-bourbon-pecan-pie-cake.jpg

INSTRUCTIONS:

  1. Preheat oven to 275 degrees. Allow pie dough to come to room temperature. Roll the dough out to about 1/4 inch thick and place inside the pie pan. Cut off the excess dough. You don’t need the crust to be pretty since it’s just going into a cake. Pop the pie crust into the oven and let bake.for about 10 minutes. * not all pie dough is vegan. You just have to read the ingredients. I have found several brands that are. You can also buy a frozen pie crust and just let it thaw then remove it from its pan. Sometimes I have more luck finding vegan crust in the freezer section than the refrigerator section.

  2. In a large sauce pan, heat oil over medium heat. Whisk in the flour and cocoa and cook for about 2 minutes, whisking the whole time. Continue whisking while adding the maple syrup, sugar, water, and salt. Cook until the sugar has dissolved. Bring mixture to a boil then lower the heat to low, stirring occasionally for about 5 minutes until thickened. Remove from heat and stir in pecans, vanilla, and bourbon.

  3. Pour mixture into the crust. You can add extra pecans around the edge it you like.

  4. Bake the pie for 45 - 55 minutes. If the edge seems to be getting too brown, cover the edge with aluminum foil for the remainder of the bake time.

  5. Place the pie on a wire cooling rack and allow it to cool completely. Once the pie is totally cool, place a plate over the top of the pie and flip it over. The pie should come out onto the plate. Put another plate on the bottom of the pie and flip again. Now you should have the pie upright on a plate!

  6. To make the cake: Preheat oven to 350 degrees. In a large bowl, mix together flour, sugar, cocoa powder, baking powder, baking soda, and salt.

  7. In the bowl of your stand mixer, or another large bowl if using a hand mixer, add the milk, oil, brewed coffee, and vanilla. Slowly pour in the dry ingredients and mix until well combined. Once the batter is all mixed up, slowly fold in the whipped aquafaba using a rubber spatula, just until incorporated. Do not over mix, this deflates the aquafaba, resulting in a less fluffy cake.

  8. Grease and lightly flour one 8 inch cake pan that is rather deep. It needs to be deep enough to hold all of the cake batter.

  9. Pour about 1/3 of the batter into the bottom of the pan, then nestle the pie carefully into the center of the cake batter. Pour the remaining batter over the top.

  10. Place the pan on the top rack of your oven and bake for 45 minutes to 1 hour, or until a tooth pick comes out clean when poked into the cake. You might have to poke away from the center a bit because the pie is gooey and will trick you into thinking the cake is not done!

  11. Once cake is finished baking, place it on a cooling rack to cool completely before turning over onto a serving plate or cake board and frosting.

  12. To prepare the frosting, beat the butter, and shortening together in a stand mixer, or in a large bowl, using your electric hand mixer. Once the mixture is completely creamy, beat in the vanilla and bourbon. Slowly begin to beat in the powdered sugar, and mix until there are no more lumps. If the frosting seems too thick, you can add a few more drops of bourbon to thin it back out. Nobody is gonna be mad about it.

  13. Cover the cake with the frosting and decorate with some pecan halves if you like. Slice pie cake to serve. Store leftovers in the fridge or at room temperature in an airtight container.

If you like this recipe, try these:

Vegan Chocolate Bourbon Pecan Pie Cake

Vegan Maple Pecan Blondies

Vegan Maple Pecan Blondies

If given the option of a brownie or a blondie, I think I would choose a blondie every time. Especially a maple pecan blondie.

Maybe its all the butter, and the gooey, chewy center? I don’t know, I just love them.

Don’t get me wrong, I love brownies too, I just think that blondies don’t get enough attention!

Our daughter, Peyton, is the best blondie baker which works out well for my stomach! These Vegan Maple Pecan blondies are perfect for the fall holidays, and work well for potlucks and bake sales.

We baked these in an 8x8 pan and got some nice big blondies. You can just was easily bake them in a 9x13 pan, they just won’t be as thick, but you would certainly end up with more if you planned on sharing them!

If you are in the camp that always bakes brownies and never blondies, tis the season to show these underrated treats some love! I can't imagine you would be sad you did! And if for some reason you don’t love these blondies, just go ahead and mail them to me!


INGREDIENTS:

  • 1 1/2 cup vegan butter, softened

  • 1 3/4 cups granulated sugar

  • 2 flax eggs (2 tablespoons ground flax, 6 tablespoons water)

  • 2 starch eggs (2 tablespoons starch, like tapioca, 6 tablespoons water)

  • 3 cups all purpose flour

  • 1 teaspoon baking powder

  • 1 teaspoon salt

  • 1/2 cup maple syrup

  • 1 teaspoon vanilla extract, or vanilla bean paste

  • 1 1/4 cups chopped pecans, divided

INSTRUCTIONS:

Preheat oven to 350 degrees

  1. In a stand mixer, or large bowl if using a hand mixer, beat flax eggs, starch eggs, and sugar for a a few minutes.

  2. Whisk flour, salt and baking powder together in a separate bowl.

  3. Beat the butter into the sugar and “egg” mixture, then add the flour mix a little at a time while beating each addition in.

  4. Slowly beat in the maple syrup and vanilla, mixing just until combined.

  5. Fold in 1 cup of the pecans.

  6. Line an 8x8 baking pan with parchment paper, or coat in vegan butter and a little flour. Shake the excess flour from the pan. Pour batter into the pan and top with the remaining 1/4 cup of pecans.

  7. Bake on the middle oven rack for 35-40 minutes ( bake time will depend on pan size) or until a tooth pick or skewer inserted in the middle comes out clean. Transfer to a wire cooling rack and allow the blondies to cool completely before cutting.

If you like this recipe, try these:

Vegan Maple Pecan Blondies

Vegan Chocolate Orange Cake

Vegan Chocolate Orange Cake

When I was a kid, I loved getting those foil wrapped chocolate orange shaped candies. The ones you throw down to get the chocolate “orange slices” to break apart like magic, and then eat so many pieces you feel sick. Yeah, those! They were my favorite holiday candy before going vegan.

I adore chocolate and orange together! So once again I had set out to veganize a cake I saw in a magazine and it seemed to be a failure. The cakes baked up beautifully but the frosting just would not come together. So I needed to switch gears and find a new flavor for the frosting. That’s when I looked over at my fruit basket and knew!

I have talked to y’all about kitchen failures before, and being ready and able to adapt and roll with the punches. If the cakes bake up and the frosting won’t work, move on to something else, some other flavor combo you love! Its not a failure unless you give you give up, and I refuse to toss out a perfectly good cake just because the frosting is a pile of weird unusable goo!!

So I whipped up a quick orange frosting for the middle, and an easy chocolate frosting for the outside and that was that. But when I cut the cake and realized it was a bit delicate and crumbly, not the texture of any other cake I have baked. I managed to get it all frosted and it turned out pretty in the end, but I deiced I would not post this recipe because I was sure I would get comments about the texture. It was not “perfect” or my idea of a perfectly textured cake, or what I was used to. But when I took my first bite I quickly changed my mind. It was so delicious and the texture actually worked so well once frosted, that I didn’t want to change the recipe on bit for fear of messing it up.

If the cake seems to be giving you issues once you cut it, just squish the crumbs back on and keep moving. That could be a metaphor for life, am I right? I shared this cake with a handful of non vegans and they adored it as well. That was the seal of approval I needed to go ahead and post the recipe.

This cake makes me think of the chocolate oranges I can no longer eat, and its makes me smile with every bite. My son claimed it was the best cake I have ever made, and I have made a LOT OF CAKES. So, my kids may never have the memory of cracking open a big chocolate orange, but they will have the memory of me baking them this cake every year around the holidays and maybe thats even better!


INGREDIENTS:

You will need 2 round 8 or 9 inch cake pans for this recipe

  • 1 1/2 cups hot coffee

  • 1/2 cup cocoa powder

  • 1/2 bag or 4 oz vegan chocolate chips or chopped chocolate

  • 3 cups all purpose flour

  • 1 tablespoon baking powder

  • 1/2 teaspoon salt

  • 1 cup vegan butter

  • 1 cup brown sugar

  • 1 cup white sugar

  • 1/2 cup vegan plain yogurt or sour cream

  • 1 teaspoon vanilla extract or vanilla bean paste

  • 2 flax eggs

  • 1 cup whipped aquafaba

VEGAN ORANGE FROSTING:

  • 1/4 cup vegan butter

  • zest from one large navel orange

  • 3 cups powdered sugar

  • 1 teaspoon vanilla extract or vanilla bean paste

  • 2-3 teaspoons fresh orange juice

VEGAN CHOCOLATE FROSTING:

  • 1/2 cup vegan butter

  • 1/2 cup shortening

  • 4 cups powdered sugar

  • 1/4 cup cocoa powder

  • pinch of salt

  • a few teaspoons plant based milk

Vegan Chocolate Orange Cake

INSTRUCTIONS:

Preheat oven to 350 degrees

  1. Place chocolate chips, or finely chopped chocolate along with the cocoa powder in a large bowl. Pour the hot coffee over the chocolate and let the mixture sit for 2 minutes. This will melt the chocolate.

  2. Whisk the flour, baking powder, and salt in a separate bowl and set aside.

  3. In the bowl of a stand mixer, or a large bowl if using an electric hand mixer, add the butter and both sugars. Beat the butter and sugar on medium speed for a few minutes until the mixture is light and fluffy.

  4. Beat in the flax eggs, then the vegan sour cream, or yogurt, and the vanilla.

  5. Alternate adding some of the flour mix, then the chocolate mixture to the mixing bowl, back and forth, begining and ending with the flour. Mix on medium speed until the mixture is well incorporated and smooth.

  6. Add the 1 cup of whipped aquafaba to the cake batter and carefully fold it in with a rubber spatula until well incorporated but careful not to over mix.

  7. Prepare the cake pans by coating them with a thin coating of butter or spraying them with some cooking oil. Lightly dust the pan with flour and shake them out. Divide the batter between both pans and place on the middle oven rack. Bake cakes for 30-40 minutes. Cakes are done when a tooth pick inserted into the center comes out clean. Place cakes on a wire cooling rack and allow to cool completely before removing from pans.

  8. Prepare the orange frosting by beating the butter, vanilla, and organ zest on medium speed of you stand mixer or hand mixer. Beat in the powdered sugar and 2 or 3 teaspoon of juice from the orange until creamy and well incorporated. If it seems too thin you can add a little more powdered sugar.

  9. Prepare the chocolate frosting by beating the shortening, vanilla, and butter together on medium speed. Add the cocoa powder and powdered sugar and continue mixing unit smooth and everything is incorporated. Add a few drops of plant based milk if the frosting is too thick to get the desired, spreadable, consistency.

  10. Once cakes have cooled completely, turn them out onto the cooling rack and pop them in the fridge for about 30 minutes. The texture of this cake is a bit crumbly, so having it cold will help. CAREFULLY cut each chilled cake in half horizontally. I suggest leaving the cake on a flat surface and using a large knife cut through the center. Carefully lift the top layer and place it on a cake board or whatever plate you wish to serve the cake on. Take 1/3 of the orange icing and spread it on the first layer of cake Again it may seem extra crumbly just get the icing spread as evenly as you can. Repeat with remaining layers until all layers are frosted and stacked.

  11. Take 1/3 of the chocolate frosting and crumb coat the cake. This simply means you are spreading a thin layer of frosting on the cake, and are not worried that some crumbles are mixing in. Once again, this cake is a bit crummy, so crumb coating it is an important step. Pop the cake into the fridge until the frosting hardens, then evenly frost the cake with the remaining frosting.

  12. Store cake in an airtight container at room temp or I personally like to store this cake in the fridge. Slice to serve.B

If you like this recipe, try these:

Vegan Lime Mojito Cupcakes

Vegan Lime Mojito Cupcakes

TYPE META DESCRIPTION HERE

Vegan Triple Coconut Cheesecake

Vegan Triple Coconut Cheese Cake

I have tried a lot of vegan cheesecake recipes over the years and have had some hits and some misses.

What I have learned from all the different recipes I have tried, is that I do prefer to use cream cheese instead of cashews and that I really love the addition of chickpeas.

I also decided when I was creating this recipe to try and use some of the liquid left from the chickpeas and whip some fluffy aquafaba and fold that in. Partly because it was there and I didn’t want it to go to waste, and partly because I thought it would add a little lightness and lift to the recipe.

I also decided to use up the remaining whipped aquafaba to use as the topping for this vegan cheesecake. You can just as easily use a store-bought coconut whip if you prefer and save the extra aquafaba for a future recipe. It freezes really well!

I personally think this cheesecake recipe is really simple and super tasty. Its creamy and light, and full of coconut flavor! If you are feeling extra, you could top this cake with our vegan caramel or fudge sauce and skip the whip all together. No matter how you top it, I think you will love it!


INGREDIENTS:

You will need for this recipe:

  • a blender or food processor

  • 8 or 9 inch springform pan

  • aluminum foil

The Crust:

  • 1 1/4 cup graham crackers ( one full sleeve)

  • 3 tablespoons vegan butter, melted

  • 1/2 cup unsweetened coconut flakes or shredded coconut

  • 5 tablespoons white sugar

The Filling:

  • 2 (8 oz) containers vegan cream cheese ( we used Miyoko’s)

  • 1 (15 oz) can chickpeas ( drained but liquid reserved)

  • 1 cup white sugar

  • 1/4 cup tapioca starch

  • 7 (oz) or about half a can of full fat coconut milk or cream

  • 2 teaspoons vanilla extract

  • 1/2 teaspoon coconut extract (optional)

  • pinch of salt

  • 1 cup whipped aquafaba (made from reserved chickpea liquid)

*the cream cheese brand we used is pretty tangy. If using a milder cream cheese like Tofutti, then I suggest adding a few teaspoons of lemon juice to the recipe.

Toppings:

  • Leftover aquafaba plus 1/2 cup sugar (you could also used ready made coconut whipped topping)

  • 1/4 cup unsweetened coconut flakes or shredded coconut, toasted

Vegan Triple Coconut Cheese Cake

INSTRUCTIONS:

preheat oven to 350 degrees

  1. Begin preparing the crust by adding the graham crackers and coconut to a food processor or blender. Blend until the crackers and coconut are broken down to sandy consistency. I always do this in my food processor because it seems to work a little better. Add the butter and sugar to mixture and blend until well combined.

  2. Prepare a springform pan by wrapping the outside in a few sheets of aluminum foil. The cake will bake in a water bath so the goal is to make sure no water will seep through the cracks. Or you will be left with a sad, soggy cheesecake. Nobody wants that!

  3. Press the crust mixture evenly into the bottom of the pan. Pop the pan in the oven for about 10 minutes. Remove and allow the crust to cool. Reduce oven temp to 325 degrees.

  4. To prepare the aquafaba, add the liquid from the chickpeas to a stand mixer, or a large bowl if using an electric hand mixer. Add 1/4 teaspoon of cream of tarter or salt. Beat on high until the mixture resembles whipped egg whites and has formed stiff peaks.

  5. To prepare the filling, add the chickpeas, along with the coconut milk to your blender or food processor. Process until the mixture is completely smooth! Next add the remaining ingredients EXCEPT the whipped aquafaba and blend. Once the filling is completely mixed and creamy smooth, transfer to a large bowl. Take 1 cup of the whipped aquafaba and gently fold it into the mixture using a rubber spatula until it is fully incorporated.

  6. You can place the remaining aquafaba in the fridge and rewhip it later for the topping. If not using it for the topping it will keep in the fridge for a up to a week, or you can freeze it for later use.

  7. Pour the filling into the springform pan over the cooled crust. Place the spring form pan into a roasting pan or any other pan that you may have that is larger than the springform. I use a 12 inch cake pan. Fill the larger pan halfway with hot water. Carefully place the cake into the oven in the center rack. Allow cake to bake for 60-70 minutes.

  8. Allow the cake to cool on the counter, on top of a cooling rack, for 15 minutes before placing the inside the fridge for at least 5 hours to set.

  9. If using aquafaba as your whipped topping, remove from fridge. Add 1/2 cup of sugar and rewhip the mixture until stiff peaks form.

  10. Add the coconut to a small skillet over medium heat. Keep moving the coconut around the pan to avoid burning it. It will toast up golden brown in just a few minutes. Allow to cool.

  11. Top the cheesecake, still in the pan, with whipped topping and toasted coconut when ready to serve. Remove the ring from the pan and slice the cake to serve. Store leftovers covered in the fridge.

    If you like this recipe, try these:

Vegan Hummingbird Cake

Vegan Hummingbird Cake

Vegan Maple Spice Cake

Vegan Maple Spice Cake

Vegan Lemon Cupcakes with Cream Cheese Frosting

Vegan Lemon Cupcakes with Cream Cheese Frosting

vegan triple coconut cheesecake

Vegan Candied Pecan Maple Spice Cake

Vegan Candied Pecan Maple Spice Cake

I want to tell you a short story about how this cake is the product of a couple epic fails. One of those happy accidents, or maybe one of those Hail Mary passes in baking where you think you are done but give it one last shot, fingers crossed.

Why am I telling you this? Well in hopes of encouraging you. To let you know that even food bloggers have their fare share of kitchen disasters just like everyone else. And even though I bake all the time, and like to toot my own horn at veganizing just about any recipe I find that I want to try, sometimes I fail and fail hard.

I found a beautiful fall cake in a magazine that I could not wait to turn vegan. It never even crossed mind that it could go south the way it did.

Whenever adding fruit to a baked good you add moisture, and it does not always work in your favor. Long story short I ended up with three super dense, 9 inch pancakes instead of cakes.

I then came to the conclusion that I would not waist any more of my time on that cake and would just make a fall inspired spice cake for the delicious looking frosting in the original cake. It called for cool whip but I was convinced I could make a butter cream that was close. I was SO wrong.

Once again, certain fruits and butter cream only end in disaster. Thus the candied pecans stepped in, along with a maple butter cream, and I am not lying when I say this is now hands down my favorite cake on the website.

Its fluffy with the right amount of spice, the butter cream has a hint of maple and the candied pecans are the perfect sweet and salty crunch the cake needed. This cake would work beautifully for Thanksgiving or any fall gathering.

And remember, when a recipe seems like a failure, its not the end of the story. Just shake it off and keep baking. Something delicious may just come out of all the mess. Happy fall y'all !


Ingredients:

  • 2 1/2 cups all purpose white flour

  • 1 1/2 cups sugar

  • 1 tablespoon baking powder

  • 2 teaspoons ground cinnamon

  • 1/2 teaspoon nutmeg

  • 1/2 teaspoon ground ginger

  • 1 teaspoon salt

  • 1 1/4 cup aquafaba (whipped chickpea liquid, you are measuring out the WHIPPED aquafaba - not the liquid)

  • 1 cup oat or almond milk

  • 2 teaspoons vanilla extract

  • 1 1/4 cup vegan butter

Spiced Maple Buttercream:

  • 1/2 cup vegan butter

  • 1/2 cup shortening

  • 3 cups powdered sugar

  • 2 tablespoons maple syrup

  • 1-2 teaspoons cinnamon

  • 1 teaspoon ground nutmeg

  • 1 teaspoons vanilla extract

Candied Pecans:

  • 1 cup pecan halves

  • 2 teaspoons vegan butter

  • 2 tablespoon brown sugar

  • 1/2 teaspoon cinnamon

  • 2 teaspoons maple syrup

  • pinch of salt

Vegan Candied Pecan Maple Spice Cake

Instructions:

preheat oven to 350 degrees

  1. Prepare (2) 8 inch cake pans by first coating with a thin layer of vegan butter, then lightly dusting pans with flour.

  2. Prepare the aquafaba according to instructions. (follow link to recipe and instructions)

  3. In the bowl of your stand mixer, or a large bowl if using a hand mixer, whisk together all of your dry cake ingredients.

  4. Add the butter, and all of the milk into the dry ingredients. Cream on medium speed for a few minutes until completely smooth. Add vanilla and mix for a few more seconds.

  5. Next, with a spatula, gently fold in the aquafaba, careful not to over mix. You do not want to deflate the aquafaba. If you do, your cake will not be as fluffy.

  6. Evenly divide batter between the 2 prepared pans and bake cakes for 40 -45 minutes, or until a toothpick inserted in the center comes out clean.

  7. While the cakes are cooking, prepare the candied pecans by heating a small skillet on medium heat. Melt the butter, next adding the pecans, brown sugar, maple syrup, cinnamon, and salt. Lower the heat a bit and continue moving the pecans around the pan with a spoon while the sugar melts, and begins to get sticky. The nuts and sugar can burn quickly, so be sure to keep the pecans moving until the sugar becomes fully melted and looks like caramel. This can take between 5 and 10 minutes depending on the pan. Once pecans are done, pour them out onto a plastic cutting board or a piece of wax paper allowing them to cool, and the sugar to harden. Once they have cooled you can break them apart and into pieces. Set the pecans aside.

  8. Allow cakes to cool in the pans on a wire cooling rack for about 20 minutes.

  9. While cakes are cooling, prepare the frosting by mixing together the butter and shortening in your stand mixer or using an electric hand mixer. Add in the vanilla, spices, and maple syrup. Continue mixing until well incorporated. Slowly begin beating in the powdered sugar. If the frosting seems too stiff, add a few teaspoons of milk at a time until it has reached a spreadable constancy.

  10. Once cakes have cooled for 20 minutes, turn them out onto the cooling rack to cool completely. Once cakes are completely cooled, begin frosting by adding a layer of buttercream on one cake layer, and spreading evenly to the edges. Sprinkle half of the candied pecans evenly on the first layer. Place second cake layer on top and cover the cake with remaining buttercream and sprinkle with remaining candied pecans.

  11. Slice to serve. Store cake in an airtight container.

If you like this recipe, try these:

Vegan Coca-Cola Cake

Vegan Chocolate Peanut Butter Dream Cake

Vegan Lime Mojito Cupcakes

Vegan Candied Pecan Maple Spice Cake

Vegan Candied Pecan Maple Spice Cake

Vegan spice cake with maple frosting and candied pecans

Vegan Pumpkin Spice Monkey Bread

Vegan pumpkin spice monkey bread

It’s fall y’all, well maybe not here in Florida. We don’t actually get fall. We get summer, a little bit cooler summer, a month of “ summer winter”, and back to summer.

That being said, I tend to force the feeling in our house, and pretend there are actually leaves falling in crispy fall air by baking up all things autumn. That includes all things pumpkin.

I have attempted monkey bread several times with epic failure and then I discover my error was the dough. I had made all previous attempts with a biscuit type dough instead of a simple yeast dough. So I took our artisan bread dough recipe and jazzed it up a little, and it was like instant monkey magic.

I know there seems to be a lot of ingredients in this bread but most are staples in my house anyways. You will use almost one full can of pumpkin puree. This recipe seems complicated at first, but it’s not.

The hardest, or most time consuming part is rolling all the little dough balls, but if you have kids, this is your chance to have them help you in the kitchen. My kids love helping with this!

This bread is perfect to take to a pot luck or party because you literally just pull pieces off, no cutting required! Its sweet, nutty, gooey, and most importantly, it taste like fall! Even if you live in a place that doesn’t really offer you all of the seasons! So if you love monkey bread and fall flavors, this recipe is a must try! Pumpkin spice for life!


INGREDIENTS:

  • 6 cups all purpose flour

  • 1/2 cup plus 2 tablespoons pumpkin puree

  • 1 and 1/3 cup water

  • 1/3 cup sugar

  • 4 teaspoons active dry yeast

  • 1 teaspoon salt

  • 2 teaspoon cinnamon

  • 2 teaspoons pumpkin pie spice ( or you can add 1/2 teaspoon each nutmeg, allspice, ginger, and clove)

  • 2 teaspoons vanilla extract

Coating For Dough

  • 3 tablespoons vegan butter

  • 2 tablespoons pumpkin puree

  • 2 tablespoons maple syrup or agave

  • 3/4 cups sugar

  • 1-2 teaspoons cinnamon

  • 1/2 cup chopped pecans or walnuts

Glaze

  • 2 tablespoons pumpkin puree

  • 2 cups powdered sugar

  • 1 teaspoons cinnamon

  • teaspoon milk if you need to thin the mixture out some

Vegan pumpkin spice monkey bread

INSTRUCTIONS:

  1. In the bowl of stand mixer, add all of the ingredients for the dough. If you do not have a stand mixer, add all of the ingredients to a large bowl.

  2. Use a spoon to mix the ingredients together, well. If using a stand mixer, attach the dough hook and let the mixer run on medium speed for a few minutes to knead the dough. If mixing by hand, make sure are the ingredients are mixed well, then knead the dough by hand for several minutes on a clean floured surface. If you dough seems too dry and is not coming together you can add a few extra tablespoons of water, if it seems too sticky, add a few tablespoons of four.

  3. Place the dough in a lightly greased bowl and cover with plastic wrap or a kitchen towel. Place the dough in a warm place and allow it to double in size. This take about an hour.

  4. Coat an angle food cake, fluted pan ( a round cake pan with a hole in the middle. Not a bunt pan. you want smooth sides) with some vegan butter.

  5. Melt 3 tablespoons of butter, then add 2 tablespoons pumpkin puree, and 2 tablespoon maple syrup . Mix well. In a shallow dish combine the 3/4 cups of sugar and 1- 2 teaspoons of cinnamon. Once dough has risen pinch of pieces and roll golf ball size balls with the dough. Coat each ball in the butter, pumpkin mixture then roll them in the sugar and cinnamon. Place balls into the pan in a single layer. Sprinkle 1/4 cup of the chopped nuts over the first layer of dough, then repeat another layer of dough balls and cover with remaining nuts. You should have two layers of dough balls stacked into the pan.

  6. Cover the cake pan with a kitchen towel and allow the dough to rise once more. This should only take about half and hour.

  7. Preheat oven to 350 degrees. Place the pan on the center rack of the oven and bake for 30-35 minutes or until a cake tester or skewer inserted into the center of the bread comes out clean.

  8. Let the monkey bread cool for about 10 minutes on a wire cooling rack, then run a knife carefully around the edges. Flip the pan carefully onto a plate. Mix up the ingredients for the glaze and drizzle over the monkey bread. Serve warm or at room temperature.

  9. Store leftovers in an airtight container at room temperature or in the fridge.

If you like this recipe, try these:

Pumpkin Butter

Pumpkin Spice Vegan Pop-Tarts

Pumpkin Spice Cashew Creamer

Vegan pumpkin spice monkey bread

Vegan pumpkin spice monkey bread

Vegan Neapolitan Whoopie Pies

IMG_4817.jpg

Neapolitan has always been my favorite ice cream. It is a basic but delicious flavor combo.

I have also always loved a whoopie pie because it’s like the perfect marriage between and cookie and a cake, with just the right amount of forsting.

So when my daughter asked if we could make vegan neapolitan whoopie pies, the only answer was absolutely YES! We (pretty much just her, if I am being totally honest here) attempted a few batches to get the all of the flavors right and finally came up with a winner.

I am a fan of using freeze dried strawberries in baking. They can be ground up to powder so don’t add too much moisture to your bake or frosting like fresh strawberries or jam can. They also pack a pretty big punch of strawberry flavor, so a little goes a long way.

I also love that a whoopie pie travels better than a cupcake, making these the perfect treat to take to. a bbq, or pot luck.

So a big WOOPIE for one of my favorite vegan treats, and an awesome daughter who thought to bake them up. My stomach and heart are super grateful! Long live one of the best flavor combos to ever exist!


INGREDIENTS:

  • 2 3/4 cups all purpose flour

  • 1 teaspoon baking soda

  • 1 teaspoon baking powder

  • 1/2 teaspoon salt

  • 1 1/3 cup sugar

  • 1/2 cup vegan butter, room temperature

  • 2 teaspoons vanilla extract

  • 1 tablespoon tapioca or corn starch

  • 3 tablespoons water

  • 2/3 cups plant based milk, plus 3 tablespoons

  • 1/3 cup cocoa powder

STRAWEBERRY BUTTER CREAM :

  • 1/4 cup vegan butter

  • 1/4 cup shortening

  • 3 cups powdered sugar

  • 3 tablespoons freeze dried strawberry powder (we buy freeze dried strawberries and pop them into to a blender to turn them to powder)


INSTRUCTIONS:

  1. In a medium sized bowl whisk together flour, baking powder, baking soda, and salt.

  2. In a small bowl whisk the starch and 3 tablespoons of water.

  3. In a large bowl, using an electric hand mixer, or in the bowl of a stand mixer on medium speed, beat the butter, sugar and vanilla until light and fluffy. Add the starch and water mixture and mix until well combined.

  4. Reduce the speed on your mixer and slowly begin adding in the flour and 2/3 cups of milk, alternating adding a little of each at a time. Mix just until the ingredients are well combined.

  5. Scoop out half of the batter into a separate bowl. Add the cocoa powder and 3 tablespoons of milk to one half of the batter and mix until well combined.

  6. Line 2 baking sheets with parchment paper. Scoop 2 tablespoons sized scoops of dough into the parchment paper, leaving several inches between each mound. Wet your hands and smooth out the dough, forming them into a small disc shape, flattening them out a bit. You should have 12 vanilla and 12 chocolate cookies. Pop both cookie sheets into the fridge for about half an hour.

  7. In a large bowl beat the butter, and shorting for the frosting together. Beat in the strawberry powder, then begin adding in the powered sugar a little at a time to avoid a big mess. Beat until the frosting is smooth. If it seems too dry, you can a few drops of plant based milk. Set aside.

  8. Preheat oven to 400 degrees.

  9. Bake the cookies for 10-12 minutes. Remove from oven and allow to cool a bit before transferring them to a wire cooling rack. Allow the cookies cool completely.

  10. Pair up vanilla and chocolate cookies into a dozen pair. Divide the frosting evenly between the cookies, frosting and sandwiching them together to serve.

  11. Store in an airtight container at room temp or in the fridge.

If you like this recipe, try these:

Vegan Strawberry Lemonade Cupcakes

Vegan Chocolate and Peanut Butter Dream Cake

No Bake Vegan Strawberry Pie

IMG_4828.jpg

vegan neapolitan whoopie pies. Vegan vanilla and chocolate soft cookies with vegan strawebery butter cream

Vegan Cinnamon Sand Dollar Cookies

Vegan cinnamon sand dollar cookies surrounded by sea shells.

These adorable little vegan cinnamon sand dollar cookies are basically a summertime themed snickerdoodle!

We are parents to 3 girls and a 1 boy. This means we have watched the Little Mermaid and Finding Nemo approximately 9 gazillion times, and have hosted about seventy eleven mermaid/ocean themed birthday parties over the years. These cookies scream beach themed gathering!

They are pretty easy to make, they just require a little time to press all those almonds down into the dough! They bake up quickly and are super delicious to boot.

So if you need a beachy themed cookie for a party, or just want to whip up a batch for yourself because they are so cute and addictive, then we are here to serve.

And if you are stuck watching a the same mermaid or fish movie for the millionth time and just need something to break up the monotony of this phase of life, these should help. They won’t however help with the songs that are forever stuck in your head from said mermaid movies. Hey, I just make food, not miracles.


INGREDIENTS:

  • 3 cups all purpose flour

  • 1/2 teaspoon baking powder

  • 1/2 teaspoon salt

  • 1 cup vegan butter, softened

  • 1 cup powdered sugar

  • 1 cup granulated sugar, divided

  • 2 tablespoons tapioca starch, plus 6 tablespoons water

  • 2 teaspoons vanilla extract

  • 1 tablespoon ground cinnamon

  • slivered almonds


INSTRUCTIONS:

  1. Whisk together the flour, baking powder and salt in a medium sized bowl.

  2. Using a stand mixer or an electric hand mixer and a large bowl, cream together butter, powdered sugar, and 1/2 cup granulated sugar until light and fluffy. This will take a few minutes.

  3. Mix the tapioca starch and water together.

  4. Add starch mixture and vanilla to the butter sugar mixture and mix.

  5. Add in the flour and mix until well combined.

  6. Mix remaining 1/2 cup granulated sugar and cinnamon in a small bowl.

  7. Preheat oven to 350 degrees. Line 2 baking sheets with parchment paper.

  8. Scoop dough using a small cookie scoop or spoon ( around 2 teaspoons of dough) and roll into balls. Roll the balls in the cinnamon sugar mixture.

  9. Use the bottom of a glass to press the cookies out flat. It helps to spray the bottom of the glass with some cooking spray so they dough does not stick.

  10. Press 5 pieces of slivered almonds into each cookie to make a star shape.

  11. Bake cookies for 7-10 minutes, just until the edges seems done. Let cookies cool on the sheet for a few minutes then transfer to a cooling rack to finish cooling.

  12. Store cookies flat in an airtight container. This helps the almonds stay put! We stored them in a zip lock and it caused some of the almonds to fall out.

If you like this recipe, try these:

Vegan Ranger Cookies

Gluten Free Mexican Wedding Cookies

Dairy Free Oreo Truffles

A woman holding a vegan cinnamon sand dollar cookie

Vegan cinnamon sand dollar cookies

Vegan Gluten Free Mexican Wedding Cookies

Vegan Gluten Free Mexican Wedding Cookies

When I was a kids I used to beg my dad to buy me a bag of the Keebler Danish wedding cookies in the pink bag, every time we went to the grocery store. I am not sure if it was the pink bag, or the delicious little cookies inside, all covered in snowy powdered sugar.

Either way I loved them! I did not attempt making my own until I good and grown, and needed a Russian treat for an international school festival one of our kids attended. The Russian apple cake I fist attempted was an epic failure ( I forgot to add sugar, I’m and genius, I know) so In a pinch I turned to googling and found what seemed to be a Danish wedding cookie, but called a Russian tea cookie, but also commonly known as a Mexican wedding cookie.

Apparently this cookie goes by a lot of names, but I most often hear it called a Mexican wedding cookie, or snow ball. The cookies were so easy to make, a huge hit, and whatever you call the, rest assured they are amazing.

My awesome daughter was kind enough to bake up a gluten free batch recently for my Man Jong Club (I know, I am all over the place in this post, but y’all Mah Jong is SO FUN) so everyone could enjoy a treat. We used our favorite, fail proof, gluten free flour blend from the A Little Insanity website. It has worked in any recipe we have ever used it in, and is 100% worth your time to mix up a batch. Also, her site is great for all things allergy friendly and GF, so give it a gander!

You can also use regular all purpose flour in this recipe if you are not GF! It works just fine. So if you have been craving a vegan Danish, Mexican, Russian, Italian, tea, butter ball, snow ball, international cookie of mysterious origin, we have you covered, dipped, and rolled in powdery sugar goodness!


INGREDIENTS:

  • 2 1/2 cups gluten free flour blend (we use this one, it is hands down the best we have tried)

  • 1 cup vegan butter, softened

  • 1 cup powdered sugar, plus extra for rolling

  • 1 teaspoon vanilla extract

  • 1/2 teaspoon almond extract (optional)

  • 1/4 teaspoons salt

  • 1 cup almond meal ( ground up almonds)

Vegan Gluten Free Mexican Wedding Cookies

INSTRUCTIONS:

Preheat oven to 350 degrees

  1. In large bowl mix softened butter and sugar until creamy. Add in the vanilla and almond extracts and mix.

  2. Add in the dry ingredients and mix until well incorporated. The dough be dry but wet enough to hold the shape of a ball. You can find almond meal in the baking section of most stores now. It is NOT almond flour. It is more coarse. We normally just pop some almonds in a blender to make the meal.

  3. Line 2 baking sheets wth parchment paper. Using a small cookie scoop or a talbesppon, scoop dough and roll into balls. The cookies do not really spread, so you do not have to space them out too much.

  4. Bake for about 12-15 minutes, just until the cookies are starting to brown around the edges.

  5. Allow cookies to cool completely before rolling them in powdered sugar. If the cookies are even still warm it will cause the powdered sugar to cake up and melt on the cookies. So make sure they are totally cool.

  6. Store cookies in an airtight container.

If you like this recipe, try these:

Vegan ranger cookies

The Perfect Vegan Peanut Butter Cookie

Easy Vegan Fudge

**you can sub the same GF flour blend in these cookie recipe. We have done it and it works great!

Vegan Gluten Free Mexican Wedding Cookies cut in half

vegan gluten free mexican wedding cookies

Vegan Marshmallow Cream Cheese Fruit Dip

Vegan marshmallow cream cheese fruit dip surrounded by strawberries, grapes, blueberries, and apples.

I have a friend named Shannon who is just about perfect. She is for sure the perfect hostess, and ever since I have known her (which has been forever) she could host a perfect party with her eyes closed.

It was at one of her many gatherings a million years ago that I first had marshmallow fluff cream cheese fruit dip. I had no idea what I was eating, I just knew I could not stop eating it.

This is saying a lot for me because I will always choose a veggie plate over a fruit plate, every single time. I like fruit just fine, but I like dip more, and veggie trays normally involve dip. So give me a dip for my fruit and its a game changer.

I have not eaten this dip in years or even thought about it since going vegan. That is until we were trying to plan snacks for our daughters princess themed third birthday party, and I need a “grey stuff” from Beauty and the Beast. Suddenly I remembered the marshmallow cream cheese dip, and realized that I could use sweet aquafaba whip in place of marshmallow fluff! It worked y’all, and I actually had to refill the bowl of dip during the party.

Also, you can dye it any color with a few drops of food color, in case you ever need some “grey stuff, its delicious, don’t believe me, ask the dishes. And thanks again Shannon for being an amazing friend all these years, for hosting the best parties, and for making this dip a gazillion times so I could stuff my face with all the fruits!


INGREDIENTS:

  • 2 cups Sweet Aquafaba Whip

  • 8 oz container of vegan cream cheese, we used Kite Hill

  • 1/2 teaspoon vanilla extract


INSTRUCTIONS:

  1. Make Sweet Aquafaba Whip according to instructions. You will have a good bit leftover, but could use it to make meringues, or store in the fridge for later to use as whip cream.

  2. Beat cream cheese with an electric hand mixer or briskly stir it with a fork to soften it up. Using a plastic spatula, fold in the 2 cups of sweet aquafaba whip and 1/2 teaspoon of vanilla extract, just until everything is well incorporated.

  3. Serve with fruit, vegan graham crackers or cookies.

  4. I prefer to serve immediately just because the aquafaba will break down some once stored in the fridge. This dip does hold up better than the whip does on its own, and I have eaten the leftover dip the next day without it being weird or liquidly.

If you like this recipe, try these:

Vegan Caramel Sauce

Vegan Fudge Sauce

Grilled Peaches with Maple and Vegan Ricotta

A strawberry being dipped in vegan marshmallow cream cheese fruit dip

vegan marshmallow cream cheese fruit dip

Vegan Strawberry Lemonade Cupcakes

Vegan strawberry lemonade cupcakes

We have 4 kids, so we bake a lot of cupcakes. I mean who doesn’t love cupcakes. They are quicker to bake than a whole cake, and always my preference for birthday parties and gatherings.

This summer we seem to be stuck on a fruity cupcake kick. Our 13 year old daughter is an amazing baker and love thinking up new cupcake flavors. Recently we decide to take two of our favorite cupcake flavors, strawberry and lemon, and combine them!

These Vegan Strawberry Lemonade Cupcakes are not just delicious, but also pretty adorable with the little straw poking out of the top! We prefer to use freeze dried strawberries in this recipe because they pack a punch of strawberry flavor without adding too much extra liquid to the cupcake like fresh strawberries can. You can normally find these strawberries where you find other dried fruits or fruit and nut snacks in your local grocery store.

So if you are celebrating a birthday, holiday, or just the fact that its summer, these cupcakes are the perfect sweet treat for any occasion! And I promise nobody will ever even guess they are vegan!


INGREDIENTS:

  • 3 cups all purpose flour

  • 2 cups white sugar

  • 1 1/2 teaspoons baking powder

  • 1 teaspoon baking soda

  • 1/2 teaspoon salt

  • 2/3 cups lemon juice (about 4 lemons)

  • zest from 2 lemons

  • 3 tablespoons crushed, freeze dried strawberries

  • 2 cups plant milk (I like to bake with oat milk)

  • 1/2 cup melted vegan butter

  • 1 teaspoons vanilla extract

  • fresh strawberries for garnish

Frosting:

  • 1/2 cup vegan butter

  • 1/2 cup shortening

  • 5-6 cups powdered sugar

  • zest from 1 lemon

  • juice from 1/2 lemon

  • 1 teaspoon vanilla extract

  • 2 tablespoons crushed, freeze dried strawberries


INSTRUCTIONS:

PREHEAT OVEN TO 350 DEGREES

  1. In a large bowl, whisk together dry cake ingredients. In a smaller bowl, whisk together the wet ingredients. We put the strawberries into a blender and blend until they are powdery.

  2. Combine the wet ingredients into the dry and mix until well combined.

  3. Line a muffin tin with 24 cupcake liners. We actually have a tin that holds 2 dozen cupcakes, but if yours holds 1 dozen, you will need to bake in batches.

  4. Fill the cups 3/4 of the way full. Bake for 25 to 30 minutes or until a toothpick inserted in the middle of one of the cupcakes comes out clean.

  5. Allow the cupcakes to cool completely.

  6. In a stand mixer, or using a hand mixer, cream together the butter and shortening. Add in the vanilla, lemon juice and lemon zest. Begin adding the powdered sugar a little at a time and beat it in until the frosting is the desired stiffness. Divide frosting in half. Beat in the crushed strawberry powder into one half of the frosting.

  7. Fill a piping bag with half lemon frosting and half strawberry side by side. We do this by laying out a piece of plastic wrap. Scoop equal amounts of frosting side by onto the wrap. Roll the plastic wrap into a log shape. Twist both ends. Cut one end of place the plastic wrap, then place the log with the cut end side down into a piping bag fitted with a large piping tip. Pipe frosting onto cooled cupcakes in a swirl pattern, and garnish with a piece of fresh strawberry and small paper straw if you like ( we cut a regular straw into 4 pieces to garnish the cupcakes) This video shows a different method of piping 2 different frostings. You can use which ever one you find easier! https://www.youtube.com/watch?v=mUawMYKM29E

  8. Store cupcakes in an airtight container at room temp or in the fridge. I like to store them in the fridge until I am ready to serve just because we live in Florida and I don’t like the frosting getting too soft since its always, ALWAYS hot here!

Serves 24.

If you like this recipe, try these:

Vegan Lime Mojito Cupcake

Vegan Lemon Cupcakes with Cream Cheese Frosting

Vegan No Bake Strawberry Pie

vegan strawberry lemonade cupcakes

Vegan strawberry lemonade cupcakes

Vegan Hummingbird Cake

Hummingbird Cake

I can remember very vividly the first slice of Hummingbird cake I ever ate. I was at the hospital waiting on my best friends daughter to be born and decided I needed a cup of coffee from the coffee cart. The cart also sold cake and I always need cake, sooooo. At first I thought the cake was a carrot cake so I just pointed to it and asked for slice.

Well, it was not carrot cake and I was in love from the first bite. I ran back over to a ask what I was eating to learn it was actually a Hummingbird cake. I had never in all my southern life eaten a hummingbird cake. I had to google it to figure out what is in it. It definitely looks carrot cake-esq. Instead of carrots it has crushed pineapple, and bananas to keep it nice and moist, and pecans and coconut for some crunch.

Cream cheese frosting has always been my favorite on just about any cake, and this is no exception. This cake reminds me of summer and It will forever remind me of the day sweet Teegan was born.

This classic southern cake is not hard to veganize either. We used starch and aquafaba to replace the eggs, vegan butter, and vegan cream cheese. It’s that easy and so delicious! Also, no actual hummingbirds were harmed in the making of this cake. You can rest easy!


INGREDIENTS:

You will need 3, 8 inch round cake pans, and parchment paper for this recipe

  • 3 cups all purpose flour

  • 2 teaspoons ground cinnamon

  • 1 teaspoon baking soda

  • 1 teaspoon baking powder

  • 1 teaspoon salt

  • 1/2 teaspoon allspice

  • 1/2 teaspoon nutmeg

  • 3 tablespoons tapioca or corn starch

  • 1/2 cup water

  • 2/3 cup brown sugar

  • 1 1/2 cups sugar

  • 1 1/2 cups whipped aquafaba

  • 2 teaspoons vanilla extract

  • 3/4 cup neutral tasting oil like grape seed or canola

  • 2 cups mashed bananas (5 - 6 small to medium bananas)

  • 1 can crushed pineapple (8 oz), drained

  • 1/2 cup chopped pecans

  • 1/2 cup shredded coconut

CREAM CHEESE FROSTING:

  • 3/4 cup vegan cream cheese

  • 1/2 cup vegan butter

  • 5 cups powdered sugar

  • 1 teaspoon vanilla

  • pinch of salt


INSTRUCTIONS:

Preheat oven to 350 degrees.

  1. Whisk together flour, salt, cinnamon, baking powder, baking soda, all spice, and nutmeg in a large bowl.

  2. Make aquafaba according to directions. Set aside.

  3. Mix 1/2 cup of water with three tablespoons of starch. Beat the starch, sugar, brown sugar, and vanilla together in a large bowl. Add the oil. Next beat in the bananas and pineapple until the bananas are good and mashed up, and everything is well combined.

  4. Fold the dry ingredients into the wet ingredients, just until everything is nice and evenly incorporated.

  5. Stir in the nuts and coconut.

  6. Lastly, fold the whipped aquafaba into the batter, just until it is incorporated. Try not to over mix it.

  7. Prepare all three cake pans by coating each pan with butter. Line each pan with a 8 inch circle of parchment paper. Just trace a circle onto the parchment using the bottom of the pan as your guide, cut it out, and place into the the bottom of each pan. Coat the parchment in butter as well, then add a little flour to each pan to coat, shaking out any excess flour. Divide the batter evenly between the three pans.

  8. Bake cakes for 25 - 30 minutes, or until a cake tester or skewer inserted in the middle comes out clean. Allow cakes to cool for about 15 - 20 minutes in the pans. Turn them out onto wire cooling racks to finish cooling.

  9. While the cakes are cooling prepare the frosting by beating the cream cheese and butter together in a stand mixer, or in a large bowl using an electric hand mixer. Add in the vanilla, then slowly beat in the sugar and salt until you have the desired consistency. You need the frosting on the stiffer side to keep the cakes from sliding apart.

  10. Once cakes have completely cooled, divide the frosting into thirds. Frost the first layer and sprinkle with a thin layer of extra pecans if you have any leftover. Top with the next layer, frost, and add a thin layer of leftover coconut. Add the top layer and frost. You can top the cake with more nuts, or nuts and coconut. You do not have to add nuts and coconut between the layers, we just prefer to do so if we have leftovers.

  11. Slice and serve. Store any leftovers in the fridge. This just keeps the cream cheese from getting too soft.

If you like this recipe, try these:

Vegan Chocolate Mint Cookie Cake

Vegan Lemon Pound Cake

Vegan Lime Mojito Cupcakes

A piece of Hummingbird Cake

vegan hummingbird cake with coconut, pecans, banana,and pineapple. Topped with vegan cream cheese frosting

Vegan Coca-Cola Cake

Vegan CoCola Cake with a scoop of vanilla ice cream.

So, for many, many years of my life, eating at Cracker Barrel was a road trip staple. Actually, since I was a kid, eating at Cracker Barrel was just a regular thing, road trip or not. I mean, they have candy, toys, audio books , scented candles, and delicious southern food! Also, they bring you biscuits AND corn muffins with your meal. It’s a dream really.

Even as a non vegan kid, I could have lived off of their vegetable plate! On the rare occasion where I didn’t need to unbutton my pants just to breath after my dinner, I would order my all time favorite dessert, fudgy Coca-Cola Cake!

I mean y’all, its a chocolate cake baked with COKE! My husbands nana used to make a chocolate cake where you poured the frosting onto the cake and it hardened on top and tasted like fudge, I think this is just a southern thing. This frosting is kind of like that. You spread it onto a warm cake so it melts, then hardens back up to perfection.

Veganizing this classic cake isn’t hard to do. We used starch in place of the eggs, swapped butter, chocolate, and milk for plant based versions, and tada!!!!!

Now my kids get to know about this magic, too! I know, I know, this cake is not even remotely good for you, but sometimes you gotta compromise your otherwise healthy ways and eat cake, vegan chocolate coca-cola cake! Just trust me here!


INGREDIENTS:

  • 2 cups all purpose flour

  • 2 cups white sugar

  • 1 teaspoon baking soda

  • 2 teaspoons baking powder

  • 3/4 cups cocoa powder

  • 2 tablespoons tapioca or corn starch

  • 6 tablespoons water

  • 1 1/4 cup Coca-Cola

  • 1/2 cup vegan butter

  • 1/2 cup oil like grape seed or canola

  • 1/2 cup plant based milk plus 1 teaspoon vinegar

  • 2 teaspoons vanilla

CHOCOLATE FROSTING:

  • 3 cups powdered sugar

  • 1/2 cup vegan butter

  • 1/4 cocoa powder

  • 1/4 cup vegan chocolate chips, plus 1 teaspoon butter

  • 1/4 cup Coca-Cola

  • 1 teaspoon vanilla

Vegan CoCola Cake Bite

INSTRUCTIONS:

Preheat oven to 350 degrees

  1. Whisk the starch and 6 tablespoons of water together in a small bowl.

  2. In a medium size sauce pan, over medium heat, add the butter, sugar and coke. Let mixture simmer until the sugar and butter have melted.

  3. Add the milk and vinegar together in a cup and let the mixture sit for a few minutes.

  4. Mix all of the remaining dry ingredients together in a large bowl. Pour in the heated coke mixture, oil, milk , vanilla, and starch mixture. Mix until well combined.

  5. Spray an 9x13 cake pan or pyrex with some oil. Pour batter into the pan and bake for 25-30 minutes or until a cake tester or tooth pick inserted into the center comes out clean. Remove from oven. Begin making the frosting. The cake still needs to be warm when you frost it!

  6. Start the frosting by adding the chocolate chips and 1 teaspoons of butter to a microwave safe container. Microwave for 30 seconds, then stir. Repeat until the chocolate has melted.

  7. Using a stand mixer or large bowl and electric hand mixer, add the melted chocolate, cocoa powder, vanilla, butter, and mix until everything is well incorporated. Begin alternating adding a little coke, then a little powdered sugar at a time. This helps with avoiding a big mess. Mix until creamy and smooth.

  8. Spread the frosting over a still warm cake and let cool before slicing into squares . The frosting will melt then re-harden as it cools. Store covered at room temperature.

  9. Serve with dairy free vanilla ice cream.

If you like this recipe, try these:

Chocolate Peanut Butter Dream Cake

Nostalgic Vegan Ice Cream Cake

Vegan Coconut Chocolate Blondie Skillet Sundae

Vegan Cocola Cake

vegan chocolate coca-cola cake

Vegan Meringue Cake with Sweet Lemon Ricotta and Berries

Vegan Pavlova

Pavlova cake is named after the Russian Ballerina, Anna Pavlova, from her time touring in Australia and New Zealand. Supposably, a chef at the Wellington hotel created the cake for the dancer, claiming it reminded him of her tutu!!

Because I adore ballet, and adore meringue, it only seemed logical we try to veganize this classic dessert.

Well like a lot of things I things I try and veganzie, this one took many attempts and the result wasn’t exactly like I had imagined, but eventually we got a cake we were happy with. Even though I could not quite get the marshmallow center I wanted, I got a delicious meringue cake, and I can live with that!

Traditional Pavlova is made with egg white meringue that is marshmalllowy inside. In this vegan version is we use sweet, whipped, aquafaba to replace the eggs and made a drier meringue to help hold its shape.

The result is a perfectly, light, delicate meringue cake, filled with sweet lemon tofu ricotta and fresh berries.

This cake requires patients as it takes a long time to bake and dry out. I promise it’s worth every minute it takes. This vegan Pavlova makes for the most impressively beautiful, light, and delicious dessert and will surely impress anyone who tries it!


INGREDIENTS:

  • Liquid from 1 can of chickpeas

  • 1 1/2 cups powdered sugar

  • 1/4 teaspoon cream of tarter

  • 1/2 teaspoon apple cider vinegar

  • 1 tablespoon tapioca starch

  • 3-4 cups mixed berries, strawberries, blueberries, black berries, or raspberries

  • Fresh mint for garnish

LEMON RICOTTA :

  • 1 block extra firm tofu

  • Juice from 1 lemon

  • Zest from 1 lemon

  • 1/4 cup maple syrup, or a few tablespoons agave


INSTRUCTIONS:

Preheat oven to 275 degrees

  1. Add chickpea liquid, powdered sugar, cream of tarter, vinegar, and tapioca starch to a stand mixer, and mix on medium speed for about 10 minutes or until a very stiff meringue has formed. If you need to use a hand electric mixer, add all ingredients to a large bowl and mix by hand until a stiff meringue has formed, don’t give up. It takes a while but will come together.

  2. Prepare 2 baking sheets by covering in parchment paper. Draw an 8 inch circle on each sheet of parchment then flip the sheet over. Divide the meringue between the 2 circle. Spread the meringue evenly to fit the circles using the back of a spoon.

  3. Bake the Pavlova for 2 1/2- 3 hours or until you can insert a tooth pick or cake tester into the center and the meringues are dry. Remove from the oven to cool completely. (ours took 3 hours but bake times will vary depending on ovens)

  4. Add the tofu, lemon and maple syrup to a food processor or high speed blender, and process until completely smooth.

  5. Divide the tofu ricotta in half. Lightly spread half of the ricotta over one of the meringues. Thinly slice some strawberries and evenly spread them over the ricotta. You can add some tother berries as well, just nestle them into the ricotta.

  6. Place the second meringue on top of the first. Add the other half of the ricotta to the center of the meringue and spread it out a little. Pile up the remaining fruit on top of the ricotta. Garnish with mint.

  7. Serve immediately. The liquid from the ricotta and fruit will eventually break down the meringues. If you wish to bake the meringues and serve later, store them in an airtight container and add ricotta and fruit when ready to serve. Any moisture in the air will cause the meringues to get sticky and they will no longer be dry and flakey, the way you want them to be. Storing them in an airtight container is essential!

  8. Slice to serve.

If you like this recipe, try these:

No Bake Vegan Strawberry Pie

Southern Vegan Strawberry Shortcake

Sweet Aquafaba Whip

Vegan Pavlova cut on a plate

vegan meringue cake with sweet lemon tofu ricotta and fresh berries

No Bake Vegan Strawberry Pie

no-bake-vegan-strawberry-pie.jpg

Easy desserts are my favorite desserts! This no bake strawberry pie is so easy and perfect for summertime entertaining, or a quick sweet treat.

We made the filling with tofu and you would never know! Its sweet, creamy, and packed with strawberry flavor thanks to using freeze dried strawberries that pack a punch of flavor.

We used vanilla sandwich cookies for the perfect simple crust, and topped the pie with easy sweet aquafaba whip.

This dessert is light and fluffy, sweet, and super simple! Just mix it all up, pop it in the fridge, and you will be eating pie before you know it, without ever having to turn on your oven!


INGREDIENTS:

  • 1 block extra firm tofu

  • 26 vegan vanilla sandwich cookies

  • 2-3 tablespoons softened vegan butter

  • 1 1/2 cups freeze dried strawberries

  • 3/4 cups powdered sugar

  • 1 teaspoon vanilla extract

  • 2 tablespoons refined coconut oil

  • juice from 1/2 lemon

  • 1 batch Sweet Aquafaba Whip

no-bake-vegan-strawberry-cream-pie-pan.jpg

INSTRUCTIONS:

  1. Place cookies in a food processor or high speed blender, and blend until the cookies are totally broken down into a crumb consistency.

  2. Mix butter into the cookies crumbs. You want softened, not melted butter. The mixture should stick together when pressing into a pie pan. If using double stuffed sandwich cookies, you will need less butter. If using original, you will need more.

  3. Press the cookie mixture evenly into a pie pan.

  4. Drain tofu, but you do not need to press it.

  5. In a food processor or high speed blender, add the tofu, powdered sugar, strawberries, oil, lemon, and vanilla. Process until the mixture is creamy and smooth.

  6. Transfer the strawberry mixture in to the pie crust, and pop in the fridge for a few hours to allow the crust and filling to set a bit. The butter in the crust and the oil in the pie will help firm the pie up once chilled.

  7. Prepare Sweet Aquafaba whip according to instructions, and top pie with the whip before serving. You can dust some crushed up freeze dried strawberries over the whip for garnish or garnish with fresh or freeze dried strawberries. Store leftovers in the fridge for a day or two.

If you like this recipe, try these:

Vegan Lime Mojito Cupcakes

Southern Vegan Strawberry Shortcake

Matcha White Chocolate Peanut Butter Cups

no-bake-vegan-strawberry-cream-pie-whole.jpg

Easy no bake vegan strawberry cream pie, with sweet aquafaba whip

Vegan Coconut Chocolate Blondie Skillet Sundae

A closeup of the ice cream on a Vegan Coconut Chocolate Blondie Skillet Sundae

I waited tables for years durning college at Chili's. You know “I want my baby back, baby back….” that Chili’s.

One of our most popular desserts at the time was something called the Paradise Pie. It was basically a chocolate coconut blondie in a cinnamon buttery skillet, topped with ice cream, caramel, and fudge sauce, sprinkled in chopped nuts.

How many of these did I eat over the years I worked there? I would honestly hate to know the real number. Lets just say A LOT, because they are addictive. My husband (who also spent some time waiting tables there) and I were talking about this glorious dessert the other day with our kids and decided it had to be veganized. They had to know the glory and wonder of this perfect dessert.

The 13 year old baking wonder had already perfected an amazing vegan blondie recipe, so I had her add coconut and chocolate chips and a graham cracker crust. The result was perfection and tasted just like I remembered it. Mind you it has been a gazillion years at least since I have had the real thing. We topped it with vanilla ice cream and our easy vegan caramel and fudge sauce recipes, and ate ourselves sick.

The kids were fans for sure, and my husband and I were more than excited!

If you have had a Paradise Pie, then you know! If not, then let me urge you to blow your diet on this! You might regret it a little, but will probably get over it pretty fast.

Also thanks Chili’s for helping me pay my rent through college and for all the friends I made working there, that I am still friends with to this day. Lets share a vegan Paradise Pie the next time we get together!


INGREDIENTS:

  • 1 cup melted vegan butter

  • 2 cups brown sugar

  • 2 egg replacers (powdered or flax egg)

  • 2 teaspoons vanila extract

  • 2 cups all purpose flour

  • 1 teaspoon salt

  • 1/2 cup mini vegan chocolate chips

  • 1/3 cup shredded coconut

  • 1 sleeve graham crackers

  • 3 tablespoons melted butter

  • 1 batch vegan fudge sauce

  • 1 batch vegan caramel sauce

  • plant based vanilla ice cream

  • 1/4 cup chopped walnuts

  • 2 tablespoons butter mixed with 1 teaspoon cinnamon (for the skillet)

A bite of Vegan Coconut Chocolate Blondie Skillet Sundae on a spoon

A bite of Vegan Coconut Chocolate Blondie Skillet Sundae on a spoon

INSTRUCTIONS:

Preheat oven to 350 degrees

  1. Place graham crackers in a blender or food process and pulse until they are finely ground to a sandy consistency. Mix in the 3 tablespoons of melted butter. Press the mixture into a 8x8 baking pan and bake for 10 minutes.

  2. While the crust is baking, mix the sugar with the melted butter, and vanilla. Mix in the flour and salt until well combined. Stir in the coconut and chocolate chips.

  3. Pour batter over the graham cracker crust and bake for 45 minutes to 1 hour on the middle oven rack. The blondies will seem a little gooey and soft even once they are done, but will firm up once cooled.

  4. Allow blondies to cool before cutting.

  5. Place the butter and cinnamon mixture in an iron skillet. You can use a small casserole dish as well if you do not have a skillet. Pop the skillet into the oven and let the butter melt. Place 4-5 blondies in the skillet and pop back in the oven for about 5 minutes.

  6. Remove from oven and top with 3-4 scoops of ice cream, fudge sauce, caramel sauce, and chopped walnuts.

  7. Serves about 4. You can always add more blondies and more toppings to the skillet to serve more.

If you like this recipe, try these:

Nostalgic Vegan Ice Cream Cake ( Dairy Queen)

Vegan Southern Strawberry Shortcake

TYPE META DESCRIPTION HERE

Easy Vegan Fudge Sauce

Vegan fudge sauce dripping from a spoon

If I am being perfectly honest, I just want to pour this vegan fudge sauce over everything in my kitchen.

Fruit, ice cream, pretzels, vegan marshmallow….we dip cookies in it, pour it over our skillet blondies, use it in our veganized Dairy Queen Classic Ice Cream Cake, and eat it by the spoon full right out of the fridge.

I say this sauce lasts about a week in the fridge, but how would I know, really? It has never lasted more than a few days in my house, so that is honestly a guess.

We made this fudge sauce full fat coconut milk, coconut oil, chocolate chips, and corn syrup so its extra thick and rich. Just the way it should be!!

This vegan fudge sauce is gooey, creamy, thick, chocolatey perfection! You may just want to go ahead and double the batch. You know, one batch for you, one for everyone else.


INGREDIENTS:

  • 3 tablespoons white sugar

  • 1/2 cup light corn syrup

  • 1/4 cup dark cocoa powder

  • 1 cup chopped vegan dark chocolate or chocolate chips

  • 2/3 cups full fat coconut milk

  • 1 teaspoon vanilla extract

  • 1/3 cup coconut oil


INSTRUCTIONS:

  1. Add all ingredients expect chopped chocolate and vanilla to a medium size sauce pan.

  2. Heat over medium heat until the sugar has melted and the mixture has come to a simmer.

  3. Mix in the chopped chocolate and vanilla. Stir unit the chocolate has melted and the fudge is smooth and creamy.

  4. Allow to cool before transferring to an airtight container. Store in the fridge for about a week.

If you like this recipe, try these:

Nostalgic Vegan Ice Cream Cake (Dairy Queen)

Vegan Caramel Sacue

Easy vegan chocolate fudge sauce

Vegan Caramel Sauce

Vegan Caramel Sauce drizzled on pumpkin bread pudding.

Vegan caramel sauce is so easy make, and so delicious.

We have tried many methods over the years and have settled on this recipe that is a combo of some of our favorite attempts.

This vegan caramel sauce is thick and gooey, with a hint of salt and cinnamon. We used full fat coconut milk so its extra rich and creamy plus some starch to make sure its plenty thick!

Its perfect for topping bread puddings, cakes, ice cream, brownies, anything you can think of. It even makes a delicious coffee drink drizzle.

You can whip up a batch in not time, and keep in the fridge for those late night bowls of ice cream, or dip one of our vegan churro ice cream sandwiches in it. Hey, I’m not judging, I’m right there with you. Caramel makes the worst day better!


INGREDIENTS:

  • 1 cup full fat coconut milk or cream (the kind in a can, shaken well)

  • 3/4 cups brown sugar

  • 1 teaspoon vanilla extract

  • pinch of salt

  • 2 teaspoons tapioca or corn starch

  • 1 teaspoon cinnamon (optional)


INSTRUCTIONS:

  1. Place brown sugar and starch in a medium size pot over medium heat, and allow it to cook while whisking for about a minute.

  2. Reduce the heat to low and add the coconut milk, salt and cinnamon.

  3. Whisk and Simmer for about 15 minutes until the caramel begins to thicken and sticks to the back of the spoon. Stir in the vanilla and allow to cool.

  4. Store in an airtight container in the fridge.

If you like this recipe, try these:

Vegan Lemon Curd

Vegan Churro Ice Cream Sandwiches

Chocolate. Peanut Butter, Banana “Nice Cream”

The Pumpkin Spice Bread Pudding featured in this picture is available in our Fall and Winter Holiday Menu E-Book. This E-book is a full holiday menu complete with 34 recipes including a main dish, sides, desserts, and cocktails.

Easy vegan caramel sauce with coconut cream and cinnamon

Vegan Lime Mojito Cupcakes

An array of vegan mojito cupcakes garnished with mint and a lime

One of my all time favorite cocktails is a minty lime mojito.

They are truly the perfect refreshing summertime drink! So we decided why not turn our favorite drink into a deliciously fresh cupcake, no booze required.

It’s the best of both worlds, and even those who do not drink alcohol can enjoy these perfectly soft lime cupcakes toped with minty lime buttercream.

These vegan mojito cupcakes are so tasty, and pretty cute too! They would be perfect for a wedding or baby shower, or a summer BBQ served with a nice tall, ice cold mojito!

I mean I can totally get behind eating a delicious mojito cupcake while sipping my favorite cocktail or mocktail. Seems like a no brainer, really. So cheers to summer, and cheers to mojitos making not only a delicious drink, but darn good cupcake, too!


INGREDIENTS:

  • 3 cups all purpose flour

  • 2 cups white sugar

  • 1 1/2 teaspoons baking powder

  • 1 teaspoon baking soda

  • 1/2 teaspoon salt

  • 2/3 cups lime juice

  • zest from 2 limes

  • 2 cups plant milk (we like to bake with oat milk)

  • 1/2 cup melted vegan butter

  • 1 teaspoons vanilla extract

  • extra lime wedges, and mint leaves for garnish.

  • optional: paper straws for decoration

MINTY LIME BUTTERCREAM:

  • 1/2 cup vegan butter

  • 1/2 cup shortening

  • 5-6 cups powdered sugar

  • 1 teaspoon vanilla

  • zest from 1 lime

  • juice from 1/2 lime

  • 1-2 tablespoons finely diced mint leaves.

An overhead look of vegan mojito cupcakes.

INSTRUCTIONS:

PREHEAT OVEN TO 350 DEGREES

  1. In a large bowl, whisk together dry cake ingredients. In a smaller bowl, whisk together the wet ingredients.

  2. Combine the wet ingredients into the dry and mix until well combined.

  3. Line a muffin tin with 24 cupcake liners. We actually have a tin that holds 2 dozen cupcakes, but if yours holds 1 dozen, you will need to bake in batches.

  4. Fill the cups 3/4 of the way full. Bake for 25 to 30 minutes or until a toothpick inserted in the middle of one of the cupcakes comes out clean.

  5. Allow the cupcakes to cool completely.

  6. In a stand mixer, or using a hand mixer, cream together the butter and shortening. Add in the vanilla, lime zest, juice, and mint. Begin adding the powdered sugar a little at a time and beat it in until the frosting is the desired stiffness.

  7. Pipe or spread frosting onto cooled cupcakes and garnish with a wedge of fresh lime, and mint leaves. We also quartered paper straws and used these for decoration.

Serves 24.

If you like this recipe, try these:

Vegan Lemon Cupcakes with Cream Cheese Frosting

Vegan Chocolate Mint Cookie Cake

Southern Vegan Strawberry Shortcake

A closeup of vegan mojito cupcakes

Vegan minty lime mojito cupcakes. Soft lime cake topped with minty lime vanlla vegan buttercream.

Southern Vegan Strawberry Shortcake

Southern strawberry shortcake a la mode garnished with mint

I had always eaten strawberry shortcake on angel food cake, or short bread. I would imagine this is how most people have eaten it.

That is until I began waiting tables in college, and the restaurant where I worked served it on fluffy biscuits.

My mind was blown, y’all. How was I raised in the south, and nobody in my family ever thought to do this. From that point on, it has been the ONLY way I want to eat strawberry shortcake.

Trust me when I tell you that you will probably be swayed as well.

We started with our fluffy southern vegan biscuit recipe, used our sweet aquafaba whip, some vegan vanilla ice cream, and topped it all with a quick strawberry compote. You could even up your game and add vegan strawberry ice cream in place to the vanilla.

You are a grown person, and you can do WHATEVER THE HECK YOU WANT TO DO!!! I mean, as long as its legal! You know what I am saying…

This southern vegan strawberry shortcake is seriously heaven on a plate!! So y’all, go make bake up a batch of biscuits right this minute and get ready to be real happy!


INGREDIENTS:


INSTRUCTIONS:

  1. Prepare biscuits according to recipe.

  2. Prepare Sweet Aquafaba Whip according to instructions. You can rewhip any leftovers easily, or bake up meringues with it!

  3. Add frozen strawberries and sugar to a medium sized pot over medium heat. Once the strawberries are melted, lower the heat and let the mixture simmer for about 15 minutes stirring often. You want the strawberries broken down and a strawberry syrup to form in the pot. Let cool for 10 minutes.

  4. To serve, slice biscuits in half and place on a plate. We normally use 1 and 1/2 biscuits per serving. Scoop some strawberries on top of the biscuits. Add a scoop of ice cream and a dollop of sweet aquafaba whip. Drizzle with more strawberries.

Serves 4-6


Overhead view of a souther strawberry shortcake a la mode, garnished with mint.

vegan strawberry shortcake with fluffy southern vegan biscuits