Sides

Easy Vegan Macaroni Salad

IMG_1642.jpg

I never ate at lot of macaroni salad growing up.

My dad would sometimes buy it from the deli, and on the rare occasion I did eat it, I loved it.

It’s sweet, creamy, tangy, and savory all at the same time! Crunchy veggies, and macaroni noodles, mayo, vinegar, and a little sugar.

One day my neighbor was talking about wising he had some vegan macaroni salad and suddenly I was craving it too. So I went home and recreated the macaroni salad of my childhood.

Now days, I make this side all of the time. Its quick, easy and crowd pleaser. All of my kids love it and that is a win as far as I am concerned.

I would like to think this kind of dish originated in the south, but I actually looked it up and you can thank the New England states for this tasty side.

My guess is it was the south that decided to add sugar. Just like ice tea, the south believes sugar makes most things better.

Regardless of where macaroni salad came from, I’m just glad it did, because this classic side dish is now one of my favorites, and is so easy to make!!


INGREDIENTS:

  • 16 oz package elbow macaroni

  • 1/2 red bell pepper

  • 1/2 small yellow onion

  • 1 carrot

  • 2 stalks celery

  • 1 cup vegan mayo

  • 2 tablespoons apple cider vinegar

  • 1/4 cup sugar, or 2 tablespoons agave

  • 1 teaspoons salt

  • 1/2 teaspoon pepper

  • optional: dried parsley for garish


INSTRUCTIONS:

  1. Boil noodles according to package instructions. Drain, rinse, and set aside.

  2. Finley dice the onion, pepper and celery. Grate the carrot on a box grater or finely dice it as well.

  3. Toss the noodles and diced veggies together in a large bowl.

  4. In a small bowl mix together the mayo, sugar, vinegar, salt and pepper.

  5. Pour the mayo mixture over the noddles and stir until everything is well combined.

  6. Serve room temp or chilled.

IMG_1651.jpg

Raw Sesame Zucchini Noodle Salad

IMG_1278.jpg

I love making noodles out of zucchini.

If you do not have one of those zoodle making gadgets, don’t fret! A regular vegetable peeler works fine for veggie ribbon noodles!

This Raw sesame zucchini noodle salad is one of my favorites because it is so easy, delicious, and healthy. Just peel, toss, and serve! I mean really, you don’t even cook it, how easy is that!

Toss on some grilled tofu, and this perfectly light side dish transforms into fully satisfying, healthy lunch or dinner in just minutes!


Ingredients:

  • 3 medium zucchini

  • 1 and 1/2 cup shredded cabbage or slaw mix

  • 1 cup match stick or shredded carrots

  • 1/2 thinly sliced red onion

  • 1 tablespoon toasted sesame seeds

  • 1/4 chopped cilantro

For the Dressing:

  • 1/4 cup coconut aminos or soy sauce (if using soy skip the extra salt)

  • 2 teaspoons sesame oil

  • 1 tablespoon apple cider vinegar

  • 1 teaspoon salt

  • 2 teaspoons of agave or white sugar


Instructions:

  1. Wash and trim ends from each zucchini. Using a veggie spiralizer (zoodle maker) cut noodles from each zucchini into a large bowl. If you do not have a zoodle making gadget, you can cut ribbons from the zucchini using a regular veggie peeler. Just make long ribbons from the zucchini until you reach the core. The seedy part does not peel well.

  2. Add the slaw mix, carrots, onion, sesame seeds, and cilantro to the bowl with the zoodles and toss.

  3. In a small bowl whisk together the ingredients for the dressing. You can taste and adjust to your liking. Pour dressing over the veggies and toss. Garnish with extra cilantro, and sesame seeds if you like.

Serve at room temp or allow to chill before serving.

Vegan Deviled Eggs

Perfect vegan deviled eggs

Once again agar powder steps in to do some truly amazing vegan magic (or science) to create a perfect vegan deviled egg!

For those unfamiliar with agar powder, it is a vegan gelatin derived from seaweed. It can be found in asian grocery stores or online. I use agar often in vegan cheese making, so always have some on hand.

The next ingredient that makes these eggs really convincing is Indian Black Salt, or also called Kala Namak. It is salt that is high in sulfur so it smells and taste like eggs! You can find this at specialty spice shops or also online. I really suggest not skipping the salt because it is the ingredient that make these vegan eggs taste like an egg.

The filling is made from tofu because as we all know, tofu makes a great egg substitute. It makes for a creamy filling with the help of some mustard, vegan mayo, and spices.

If you do not have egg molds, they can purchased on amazon or craft stores in the baking section, or you can use a deviled egg serving tray to mold the whites. A serving tray is actually how I made my first batch and it worked well, although it makes for shallow eggs.

I have fed these eggs to any and all vegan and non vegan friends and family that were willing to try them, and they were all amazed at how close these are to the real thing! So if you are skeptical, by all means, whip yourself up a batch and let me prove you wrong! I think you and everyone else you serve them to will be wowed and amazed.

I have missed deviled eggs for years and now I don’t have to. I make these for just about every pot luck, BBQ, or holiday get together side by side next to tray of regular deviled eggs, you would hardly notice a difference. Magic….sheer vegan magic!

These deviled eggs are delicious, beautiful, and super fun to serve to unknowing friends and family, if for no other reason, for the reaction you get when you tell them they are vegan!


Ingredients:

For the egg white:

  • 2 cups almond milk

  • 1 tablespoon agar powder

  • 1/2 teaspoon Indian Black Salt, also called Kala Namak (this salt has a high sulfur content so it smells and tastes like egg. It is an essential ingredient in this recipe if you want this vegan version to taste like an egg)

For the yolk:

  • 1 block extra firm tofu

  • 1/4 cup vegan mayo

  • 3 tablespoons yellow mustard

  • 1 tablespoon apple cider vinegar

  • 1/2 teaspoon Indian Black Salt

  • 1/2 to 1 teaspoon turmeric (This is for color. The more you add, the stronger the flavor, so it is just up to preference)

  • 1/2 teaspoon dried dill, plus more for garnish

  • 1 teaspoon all purpose greek seasoning (you can skip this if you like, but it is delicious in the eggs)

  • 1-2 tablespoons diced dill pickles

  • pepper and salt to taste

  • paprika for garnish


Instructions:

  1. You will either need a silicon egg mold or a deviled egg serving tray, the kind with egg shaped divots, to form the egg whites. If you use the serving tray the eggs will be pretty shallow, but it still works.

  2. In a small sauce pan, whisk together almond milk, agar, and Indian black salt. Heat the mixture over medium heat until it comes to a simmer, then remove from the heat.

  3. Transfer the mixture to a pyrex, or glass bowl, and allow to cool on the counter top. Let the mixture sit until it appears to be thickening but is still liquid, and pourable, stirring occasionally. I have found if you pour the mixture into the molds too soon, while it is still very hot, the milk solids will separate and sink to the bottom, and the water will be left at the top. This is not an appetizing egg!

  4. Once the mixture is ready, pour it into the eggs molds and pop them in the fridge for about half an hour, or until they are nice and solid.

  5. While the molds are in the fridge, prepare the yolk filling by adding all of the ingredients, except the pickles, to a high speed blender or food processor. Process on high until the mixture is creamy and smooth. If you want to pipe the filling into the eggs, then you can drop the pickles into the mixture at the end and pulse a few times to get them good and minced. Large pieces of pickle won’t make it through a piping tip.

  6. Remove the eggs from the fridge once they have set, and spoon out a divot from the middle to make space for the filling.

  7. You can either scoop spoonfuls of the yolk filling onto the eggs, or fill a piping bag with a large tip and pipe the filling onto the egg whites. Garnish with extra dill and paprika.

  8. Store the deviled eggs in the fridge for 2 or 3 days.

Yields 1 - 2 dozen eggs depending on the depth of the mold you use.

A single vegan deviled egg in a wooden serving dish

Cheesy Vegan Scalloped Potatoes

IMG_0603.jpg

I love potatoes and I love cheese. So what’s not to love about these super easy cheesy vegan scalloped potatoes.

All you need is a pretty simple vegan cheese sauce, some thinly sliced potatoes, an 8x8 pan, and you are on your way to a veganized classic!

I used a mandolin to slice the potatoes to get them extra thin. You do need the potatoes as thin as you can get them. If you do not have a mandolin you can use the long cutting side of a box grater or a really starp knife.

Basically you cut a pile of thin potatoes, whip up an easy cheese sauce, layer and bake. It’s that easy.

if you are allergic to cashews, you can replace them with sunflower seeds or a mix of sunflower and pumpkin seeds. Just follow the same measurements and instructions for the cashews!

This side dish is warm and comforting and pretty easy to make. Its gluten free, too!

I am all in when it comes to my favorite carb and anything vegan cheese related!


Ingredients :

  • 4 - 5 medium russet potatoes

  • 1 cup cashews soaked in hot water for a few hours

  • 2 cups water

  • 1/4 cup nutritional yeast

  • 1/2 teaspoon turmeric

  • 1/2 teaspoon smoked paprika

  • 1 teaspoon light miso paste

  • 1 tablespoon apple cider vinegar

  • 4 tablespoons tapioca or corn starch

  • 1 teaspoon salt

  • 1/2 cup plant milk (I used almond milk)

  • diced green onions for garnish (optional)


Instructions:

preheat oven to 350 degrees

  1. Wash potatoes, but do not peel. Thinly slice the potatoes using a kitchen mandolin. If you do not have a mandolin you can thinly slice the potatoes using the single blade side of your box grater, or cut them as thinly as possible using a sharp knife. If they are on the thicker side it will just take them longer to bake.

  2. Drain the cashews, adding them and the remaining ingredients,minus the plant milk, to a high speed blender or food processor. Blend on high until the mixture is completely smooth.

  3. Transfer the cheese mixture to a medium sized sauce pan and heat over medium heat. Whisk the mixture continuously until it begins to thicken to the consistency of thick pudding. Once it has thickened, whisk in 1/2 cup of plant milk.

  4. Lightly spray an 8x8 casserole pan with oil. Start by placing a thin layer of potatoes on the bottom, cover in some cheese sauce, then another layer of potatoes, cheese sauce, and continue the pattern until all of the potatoes and cheese have been used. The top layer should be cheese sauce.

  5. Bake for about 45minutes to one hour, or until the potatoes are cooked through. The time may vary depending on how thick you cut the potatoes. If the top seems to be browning before the potatoes are finished, you can cover the pan with some foil for the remainder of the bake.

  6. Once the scalloped potatoes are finished cooking, sprinkle with diced green onions to serve.

IMG_0589.jpg

Vegan Gorgonzola Fried Brussels Sprouts

IMG_0535.jpg

We are a house divided where Brussel sprouts are concerned. I personally will never turn one down, but don’t ask my 8 year old to even look at them.

One of my families favorite ways to eat Brussels sprouts is slathered in gorgonzola sauce (or the vegan version of said sauce.) It took me a while to figure out a vegan version of my favorite cheese sauce, but once I did I could not stop making things with it! It is DELICIOUS!

So when I began daydreaming about new Brussels recipes, I knew it had to involve gorgonzola. And of course, I knew I should deep fry them, because I’m from the south, and we will attempt to fry just about anything down south! T

hese turned out better than I even imagined! I served my first batch at our New Years Eve party and there was not a single Brussels sprout left on the plate.

Even friends who declared they detest Brussels sprouts gobbled them up….then again, they are fried sooooooo, thats a game changer!

So not matter if you already love, or (think you) hate Brussels sprouts, try battering them in gooey vegan gorgonzola sauce, deep frying them, then let me know what you think!


Ingredients:

  • 1 pound fresh Brussels sprouts

  • 2/3 cups all purpose flour

  • 8 oz panko breadcrumbs

  • 1 teaspoon salt

  • 1 teaspoons garlic powder

  • 1 batch gorgonzola cheese sauce

  • oil for frying

Gorgonzola cheese sauce:

  • 1/2 cup cashews (I use unroasted, unsalted)

  • 1 cup water (plus more for soaking cashews)

  • 2 tablespoons nutritional yeast

  • 2 tablespoons tapioca or corn starch

  • juice from 1 lemon

  • 2 teaspoons stone ground dijon mustard divided ( the kind with the seeds in it)

  • 2 teaspoons apple cider vinegar

  • 1 teaspoon light miso paste

  • 1/2 teaspoon salt

  • 1/2 cup plant based milk


Instructions:

  1. Wash Brussels sprouts and trim off the ends. Place cleaned sprouts in microwave safe bowl and add 1/2 cups of water. Microwave for 5 minutes. If you do not own a microwave, you can steam the sprouts on the the stove top in a steamer basket until they are tender, but not mushy. Drain water from spouts, rinse in cold water, and allow them to cool.

  2. While sprouts are cooling, prepare the cheese sauce by placing cashews in a microwave safe container. Cover the nuts in water and microwave for 3 minutes. You can also soak them in hot water for 2 - 3 hours if you do not have a microwave. Drain and add the cashews and remaining ingredients EXCEPT THE MILK, and just 1 of the 2 teaspoons of mustard, to a high speed blender or food processor. Blend on high until the mixture is completely liquified.

  3. Transfer cheese mixture to a medium sized pot. Heat on medium heat, whisking continuously until the sauce begins to thicken. This takes a few minutes. You want it to be the consistency of a thin pudding. Pour half of the cheese sauce into a medium sized bowl, and leave the rest in the pot (you will reheat it to make a dipping sauce). Allow the sauce to cool.

  4. Toss the cooled brussels in the 2/3 cups of flour and 1 teaspoon of salt. You just want to coat them in the four. Pour the panko and garlic powder into a shallow dish and stir. To coat the sprouts, dip them first into the cooled cheese sauce that you set aside in a bowl, making sure they are completely coated. Next dip the sprouts into the panko, again making sure they are evenly coated. Place the coated sprouts on a plate.

  5. Fill a medium size pot about half way full with oil, deep enough to cover the Brussels sprouts. Heat the oil over medium hight heat until it is good and hot. You can poke a chopstick into the oil and if tiny bubbles form around it, the oil is ready. Place a wire cooling rack on a paper towel lined cookie sheet on the counter near the pot. This will be used to place the finished sprouts to cool.

  6. Fry a few Brussels spouts at a time just until they are golden brown. This only takes a minute or two. Place finish sprouts on the wire rack to cool.

  7. Once all the sprouts are done frying, add 1/2 cup of plant milk and 1 teaspoon of mustard to the pot with the leftover cheese sauce. Whisk and reheat. You can add a splash of lemon juice to the sauce as well for some extra zip, if you like.

  8. Serve Brussels spouts right away with the gorgonzola dip on the side.

IMG_0540.jpg

Easy Coconut Bacon

BACON! It seems to be that one food people miss when they go vegan, or plant based. I admittedly ate my fare share of turkey bacon back in the day, and have had my moments of missing that smokey, salty, crunchy element in certain recipe. Coconut bac…

BACON! It seems to be that one food people miss when they go vegan, or plant based. I admittedly ate my fare share of turkey bacon back in the day, and have had my moments of missing that smokey, salty, crunchy element in certain recipe. Coconut bacon is great for topping salads, grit bowls, soups, or adding to any recipe that calls for crispy bacon. It’s easy to make, and pretty tasty! Don’t skip out on the liquid smoke, though. It is the key ingredient in making this mock bacon taste like the real deal.

Ingredients:

  • 1 cup unsweetened shredded coconut or coconut chips

  • 2 tablespoons soy sauce or coconut aminos ( if you use coconut aminos add 1/2 teapsoon of salt)

  • 1 tablespoon maple syrup

  • 1/2 teaspoon smoked paprika

  • 1 teaspoon of liquid smoke

Instructions:

preheat oven to 350 degrees

  1. Mix coconut, and all other ingredients in a bowl.

  2. Spread coconut mixture onto a parchment lined cookie sheet, and bake for 5 mintues.

  3. Stir the coconut around on the pan, and continue baking for another 5 minutes or until the coconut is brown and crispy. Watch the coconut carefully to make sure it is not burning, as it can burn quickly.

  4. Allow to cool, and store in an airtight container in the fridge for up to one week.

Soft Vegan Challah Pretzels with Vegan Cheese Sauce

IMG_9578.jpg

Bread, in any an all forms is my favorite food.

I had to do a brief stint gluten free when our last daughter was born and we were trying to sort out her allergies. I actually had to give up dairy, wheat, and soy and it was giving up bread that did me in. I never touched dairy again, but bread, she’s my love language.

So obviously I needed to sort out an easy and delicious vegan soft pretzels recipe pretty quickly because soft pretzels are in my top 5 favorite breads. I mean come on, they are buttery, salty, soft, warm perfection.

I decided our vegan challah dough would work perfectly for creating the perfect vegan soft pretzel and I wasn’t wrong.

Don’t be intimidated by the aquafaba. It’s just bean cooking liquid and if you whip it up it acts like egg whites, which works really well in place of eggs in baked good!! I typically just use a can of chickpea liquid but any canned bean liquid will work!

And the cheese sauce!! Don’t forget the cheese sauce! There are only two suitable pretzel dips as far as I am concerned, spicy mustard or cheese sauce. Period. No further discussion on the matter. So I have added a recipe for a really quick and easy vegan cheddar cheese sauce in case you are not in a mustard mood! You are welcome.

So go make some soft pretzels! I promise your friends or family will be happy to help you eat them, or you can hoard them for yourself. I won’t judge you!


INGREDIENTS:

  • 4 cups all purpose flour

  • 1 1/4 cup whipped aquafaba (measure the whipped product, not the bean liquid)

  • 1/3 cup sugar

  • 1/2 cup oil (I use grape seed but you can use any neutral oil you like)

  • 4 1/2 teaspoons dry active yeast

  • 1 tablespoon sugar

  • 1 tablespoon salt

  • 1 cup hot water. I just use hot water from the tap, you don't want it too hot or the yeast will die, and it will not activate

  • 2 tablespoons baking soda ( This is for the water you dip the pretzels dough in before baking)

Cheese Sauce:

  • 1/2 cup cashews

  • 1 cup water

  • 2 tablespoons nutritional yeast

  • 1/2 teapsoon tumeric

  • 1/2 teaspoon smoked paprkia

  • 1 teapsoon dijon mustard

  • 2 1/2 tablespoons tapioca starch

  • 1 teaspoons light miso paste

  • 2 teaspoons apple cider vinegar

COOKING INSTRUCTIONS:

  1. In a large glass bowl mix hot water, yeast, and 1 tablespoon sugar.

  2. Let the that sit for 10 minutes to activate, or until the mixture is super foamy at the top.

  3. In a stand mixer add the yeast mixture, aquafaba, sugar, oil, salt, and 2 cups of flour. (you can mix by hand, just mix the above, and add remaining flour slowly. You will need to knead it for the same amount of time. It's a good workout though!

  4. Mix until all of the ingredients are incorporated, then add in the remaining flour. I typically will hand mix the first 2 cups of flour in, or use my paddle attachment and replace with the dough hook when I add the remaining flour.

  5. The dough should come together and not be sticky, if it seems sticky you can add 1/4 more flour a little at at time until the dough comes together. Your goal is smooth, and elastic-y dough, not sticky.

  6. Let the dough kneed in the mixer on low/medium speed for 10 minutes. The dough should be smooth at this point and have a sort of bounce back if you poke it.

  7. Form dough into a nice ball, and place in a lightly greased glass bowl. Cover the bowl with a damp kitchen towel, and place inside your oven turned off, OR on the bread proof setting if your oven has one.

  8. Bring a small pot of water to a boil and place in the bottom of the oven. The heat and steam from the water will help the dough to rise.

  9. Let dough rise about an hour, or until the dough has doubled in size.

  10. Remove dough from bowl and split in half. Next, evenly divide each half into 8 equal pieces.

  11. Rolling the dough pieces between both hands, form ropes that are about 12 inches long with each piece of dough.

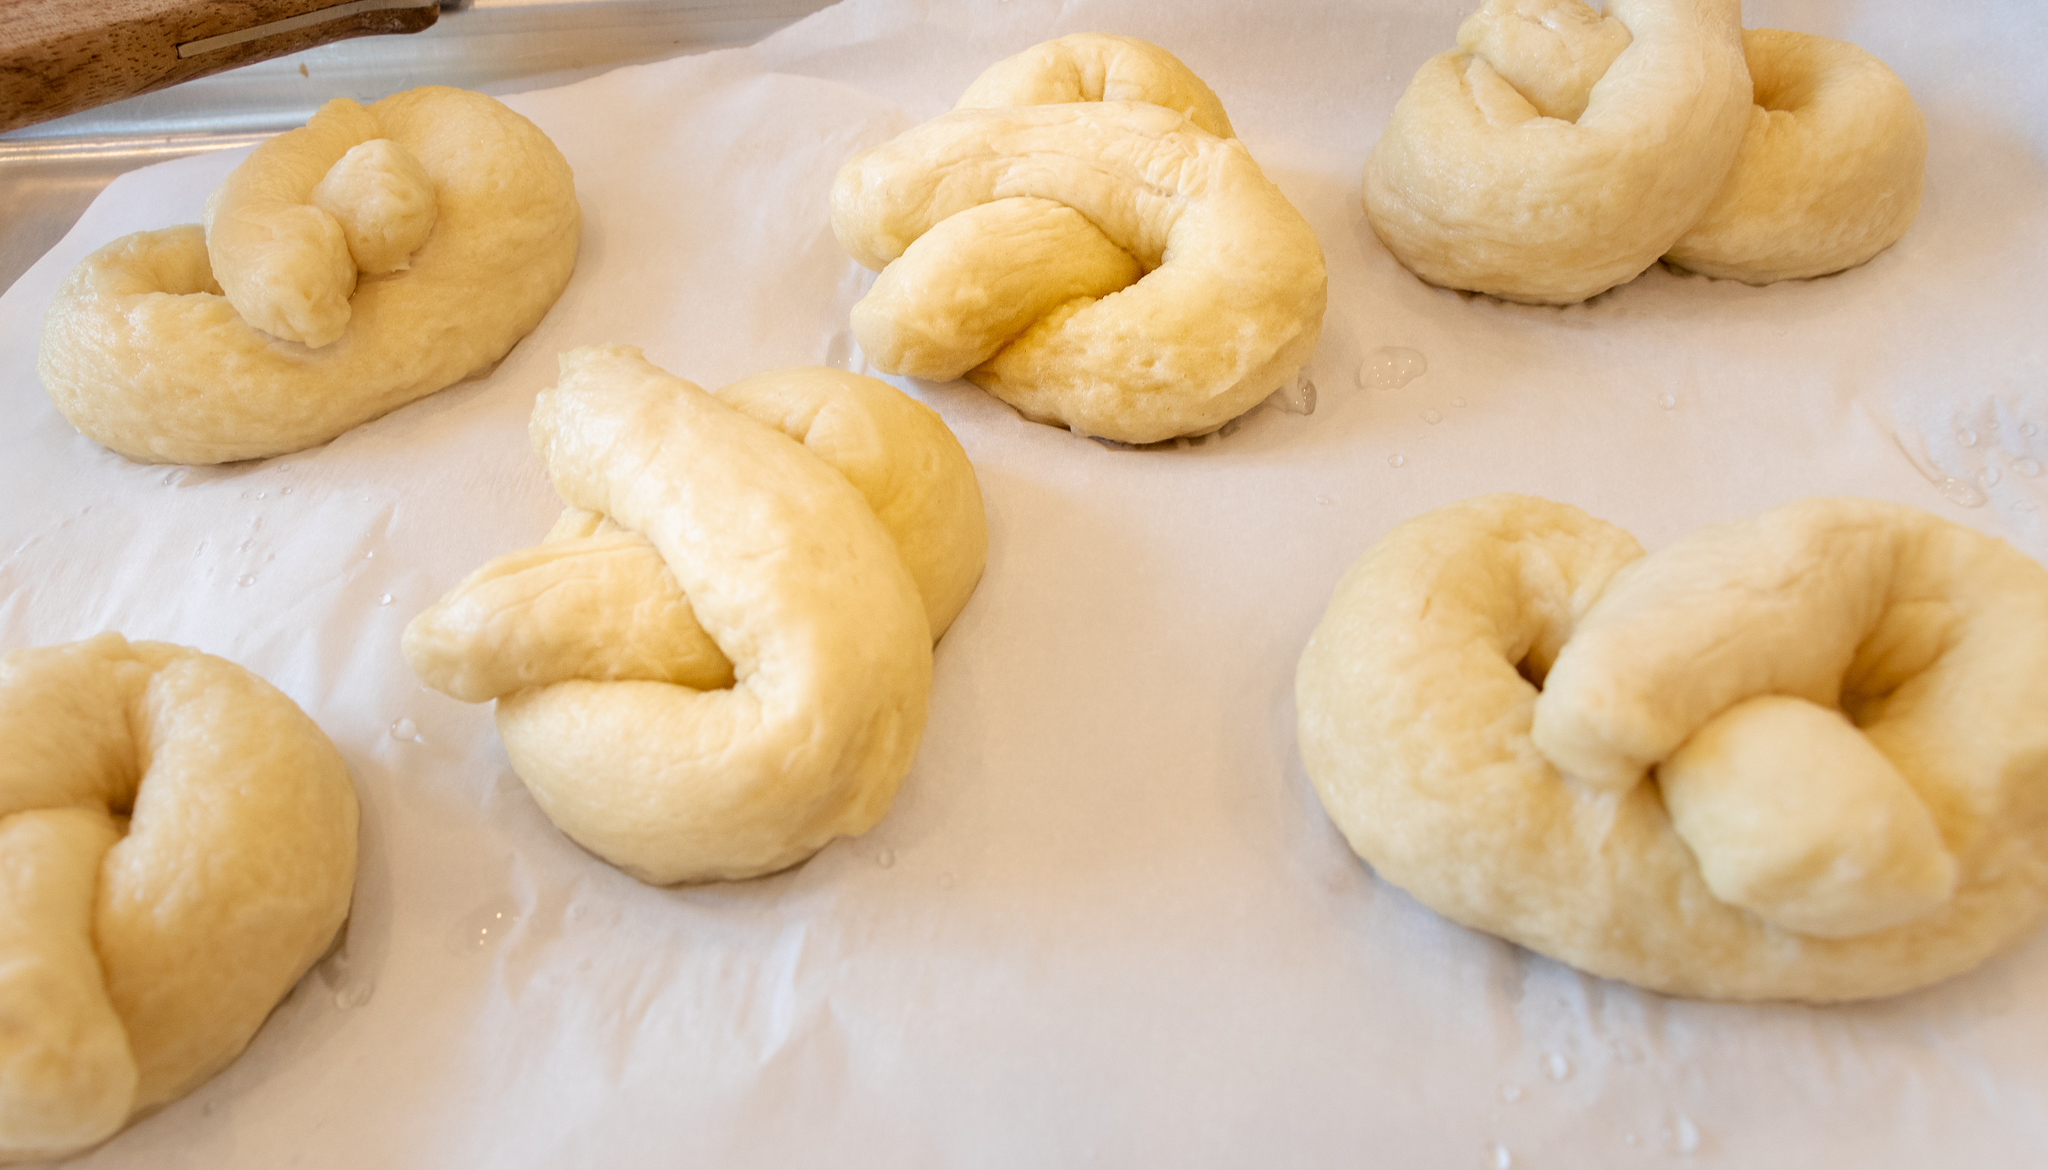
  12. Take each rope and make a U shape. Take the tops of the U, cross then twist them once. Now bring the crossed dough over the bottom of the U. ( the pictures will help if this is confusing.)

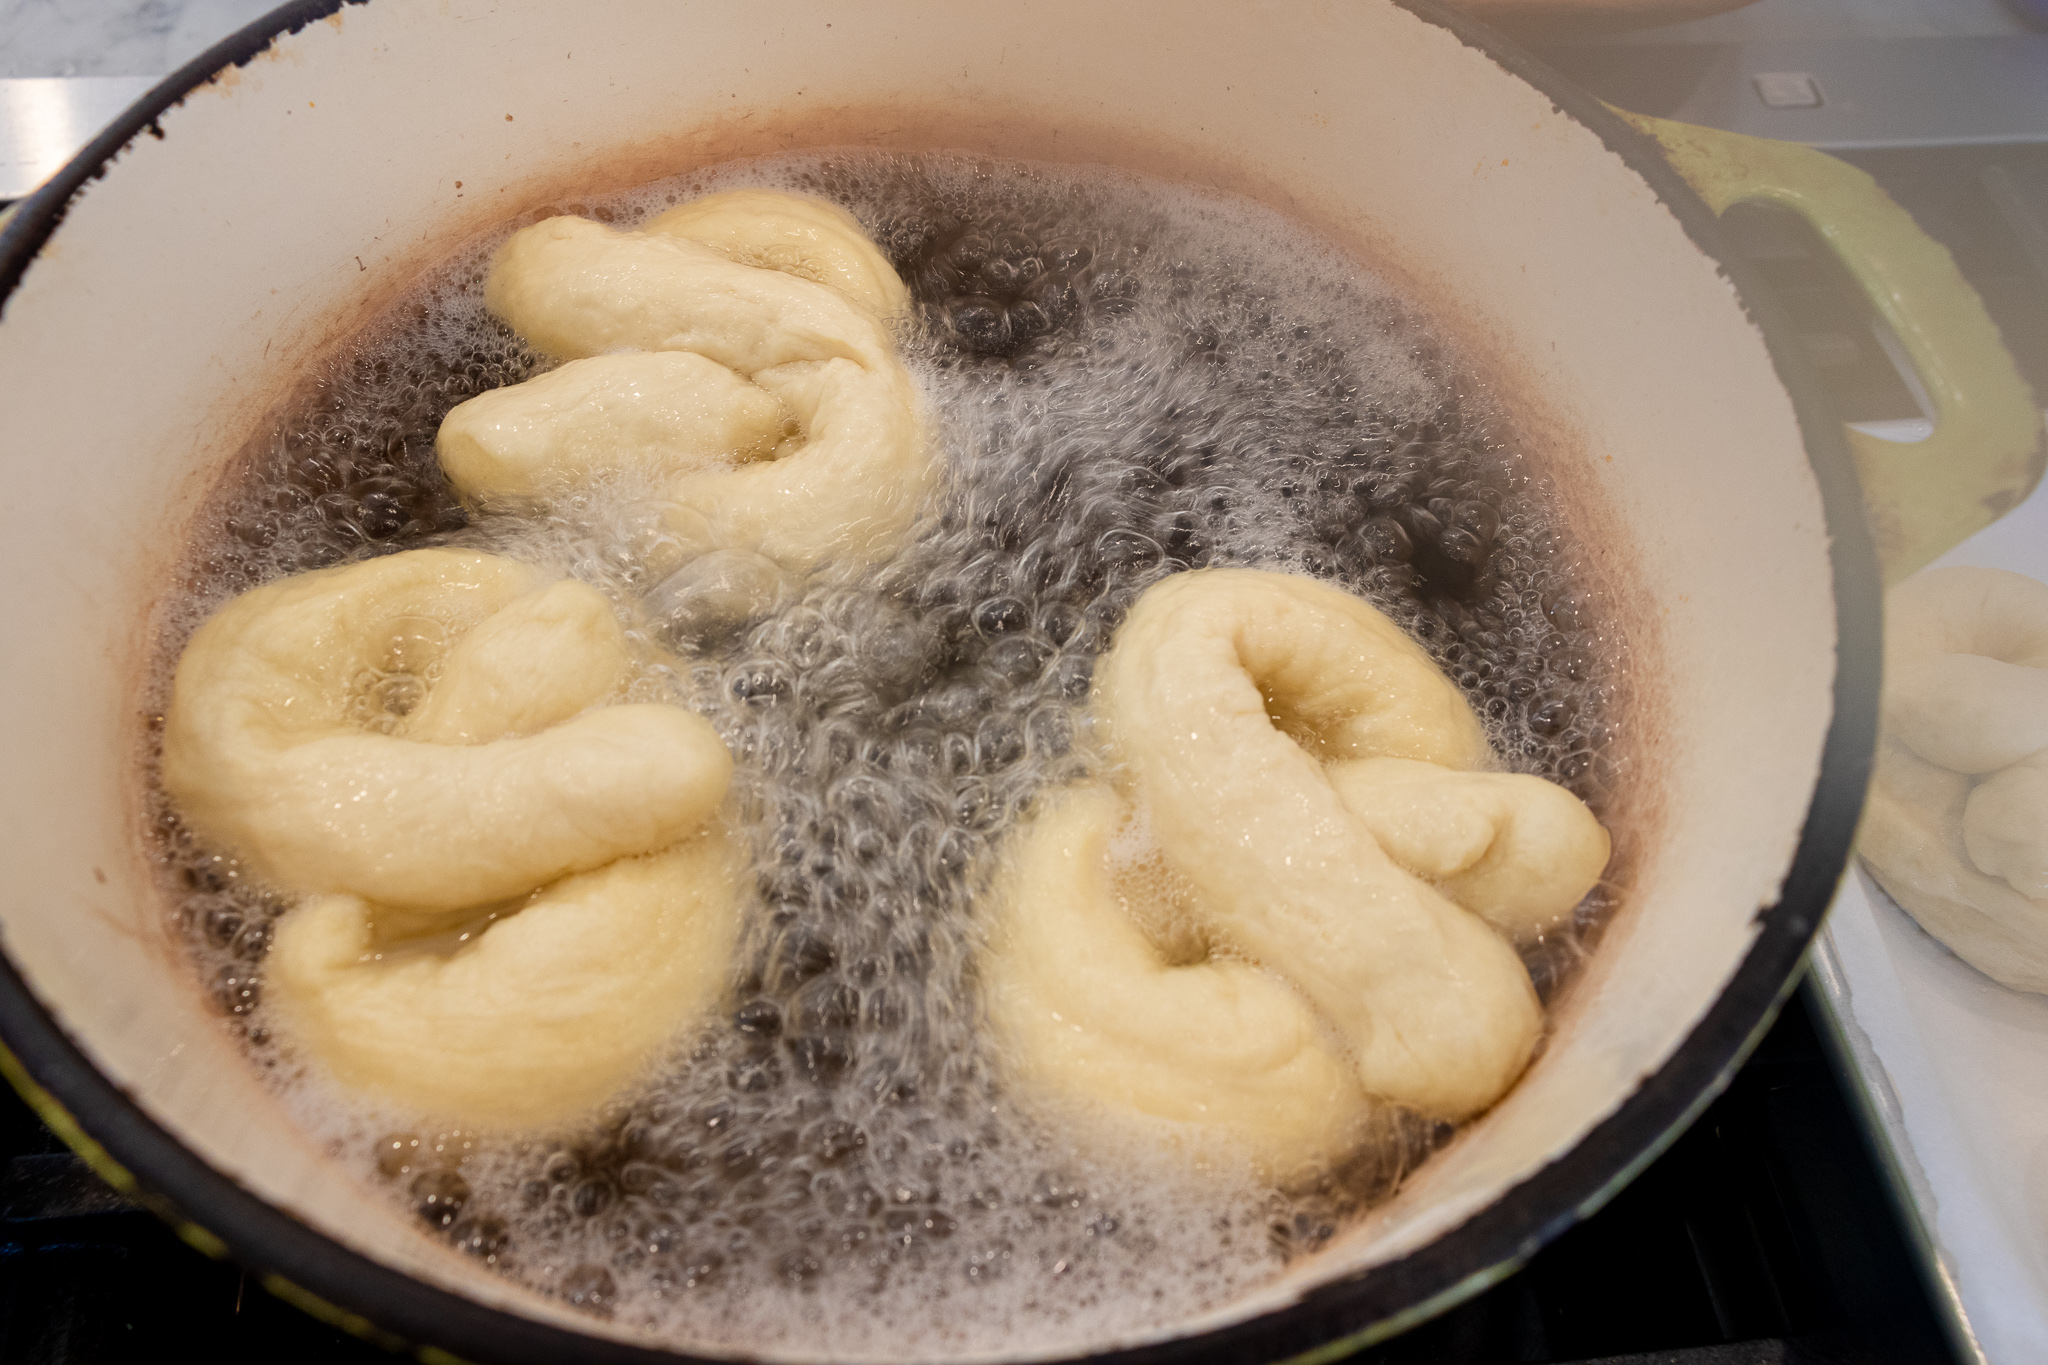
  13. Allow pretzels to rest for about 15 mintues. While this is happening bring a large pot of water to a boil. Preheat oven to 400 degrees. Once pretzels are done resting, add 2 tablespoons of baking soda to the water.

  14. Add pretzels 2-3 at a time into the water for about 30 seconds. You will need to flip them half way through. Just use a slotted spoon and gently turn them over in the water. Return them to a parchment lined cookie sheet once they come out of the water.

  15. Brush pretzels with leftover aquafaba, and sprinkle with some corse sea salt before putting in the oven.

  16. Bake pretzels for 15- 20 minutes. I normally move my top rack to the highest position for this. That way they get nice a brown. You will need to keep a close eye on them, and if they brown really quickly, move them to a lower rack for the remainder of the bake time.

  17. Once done allow to cool on pan while you prepare the cheese sauce.

Cheese sauce:

  1. Place cashews in microwave safe container and cover with water. Microwave for 3 minutes.

  2. Drain water from cashews, then add all ingredients to a high speed blender or food processor.

  3. Blend until completely smooth.

  4. Pour mixture into a pot, and cook on medium heat, stirring the WHOLE time with a whisk.

  5. As soon as the cheese starts to thicken remove from heat. If it gets to thick, add a little more water and it will thin back out.


Cheese sauce will last about a week in the fridge, pretzels can be stored in airtight container at room temperature.

Yields 16 pretzels 


Vegan Mozzarella Cheese Sticks

IMG_0067.jpg

Who doesn’t miss cheese sticks?! Half of my kids had never even had one, so I knew I needed to try and create a vegan cheese stick recipe so I could share this snack joy with them!.

These dairy free, vegan mozzarella cheese sticks are super simple to whip together.

They are made with coconut milk, making them more allergen friendly for kids to pack in their school lunches, because the last thing we want to do is exclude anyone with a nut allergy from this tasty treat!!!

They are also made with a vegan/plant based gelatin called agar agar powder. You can find agar at Asian markets or online at amazon. I prefer Living Jin brand but use whatever brand you can find or like.

Agar is activated when heated and will solidify pretty quickly once it begins to cool. So the result is a quick set vegan cheese. It only takes minutes for the mixture to come together, and a few hours for your cheese to set.

I am often asked if the oil can be left out, and in this recipe it can not. Agar solidifies and tends to have a gelatinous texture on its own. The filtered coconut oil helps get you a firmer cheese with a more palatable and cheese like texture. There are recipes out there for agar cheese without coconut oil, but they include extra starches and typically xanthan gum to help thicken and set the cheese.

If you are not into cheese sticks, you can mold this cheese in some small bowls and slice it for sandwiches or shred it for pizza.

So don’t be afraid to try and make your own vegan cheese at home. Its super easy, and really affordable. You know every ingredient that is going into it and can feel good about what you or your family is eating!

Happy cheese snacking, y'all!


INGREDIENTS:

  • 1 1/2 cups of full fat coconut milk or cream in a can (make sure it's at room temp, and shake the can very well first. You need the liquid as well as the creamy part, and since they tend to separate, a good shake will help mix it back up)

  • 1/3 cup vegan plain yogurt

  • 2 tablespoon of lemon juice

  • 2 teaspoons miso paste

  • 1 teaspoons of salt

  • 1/4 cup nutritional yeast

  • 1/4 melted cup triple refined coconut oil

  • 2 tablespoons agar powder

  • 1 teaspoon onion powder

  • 3 tablespoons tapioca starch


COOKING INSTRUCTIONS:

  1. In a food processor or high speed blender, add all of the ingredients EXCEPT the milk, and agar.

  2. Pulse a few times to mix it all up.

  3. Now add the milk, and agar to a medium sauce pan and bring to a boil. Reduce heat and simmer until mixture thickens to the constancy of a thin pudding.

  4. Add the milk mixture to the ingredients in the food processor, and mix for about a minute. The mixture will quickly begin to thicken as agar begins to solidify at room temperature.

  5. Transfer the mixture to an 8x8 pan.

  6. Allow the cheese to harden in the refrigerator uncovered for about 2 hours.

  7. Once the cheese is set, remove from the pan and cut into sticks. Store in an air tight container for up to week.

*You can also pour the mixture into small bowls to mold if you just want a shreddable, sliceable mozzarella that will melt!

Vegan Mexican Street Corn (Elote)

IMG_7996_1.jpg

What is your favorite recipe to make in the summer when fresh sweet corn is in season?

Mine is Elotes, or Vegan Mexican Street corn.

I love sweet summer corn and when it is in season I will try and use it as often as I can. I am always game for an easy corn salad, or a summer grit bowl with tempeh and fresh corn, but Mexican street corn will always be my favorite way to use up in season corn.

We have used vegan mayo and plain vegan yogurt to turn this popular street food into a vegan summer time staple. You could also use vegan sour cream if you can not find plain yogurt. Either should work just fine! And don’t forget to make or buy some vegan parmesan cheese. We normally make our own but these days most grocery stores sell a vegan version in the refrigerated cheese section.

You likely have most of the spices in your pantry, just grab a lime and fresh cilantro and you will be good to go! Well and maybe a margarita, or maybe thats just me.

So fire up the grill and start shucken, because I promise you are gonna want to make this recipe all summer long!


INGREDIENTS:

  • 4-6 ears of corn

  • 1/4 cup vegan mayo

  • 1/4 cup vegan plain yogurt

  • 1 lime

  • 1/4 cup chopped cilantro

  • 1/4 cup vegan parmesan cheese

  • 2 teaspoons smoked paprika

  • 1 teaspoon garlic powder

  • 1 teaspoon salt


COOKING INSTRUCTIONS:

  1. Shuck and clean each ear of corn, then prepare them for the grill by spraying each one with a little olive oil and squeezing juice from half the lime over the tops.

  2. Heat your grill and add corn, grilling for 10 - 15 minutes, turning a few times to get all side grilled, just be careful not to let them burn.

  3. In a bowl mix mayo, yogurt, and juice from other half of the lime, garlic, salt, and 1 teaspoon paprika.

  4. Once corn is off the grill, brush each ear with your mayo mix, saving some of the mix for drizzling over your corn.

  5. Mix parmesan and cilantro on a plate and roll each ear of corn in the mixture.

  6. Lay corn out on a serving dish and drizzle with remaining mayo, and sprinkle with the remaining paprika.

Nut Free Vegan Mac 'n "Cheese"

IMG_8237-2.jpg

INGREDIENTS:

  • 1 package macaroni , noodles regular or gluten free

  • 2 medium sized potatoes, peeled

  • 2 medium to large carrots

  • 1/2 onion

  • 1/2 cup sauerkraut

  • 3 tablespoons nutritional yeast

  • 2 teaspoons miso paste

  • 1 tablespoon apple cider vinegar

  • 1 teaspoon turmeric

  • 2 teaspoon smoked paprika

  • 1 teaspoon salt and a dash of pepper

  • 1/4 cup cooking liquid from vegetables

COOKING INSTRUCTIONS:

  1. Dice and boil potatoes, carrots, and onion until softened

  2. Add cooked and drained vegetables to a high speed blender or food processor with the rest of the ingredients.

  3. Blend on high until completely smooth

  4. Mix sauce with cooked noodles and transfer to a 9x13 baking dish

  5. Bake at 350 degrees for 20 - 30 minutes or until the top begins to brown.

  6. Optionally you can add bread crumbs, vegan shredded cheddar, or both to the top before baking!

Southern Dill Potato Salad

Southern Dill Potato Salad

My mom has always made the best potato salad, hands down, no exceptions, the best!

She is southern, from Alabama, and at every family get together when I was a kid, she was in charge or potato salad.

She always added boiled eggs to hers, and would slice the eggs and make a smily face on top with the help of some mustard. It was cute…but we con’t eggs so my versions is well, less cute, but just as tasty.

My mom uses mayo, mustard, and dill pickles in her potato salad so not too hard too veganize.

I do shake a little black salt in mine sometimes to give it that eggy flavor without the eggs. My friend Yanira adds some firm tofu to hers to give it that egg texture. In case you wanna give that a whirl.

But even without the egg, sulfury black salt, or tofu, this recipe is beyond delicious and the only potato salad recipe I ever make. I just don’t see any point with messing with perfection!

So thanks mom for making this recipe all my life and not being mad that I turned it vegan. It still taste like home to me!


INGREDIENTS:

  • 6 cups red potatoes cut into large cubes

  • 1 small red onion

  • 3 stalks of celery

  • 1/3 to 1/2 cup chopped dill pickles

  • 2 tablespoons of pickle juice

  • 1/3 cup of vegan mayo

  • 1/4 cup yellow mustard

  • 1 teaspoon salt

  • 1 teaspoon garlic powder

  • 1 - 2 teaspoons all purpose seasoning like Cavender’s or Trader Joe’s 21 season blend


COOKING INSTRUCTIONS:

  1. Boil the potatoes until they are cooked through but before they get mushy.

  2. Drain potatoes and let them cool completely.

  3. In a small bowl mix the mustard, mayo, spices, and pickle juice.

  4. In a large bowl mix the potatoes, chopped onion, celery, and pickles.

  5. Put the mustard/mayo mix over the potato salad and mix.

  6. You can serve right away or refrigerate and serve cold!

Vegan "Meaty" Cheddar Queso

Vegan “Meaty” Cheddar Queso

In college I waited tables at popular casual dinning restaurant. Not naming names, but one of our jingles involved baby baby ribs, and customers thought it was hilarious to ask us to sing it.

But hey, the job got me through college!

One of our most popular appetizers was a chili queso dip in a skillet, and I probably ate my weight in this dip before I was vegan. I have not eaten that dip in forever, but I think of it often and knew I needed to try and create a vegan version.

This one did not disappoint, and I can still eat my weight in it! You can use any store bought meatless crumble, vegan sausage, or you could even use your own vegan crumble recipe.

I love to roll up warm flour tortillas and dip them into this cheesy, spicy, magic! It also makes a delicious enchilada or quesadilla filling!


INGREDIENTS:

Cashew Queso:

  • 1 bag of frozen spicy meatless crumbles or vegan sausage (we like Beyond Meat brand, but use your favorite) or one package of vegan chorizo ( I like Trader Joe’s soy chorizo)

  • 1 cup cashews soaked in hot water for one hour or microwaved for 3 minutes

  • 1/4 cup nutritional yeast

  • 2 teaspoons of miso paste or 2 tablespoons sauerkraut with out the juice

  • 1 tablespoon apple cider vinegar

  • 1 teaspoon kosher salt

  • 1 teaspoon of turmeric

  • 1 - 2 teaspoons smoked paprika

  • 1/4 cup of tapioca/corn starch or arrow root powder

  • 2 cups of water

  • 1 small can of chili peppers

  • a few shakes of favorite hot sauce


COOKING INSTRUCTIONS:

  1. Add all ingredients except the, crumbles, chilis and hot sauce to a high speed blender or food processor.

  2. Process and blend on high until the mixture is completely smooth (no lumps at all).

  3. Transfer the mixture to a medium size pot and cook on medium heat, stirring with a whisk continually until the mixture thickens.

  4. Once the queso gets to a pudding like texture remove it from the heat and mix in the chilis and hot sauce.

  5. Heat the crumbles in a pan until cooked.

  6. In a baking dish or smalls cast iron skillet, combine the queso and cooked crumbles. Bake for 10 minutes at 350 degrees.


Serve with chips, rolled tortillas, or veggies. Add to burritos or enchiladas. 

My favorite vegan cookbook is “Veganize It!” by Robin Robertson. I adapted her recipe for cashew “cheese” sauce and created this queso. If you omit the hot sauce and chiles, and meat you will be left with a very versatile cheddar “cheese” sauce.

Vegan Pimento Cheese

Vegan Pimento Cheese

When I was a kid my step mom always kept a tub of pimento cheese in our fridge.

It completely grossed me out. Not that I ever once tried it, I just somewhere along the line decide I didi’t like it and that was that.

Flash forward to becoming an adult, and it is now one of my absolute favorite things. And now I want to cry for all those lost years where I could have been and should have been eating one of my most favorite foods.

IMG_8506.jpg

I make a lot of homemade vegan cheese. Often I make a quick coconut cheddar to whip up a batch of pimento cheese and recently posted a recipe for an easy coconut milk pimento flavored cheddar to make the most perfect batch of pimento cheese spread even. If you are feeling frisky and want to try your hand at cheese making, I have over 30 cheese recipes for you to try! You can also any pre made store bought vegan cheese you like.

The secret ingredients to a perfect pimento cheese are onion and vegan cream cheese! The onion adds a new element of flavor and the cream cheese adds more cheese goodness while lending some more creaminess to the spread.

Vegan Cream Cheese

Vegan Cream Cheese

If you like you pimento cheese a little spicy you can add a few splashes of hot sauce to the mix to add some heat as well.

So go forth and make the most delicious vegan pimento cheese. And if you have some preconceived notion that its gross, trust me and just try it. You don’t want to be like me with all those years wasted not eating the most delicious cheesy spread. You just can’t get those years back, y'all!

IMG_8507.jpg

INGREDIENTS:

  • 1 bag of cheddar shreds or one batch of our homemade Pimento Cheddar Cheese

  • 1/3 cup vegan cream cheese, homemade or store-bought

  • 2 tablespoons of vegan mayo

  • 2-3 table spoons diced pimentos, drained

  • 1/4 of a small onion diced

  • 1/2 teaspoon garlic powder

  • 1 teaspoon all purpose greek seasoning (optional)

  • 1/2 teaspoon dried mustard

  • salt and pepper to taste

Combine all the ingredients in a large bowl and stir until well mixed. That's it! It's so easy! Serve on crackers or as a sandwich.

IMG_8504.jpg

Quick Pickled Beets and Cabbage

Quick Pickled Beets and Cabbage

INGREDIENTS:

  • 1 medium shredded beet

  • 2 cups shredded cabbage

  • 2 tablespoons sugar

  • 2 tablespoons apple cider vinegar

  • 3/4 cup of water

  • 2 teaspoons salt

COOKING INSTRUCTIONS:

  1. Place all ingredients in a medium skillet, on medium heat

  2. Once the cabbage and beets begin to soften, reduce the heat to low and let simmer with a lid on for about 10 minutes, stirring occasionally

  3. After 10 minutes remove the lid. If there is liquid still in the pan, turn the heat back to medium and continue cooking until the liquid has evaporated.

  4. Cool and serve.

We love to add this to our falafel, but it would be pretty tasty on a sandwich, or just served as a side.