Vegan Chocolate Caramel and Coconut Smoothie (The Samoa)

Raise your hand if you have ever had a Samoa Girl Scout cookie. If you have, you probably know what all the hype is about. Gooey Caramel, Chocolate, and toasted coconut perfection. Sadly, Samoas are not one of the Girls Scout’s vegan cookie offering…

Raise your hand if you have ever had a Samoa Girl Scout cookie. If you have, you probably know what all the hype is about. Gooey Caramel, Chocolate, and toasted coconut perfection. Sadly, Samoas are not one of the Girls Scout’s vegan cookie offerings. No worries, Y’all! I think I have just the thing for you! This smoothie is far healthier than a cookie, but taste just as good in my opinion. It has it all!! Chocolate, coconut, and caramel all blended up creamy smooth and so delicious. What it doesn't have is refined sugar, and 100% less guilt than a cookie! Also you can have this for breakfast and not spend your day drowning in regret! WIN WIN WIN! Oh, and the caramel sauce is raw and you will probably find 100 different ways to use it, too! So don’t worry the leftovers, you will thank me later when you are dipping an apple into it ,and again not feeling one ounce of remorse! So blend yourself up a Vegan Samoa Smoothie and walk right past that cookie table those adorable girls have set up in front of your local grocery store, never looking back (OR run back and grab a box of the some of their vegan cookies because after all they are adorable, and its super hard to say no!)

Ingredients:

  • 2 frozen bananas

  • 1/4 cup dark chocolate cocoa powder

  • 1 and 1/2 cups coconut or almond milk

  • 2 cups ice ( you can use less if you don’t like a super thick smoothie)

  • 1/4 cup shredded unsweetened coconut

  • A handful of spinach (I keep a bag in the freezer for shakes and smoothies)

Easy Vegan No Cook Caramel:

  • 1/2 cup dried dates

  • 1/4 cup canned coconut cream

  • 1/3 cup maple syrup

  • pinch of salt

  • 1/4 teaspoon vanilla extract

Instructions:

  1. Peel and freeze 2 bananas. If you do no have a high speed blender like a Vitamix or Ninja, then I suggest slicing the bananas before freezing. A regular blender may have trouble breaking down a whole frozen banana. We normally just toss our bananas that are on the verge of going bad into the freezer so we do not waste them, and so we have them on hand for smoothies and nice cream.

  2. Add the ingredients for the caramel to a food processor or blender. You may have trouble getting it to process in your blender because it is a small volume of ingredients. If you do not have a food processor I suggest doubling the ingredients so you have enough volume that your blender will break it down. Lets be real, I’m sure you can find plenty of ways to use up the extra!! Store caramel in the fridge 1-2 weeks

  3. Toss frozen bananas and remaining shake ingredients into you blender. I have mentioned in other smoothie recipes that I keep bags of mixed greens or spinach in my freezer just for smoothies. It helps make the smoothie nice and cold, and my greens don’t go bad before I can use them! Blend on high until everything is nice and smooth.

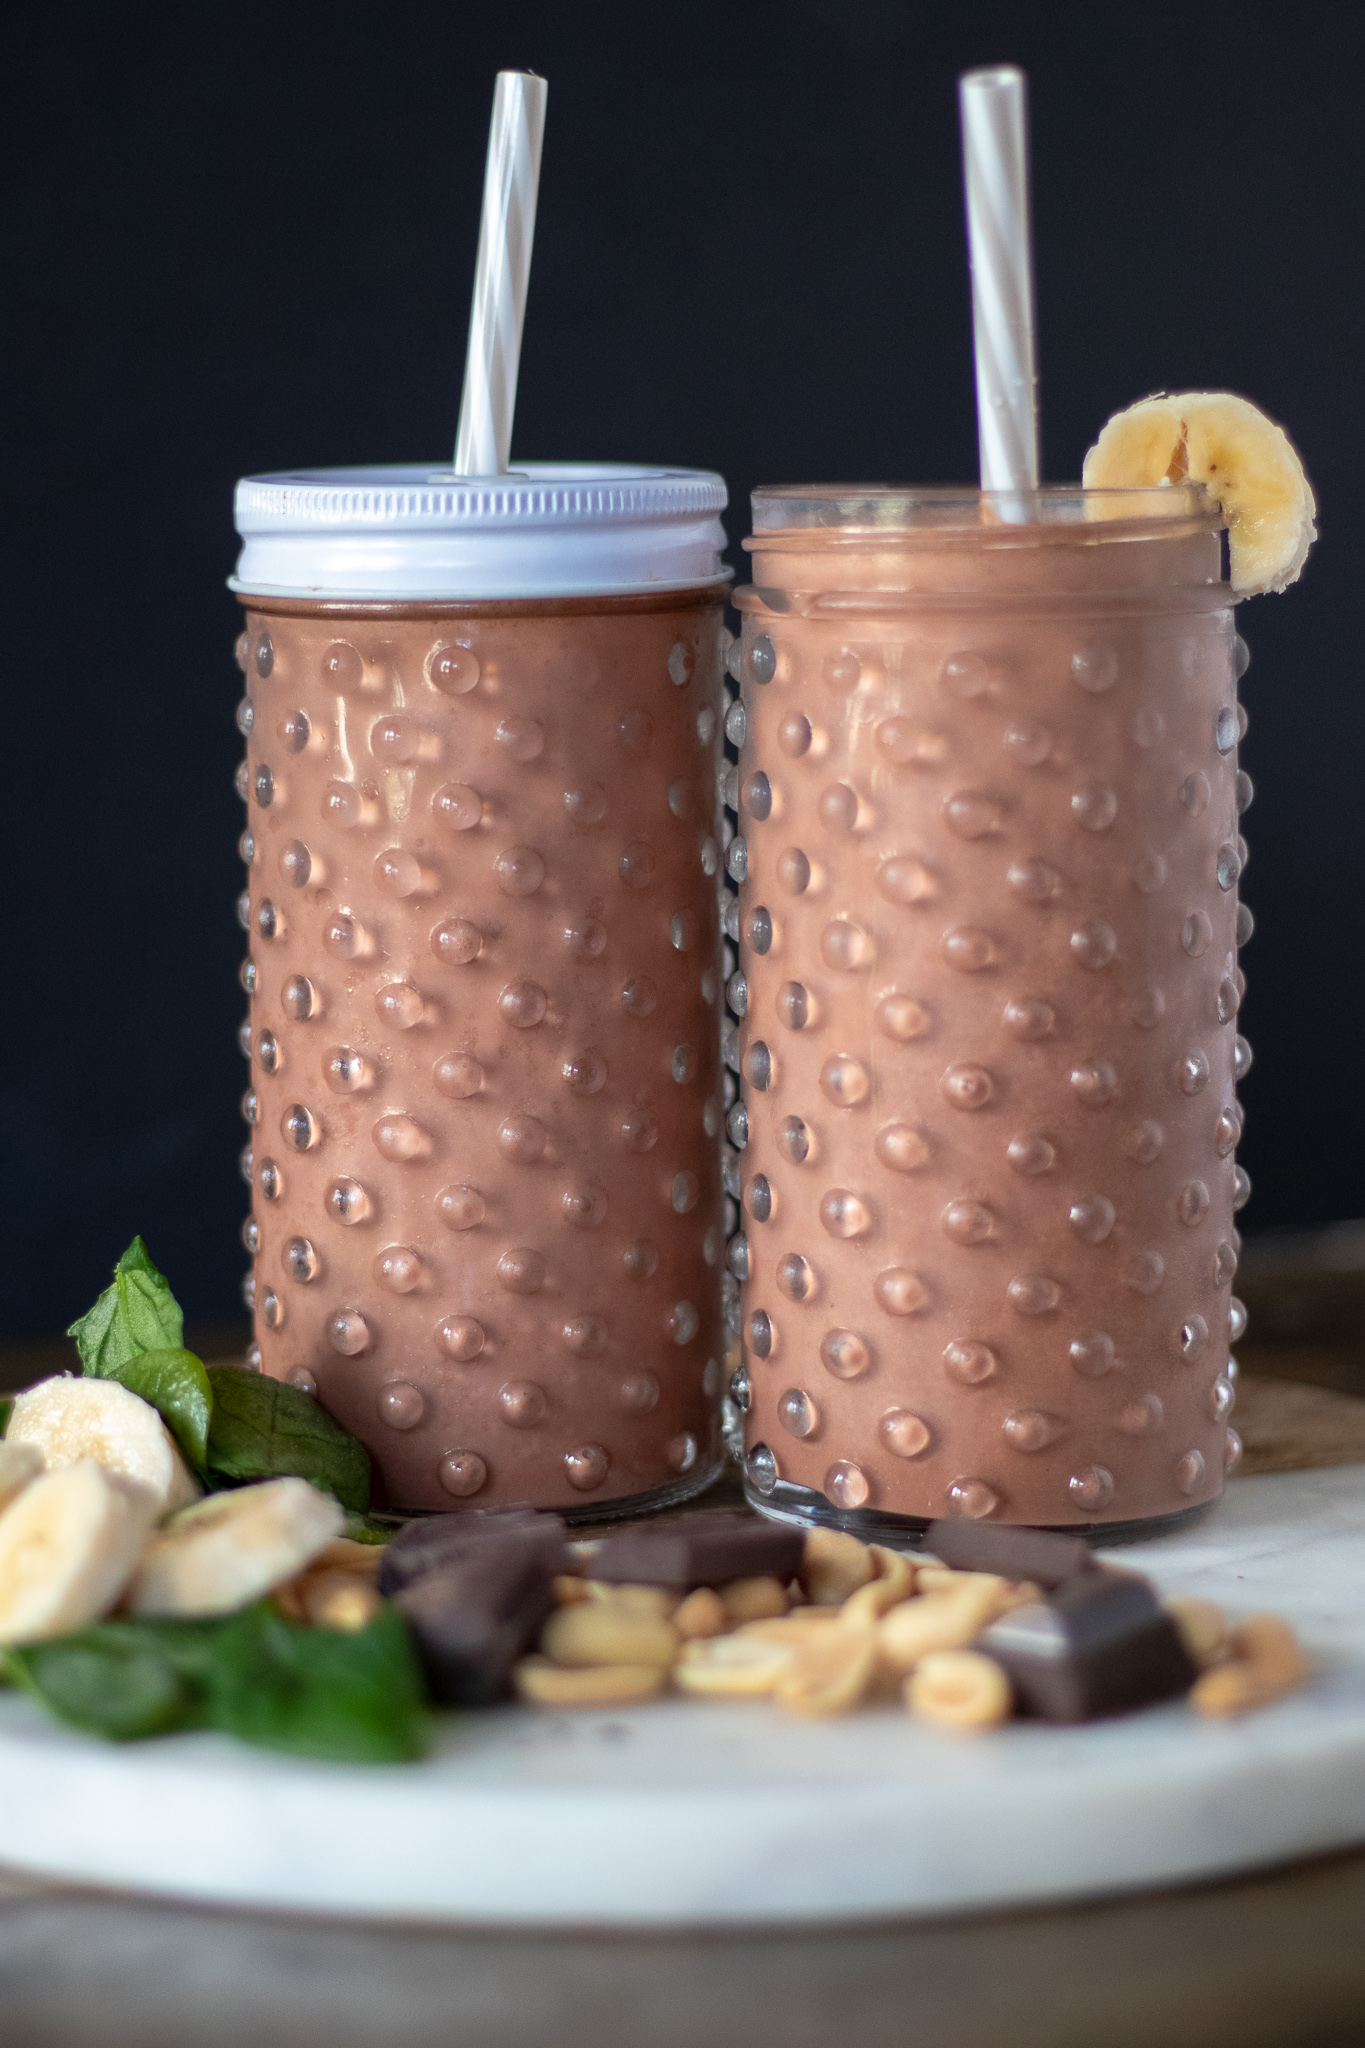
  4. To serve, pour smoothies into glasses, top with more shredded coconut (I like to toast mine if I have time) and drizzle with caramel sauce!

makes 2 large smoothies

If you liked this recipe, try these:

Chocolate Peanut Butter Smoothie, The Run-DMC

Orange Creamsicle Smoothie

Sweet Potato Pie Smoothie

Chocolate Coconut Caramel Samoa Pancakes

Raw Sesame Zucchini Noodle Salad

IMG_1278.jpg

I love making noodles out of zucchini.

If you do not have one of those zoodle making gadgets, don’t fret! A regular vegetable peeler works fine for veggie ribbon noodles!

This Raw sesame zucchini noodle salad is one of my favorites because it is so easy, delicious, and healthy. Just peel, toss, and serve! I mean really, you don’t even cook it, how easy is that!

Toss on some grilled tofu, and this perfectly light side dish transforms into fully satisfying, healthy lunch or dinner in just minutes!


Ingredients:

  • 3 medium zucchini

  • 1 and 1/2 cup shredded cabbage or slaw mix

  • 1 cup match stick or shredded carrots

  • 1/2 thinly sliced red onion

  • 1 tablespoon toasted sesame seeds

  • 1/4 chopped cilantro

For the Dressing:

  • 1/4 cup coconut aminos or soy sauce (if using soy skip the extra salt)

  • 2 teaspoons sesame oil

  • 1 tablespoon apple cider vinegar

  • 1 teaspoon salt

  • 2 teaspoons of agave or white sugar


Instructions:

  1. Wash and trim ends from each zucchini. Using a veggie spiralizer (zoodle maker) cut noodles from each zucchini into a large bowl. If you do not have a zoodle making gadget, you can cut ribbons from the zucchini using a regular veggie peeler. Just make long ribbons from the zucchini until you reach the core. The seedy part does not peel well.

  2. Add the slaw mix, carrots, onion, sesame seeds, and cilantro to the bowl with the zoodles and toss.

  3. In a small bowl whisk together the ingredients for the dressing. You can taste and adjust to your liking. Pour dressing over the veggies and toss. Garnish with extra cilantro, and sesame seeds if you like.

Serve at room temp or allow to chill before serving.

Vegan Lemon Lavender Cream Cheese Pop-Tarts

IMG_0876.jpg

I never grow tired of making pop-tarts.

I also never grown tired of thinking of new flavors to fill them with! I love all things lemon lavender and these pop-tarts are no exception

. Filled with an easy, tangy sweet lemon curd, and cream cheese, and topped with a sweet lemon lavender glaze, these pop-tarts are hands down my favorite flavor!

This pie dough is super quick and simple, as is the recipe for the curd!

If you have never had lavender in a baked good, especially paired with lemon, I think you will love it! If you don’t, then I am terribly sorry and honestly confused, because it is delicious!

Look for dried culinary lavender In your grocery stores bulk spice section. If you do not have luck finding it in larger grocery stores, look at you local health food market or farmers market.

So if you have missed pop-tarts since going vegan, rest assured you can easily make your own at home and they are far more delicious than any store bought pop-tart you could ever eat! I promise!!


INGREDIENTS:

1 cup whole wheat flour

1 cup all purpose flour

3/4 cup vegan butter

a pinch of salt

3 - 4 tablespoons ice water

1/3 cup vegan lemon curd

1/3 cup vegan cream cheese

1/2 cup powdered sugar

2 teaspoons dreid culinary lavender

2-3 teaspoon lemon juice


IMG_0821.jpg

Preheat oven to 350.

  1. Add both cups of flour, butter, and salt to a food processor and pulse until well combined.

  2. Add in the water, one tablespoon at a time until a soft dough has formed.

  3. Roll the dough out on a flour dusted, smooth surface to a 1/8 of an inch thick rectangle. You can trim up the edges with a sharp knife and save the scrap dough.

  4. Once the dough is trimmed and even, cut 3 inch by 5 inch rectangles from the dough, give or take. Be sure when you are calculating how many you can cut, to have a even number. Each pop tart needs 2 rectangles. Roll out any scrap dough and repeat the process.

  5. Scoop a heaping teaspoon each of lemon curd and cream cheese onto a rectangle, and smear it around a bit in the middle, carefully to not get too close to the edges.

  6. Top the lemon curd and cream cheese covered piece of dough with another rectangle of dough, and use a fork to press, and seal the edges. (for step by step pictures of the process, check out our Strawberry Pop-Tart recipe)

  7. Place pop tarts on a parchment lined baking sheet, or lightly spray one with cooking oil and bake for 20 - 25 minutes.

  8. While pop tarts are baking, mix together the powdered sugar with lemon juice. Add dried lavender and stir. If it is too thin, you can add a little more powdered sugar to thicken it back up. You want a spreadable consistency.

  9. Once pop tarts have cooled a bit, spread the icing and serve.

Yields 8 pop tarts.

IMG_0831.jpg

If you like this recipes, try these:

Vegan Lemon Curd

IMG_0950.jpg

This vegan lemon curd is quick, straightforward, and can be used in all kinds of recipes.

The base of this vegan lemon curd is coconut cream and is thickened with coconut oil and starch. The curd will thicken up during cooking and more when it cools.

I love all things lemon and can think of a million and ten ways to use this curd!

We use it in our lemon lavender pop-tarts, but it would be delicious on pancakes, waffles, inside cakes or pie, filling of cupcakes or just by the spoonful. No shame!! I will not judge you one bit.

This curd should stay good in the fridge for about 10 days, but it has never lasted that long in our house!

So go make this vegan lemon curd, put it on all the things, and regret nothing!


Ingredients:

  • 1 cup coconut cream, divided ( heavy coconut cream in the can, shaken well)

  • 2 tablespoons coconut oil

  • 1/3 cup lemon juice

  • 1/2 cup white sugar

  • 1/4 cup corn or tapioca starch. Tapioca will yield a more stretchy curd.

  • pinch of salt

  • Optional: 2 teaspoons lemon zest for extra lemon flavor


Instructions:

  1. In a medium sauce pan, whisk together 1/2 cup coconut cream and remaining ingredients over medium/low heat until the mixture thickens (about 5 minutes.) The curd will continue to thicken as it cools.

  2. Remove from heat and stir in the remaining 1/2 cup coconut cream.

  3. Allow curd to cool. Store in the fridge in an air tight container for up to 10 days.

Open Faced Vegan Roast "Beef" Sandwich with Jackfruit

Our oldest daughter used to order an open faced roast beef sandwich any chance she could get. Once we went vegetarian and eventually vegan, it was a dish she often mentioned missing. While it was not something I ever craved, I decided I would try to…

Our oldest daughter used to order an open faced roast beef sandwich any chance she could get. Once we went vegetarian and eventually vegan, it was a dish she often mentioned missing.

While it was not something I ever craved, I decided I would try to make a vegan version of an open faced roast beef sandwich that would hopefully satisfy her craving.

Although the jackfruit does not mimic the usual thinly sliced beef, the flavor is rich and convincing. This recipe takes a while to cook, but the prep time is fairly short. So if you are hanging around the house on a weekend, you can easily prep a batch of this vegan roast jackfruit, and let it cook while you go along your merry way!

I add red wine to this recipe and it truly makes all the difference in the rich, savory flavor, so I strongly suggest not skipping that ingredient. If you choose to skip out on the wine, I can not account for what that will do to the flavor of the jackfruit. I would suggest adding extra water or maybe some mushroom broth if you do decide to skip it!

This recipe is warm, savory, delicious, comfort food that has now become a regular on our families winter dinner rotation and hopefully yours, as well!

Ingredients:

  • Sliced sourdough or french bread

  • Vegan cheese slices

  • 2 cans of jackfruit in brine

  • 3 teaspoons low sodium Vegetable Better than Bouillon

  • 1 and 1/2 cups water

  • 1/2 cup red wine

  • 1 tablespoon tomato paste

  • 1 larger yellow onion, thinly sliced

  • 1 teaspoon dried thyme

  • 1 teaspoon black pepper

  • 2 tablespoons coconut aminos or soy sauce

  • 1 teaspoon minced garlic

For the Gravy

  • 1 yellow onion thinly sliced

  • 3 tablespoon all purpose flour

  • 2 teaspoons Vegetable Better Than Bouillon

  • 2 cups water

  • 1 teaspoon dried thyme

  • salt and pepper to taste

  • 1 teaspoon minced garlic

  • 2 teaspoons vegan butter

Instructions:

Preheat oven to 350 degrees.

  1. Heat a dutch oven, or another large OVEN SAFE pot, over medium heat on the stove top. Add a little oil, and the sliced onion, and cook until the onions are translucent. While the onion are cooking, drain the jackfruit, and using your fingers, shred the jackfruit apart into the pot with the onion. Add the Better than Bouillon and let the onion and jackfruit continue to cook for a few minutes to help remove the brine flavor the jackfruit tends to have.

  2. After about 5 minutes, add the water and remaining ingredients to the pot. Stir well and allow the mixture to come to a simmer. Once it is simmering, put the lid on the pot and carefully transfer it to the oven.

  3. Allow the jackfruit to cook in the oven with the lid on for about 1 hour. After an hour, remove the lid and cook for another hour, or until all the liquid has been absorbed. Check on the jackfruit and give it a stir a few times while it’s in the oven. Once all the liquid has been absorbed, carefully remove the pot from the oven and place the lid back on. Set aside while you prepare the gravy.

  4. For the gravy: In a medium deep skillet (I use my cast iron) add a few teaspoons of vegan butter over medium heat. Once the butter has melted, add the onions and garlic and sauté until translucent. Sprinkle the 3 tablespoons of flour over the onions and allow the flour to cook for a few minutes. Reduce heat to low. Whisk the Better Than Bouillon into the water and carefully pour the mixture into the pan. Add the remaining seasonings and stir well. Continue to stir the gravy until it has thickened.

  5. Place enough slices of bread on a baking sheet and top with cheese. Place in the oven until bread is toasty and cheese has melted (if you do not want cheese, just put the bread in until toasted).

  6. To make the sandwiches, top toasted bread with jackfruit roast “beef”and gravy.

Yields 6 - 8 open faced sandwiches.

Vegan Deviled Eggs

Perfect vegan deviled eggs

Once again agar powder steps in to do some truly amazing vegan magic (or science) to create a perfect vegan deviled egg!

For those unfamiliar with agar powder, it is a vegan gelatin derived from seaweed. It can be found in asian grocery stores or online. I use agar often in vegan cheese making, so always have some on hand.

The next ingredient that makes these eggs really convincing is Indian Black Salt, or also called Kala Namak. It is salt that is high in sulfur so it smells and taste like eggs! You can find this at specialty spice shops or also online. I really suggest not skipping the salt because it is the ingredient that make these vegan eggs taste like an egg.

The filling is made from tofu because as we all know, tofu makes a great egg substitute. It makes for a creamy filling with the help of some mustard, vegan mayo, and spices.

If you do not have egg molds, they can purchased on amazon or craft stores in the baking section, or you can use a deviled egg serving tray to mold the whites. A serving tray is actually how I made my first batch and it worked well, although it makes for shallow eggs.

I have fed these eggs to any and all vegan and non vegan friends and family that were willing to try them, and they were all amazed at how close these are to the real thing! So if you are skeptical, by all means, whip yourself up a batch and let me prove you wrong! I think you and everyone else you serve them to will be wowed and amazed.

I have missed deviled eggs for years and now I don’t have to. I make these for just about every pot luck, BBQ, or holiday get together side by side next to tray of regular deviled eggs, you would hardly notice a difference. Magic….sheer vegan magic!

These deviled eggs are delicious, beautiful, and super fun to serve to unknowing friends and family, if for no other reason, for the reaction you get when you tell them they are vegan!


Ingredients:

For the egg white:

  • 2 cups almond milk

  • 1 tablespoon agar powder

  • 1/2 teaspoon Indian Black Salt, also called Kala Namak (this salt has a high sulfur content so it smells and tastes like egg. It is an essential ingredient in this recipe if you want this vegan version to taste like an egg)

For the yolk:

  • 1 block extra firm tofu

  • 1/4 cup vegan mayo

  • 3 tablespoons yellow mustard

  • 1 tablespoon apple cider vinegar

  • 1/2 teaspoon Indian Black Salt

  • 1/2 to 1 teaspoon turmeric (This is for color. The more you add, the stronger the flavor, so it is just up to preference)

  • 1/2 teaspoon dried dill, plus more for garnish

  • 1 teaspoon all purpose greek seasoning (you can skip this if you like, but it is delicious in the eggs)

  • 1-2 tablespoons diced dill pickles

  • pepper and salt to taste

  • paprika for garnish


Instructions:

  1. You will either need a silicon egg mold or a deviled egg serving tray, the kind with egg shaped divots, to form the egg whites. If you use the serving tray the eggs will be pretty shallow, but it still works.

  2. In a small sauce pan, whisk together almond milk, agar, and Indian black salt. Heat the mixture over medium heat until it comes to a simmer, then remove from the heat.

  3. Transfer the mixture to a pyrex, or glass bowl, and allow to cool on the counter top. Let the mixture sit until it appears to be thickening but is still liquid, and pourable, stirring occasionally. I have found if you pour the mixture into the molds too soon, while it is still very hot, the milk solids will separate and sink to the bottom, and the water will be left at the top. This is not an appetizing egg!

  4. Once the mixture is ready, pour it into the eggs molds and pop them in the fridge for about half an hour, or until they are nice and solid.

  5. While the molds are in the fridge, prepare the yolk filling by adding all of the ingredients, except the pickles, to a high speed blender or food processor. Process on high until the mixture is creamy and smooth. If you want to pipe the filling into the eggs, then you can drop the pickles into the mixture at the end and pulse a few times to get them good and minced. Large pieces of pickle won’t make it through a piping tip.

  6. Remove the eggs from the fridge once they have set, and spoon out a divot from the middle to make space for the filling.

  7. You can either scoop spoonfuls of the yolk filling onto the eggs, or fill a piping bag with a large tip and pipe the filling onto the egg whites. Garnish with extra dill and paprika.

  8. Store the deviled eggs in the fridge for 2 or 3 days.

Yields 1 - 2 dozen eggs depending on the depth of the mold you use.

A single vegan deviled egg in a wooden serving dish

Lavender Vanilla Vegan Coffee Creamer

Once the weather starts getting a little warm, I abandon all affection for wintery, spicy recipes, and quickly move into craving light, springy food and drink. This includes all things lavender, and lavender coffee drinks are no exception. If you ha…

Once the weather starts getting a little warm, I abandon all affection for wintery, spicy recipes, and quickly move into craving light, springy food and drink. This includes all things lavender, and lavender coffee drinks are no exception. If you have never had a lavender latte or other lavender flavored drink, I can not urge you enough to give it a try. They are light and fragrant, and this recipe is just sweet enough without being over powering. You can find dried culinary lavender at many grocery stores, allowing you to get your lavender coffee fix quickly, and affordably while you patiently wait on spring!

Ingredients:

  • 1/2 cup cashews, plus water for soaking

  • 1 1/2 cups water

  • 2-3 teaspoons dried culinary lavender

  • 3-4 tablespoons agave

  • 1 teaspoon vanilla extract

Instructions:

  1. Cover cashews in water in a microwave safe container and microwave on high for 3 minutes. You can also soak them in hot water for a few hours if you prefer.

  2. Drain soaked cashews and add them, along with the remaining ingredients, to a high speed blender. Blend on high until completely smooth, and there are no more bits of cashew.

  3. Store in an airtight container in the fridge for up to one week. Shake well before each use.

Vegan Valentine's Chocolates (3 ways)

IMG_1168.jpg

I am pretty sure in my lifetime I have eaten more heart shaped boxes of chocolates than I care to share with you.

I LOVE cream filled, caramel filled, nugget filled, nut filled, jelly filled, chocolates. Seriously, my husband will attest to this fact, and he will also tell you I am the kind of person who will take one bite out of each one, like a jerk, so that they are from the point on property of ME, and so no one else will want them (I’m not proud of this, but it is what it is.) You know what I am talking about. You take a little bite out of one and realize its not your fave and move on, but once all the good ones are gone you will go back to those less tasty chocolates, out of desperation.

But, what if you made your own chocolates full of your most favorite flavors, AND they were vegan! Well my friends it’s actually really simple! You just need a candy mold, some vegan chocolate, and a few things for the fillings.

I wish I could take full credit for these sweet little master pieces, but it is actually our 13 year old, genius of a baker daughter ,Peyton, who brought us to this magical place of homemade chocolates! I will however take full credit for eating more of these candies than anyone else in our house.

So this Valentine’s Day (or any ol random day) whip up a batch of these for someone you love, like, simply tolerate, or even for yourself.

And if you don’t want to make them yourself, get one of your kids to do it while you watch reruns of the Office with your feet up, sipping on some coffee (I’m just daydreaming at this point) xoxo


Ingredients:

You will need candy molds for this recipe. You can use any candy molds you like, but we have found the hard molded plastic molds work better than the silicon. The silicon molds tend to cause the candies to crack when you attempt to remove them from the mold.

  • 1 cup chopped dark vegan chocolate or vegan chocolate chips

  • 1 teaspoon coconut oil

Strawberry cream filling:

  • 1 1/2 cups powdered sugar

  • 1 large strawberry, mashed up

  • 2 tablespoons softened vegan butter

  • 2 tablespoons light corn syrup

Maple cream filling:

  • 1 3/4 cups powdered sugar

  • 2 tablespoons maple syrup

  • 2 tablespoons softened vegan butter

  • 2 tablespoons light corn syrup

Carmel filling:

  • 2/3 cups white sugar

  • 3 tablespoons water

  • 1 tablespoon corn syrup

  • 7 tablespoons oat milk or canned coconut milk (these milks are thick and work well for caramel)

  • 1 tablespoon of vegan butter

  • pinch of salt

Instructions:

  1. Start buy getting set up: You will need a nice big piece of parchment paper or a silicone mat. Line up your candy molds next to the parchment paper or mat.

  2. Place the chocolate and coconut oil in a microwave safe dish. Microwave chocolate for 30 seconds at time, stirring each time, until all of the chocolate has melted.

  3. Coating the molds: Pour a small amount of melted chocolate into each mold and spread the chocolate up the sides. Tap the molds on the counter to remove any air bubbles, then turn the molds upside down onto the parchment paper so the extra chocolate drips out (see pictures above.) Pop the molds in the fridge for 10 - 15 minutes or until the chocolate has set. Prepare filings while molds set.

  4. For the strawberry and maple filling: Mix all of the ingredients for either filing in a bowl until nice and smooth, and there are not more powdered sugar lumps. If making strawberry, first mash the fresh strawberry with a fork in the bowl before adding the other ingredients.

  5. For the caramel filling: In a small sauce pan add white sugar, corn syrup, water, and stir. Place pan on the stove top on medium heat. DO NOT STIR THE MIXTURE ONCE IT IS ON THE STOVE. Allow the mixture to simmer until golden brown. Once the mixture has reached golden brown, remove from the heat and carefully stir in the butter and milk. The mixture tends to bubble up a lot once you add the butter and milk, so be careful not to burn yourself. Once everything is well combined, pour caramel into a bowl and allow to cool.

  6. To fill the molds: Pipe or scoop filling into the centers of the chocolate coated molds, leaving enough room around the sides and the top to cover the candies in chocolate. Reheat the chocolate until it has melted. Pour melted chocolate over the filling all the way to the tops of the molds. Once all of the molds are covered in chocolate, run a cake scraper, or butter knife across the top of the candy tray to remove the excess chocolate. Pop chocolates back in the fridge until the chocolate is hard and set. Turn over your mold and tap to remove the chocolate (if using the hard mold) or if using a silicon mold, gently peel the mold away from the candies and remove.

  7. Store leftover chocolates in the fridge. (They get a bit melty if they sit out too long and its warm inside your house, so I always just keep them in the fridge)


This recipe will fill 2 - 3 molds depending on the size of the mold. There is normally leftover filling which we refrigerate for a later batch. The cream fillings will keep in the fridge for several weeks. You may need to melt more chocolate depending on how many candies you are making, as well.

IMG_1058.jpg

Popcorn Tofu

Popcorn Tofu

Popcorn chicken used to be a serious weakness of mine! My kids even used to beg me to get them a box from our grocery store deli every time I went shopping.

After we went vegan we were all so excited to find the most delicious popcorn tofu at Costco! Imagine my joy! But in true Costco fashion, I was able to buy it maybe twice before they stopped selling it, despite my long, pleading notes in the suggestion box.

Eventually, I decided I could just start making our own. Sometimes I truly wonder what has happened to my brain, then I remember I have 4 kids, enough said.

So when it FINALLY occurred to me to make my own, it was game on. And I promise this recipe is way better than what I got at Costco! You could just as easily make this recipe in your air fryer if you are avoiding oil. I would try it at 375 degrees for 15 - 20 minutes, but check half way to see if they are getting too crispy.


This recipe is quick and easy, perfect for a quick dinner, a salad topper, filling for wraps, party appetizer, or a tasty snack! This popcorn tofu also works well for meal prep. Just fry up a batch and store it in the fridge. When you are ready to use it, just pop it in a 350 degree oven for 10 minutes and you are good to go!

And if you were ever a fan of honey mustard, I highly suggest making our Sweet No Honey Mustard dip for these tasty nuggets!


Ingredients:

  • 1 block extra firm tofu

  • 3/4 cups corn or tapioca starch

  • 2 cups bread crumbs

  • 1/2 cup vegan plain yogurt (I use Kite Hill)

  • 1/2 cup non dairy milk

  • 1 teaspoons salt

  • 1 1/2 teaspoons each, garlic, smoked paprika, and all purpose seasoning (we use a greek seasoning)

  • 1/2 teaspoon each chili powder, thyme, black pepper

  • oil for frying

Sweet No Honey Mustard Sauce:

  • 1/3 cup vegan mayo

  • 3 tablespoons yellow mustard

  • 2 tablespoons agave

  • 1/2 teaspoon all purpose seasoning (we use an all purpose greek seasoning)

  • pinch of salt


Instructions:

  1. Remove tofu from package and drain. Wrap the tofu in a clean kitchen towel or some paper towels and place a few books, or a heavy pan on top. Let the tofu sit for 15 minutes to press out any extra water.

  2. Cut the tofu block in half, then cut halves into 1/2 inch strips. Using your hands, break off pieces of the strips to form little tofu nuggets.

  3. In a medium bowl, whisk together the yogurt and milk.

  4. In another, bowl whisk 1/2 cups of the starch and all of the seasonings.

  5. In another bowl, add the bread crumbs.

  6. First toss the tofu into the starch and seasoning mixture

  7. Next add the tofu to the milk and yogurt and stir. All of the liquid should be absorbed by the tofu, although it will be a sticky mess. Now sprinkle the remaining 1/4 cup of starch over the tofu and toss.

  8. Using your hands (I promise, it’s just easier) pick up a small handful of tofu and toss it around in the breadcrumbs until fully coated. You can use your hands to separate any tofu that got clumped together, sifting it though your fingers. Place coated tofu into a dish, and repeat until all of the tofu is coated.

  9. Heat a few inches of oil in a high sided skillet. I use my cast iron for this. While the oil is heating, place a wire cooling rack on top of a paper towel lined baking sheet. This is where you will place the finished tofu to cool.

  10. Once the oil is nice and hot, carefully add the tofu in small batches to the pan (you can poke a chopstick into the oil, and if tiny bubbles form around the stick, the oil is ready). Using a slotted spoon, keep the tofu moving around for a few minutes to make sure all of the sides get nice and crispy. Once tofu is browned and crispy, remove and place on a wire cooling rack. Repeat with remaining tofu.

  11. If making the Sweet No Honey Mustard, whisk all ingredients together and store in an air tight container in the fridge. Serve tofu hot, or even room temp with sweet mustard, or any dip you like.

If you like this recipe, try these:


Vegan Chocolate Peanut Butter Smoothie (The Run- DMC, cause its tricky)

I am normally not a huge fan of hiding veggies from my kids or husbands in the food I make, but smoothies are an exception! I love beets! Raw, roasted, pickled, I love them. My family, not so much. So if I can sneak these nutrient dense, vitamin ric…

I am normally not a huge fan of hiding veggies from my kids or husbands in the food I make, but smoothies are an exception! I love beets! Raw, roasted, pickled, I love them. My family, not so much. So if I can sneak these nutrient dense, vitamin rich veggies into a shake without them knowing, I will do it every time ( cause I’m tricky like that!) And I promise they always drink this one and are none the wiser!. This smoothie is sweet, nutty, chocolaty goodness, and a healthy way to start you or your families day! And if you now have “It’s Tricky” stuck in you head for the rest of the day, you are most welcome. I’m right there singing along with you.

Ingredients:

  • 1 banana

  • 1/4 cup dark chocolate cocoa powder

  • 3 heaping tablespoons peanut butter

  • 1 big handful of fresh or frozen spinach (I buy a bag of fresh and toss the whole bag in the freezer for smoothies, works great!)

  • 1/4- 1/2 a small red beet, peeled and quartered

  • 1 - 1 1/2 cups plant based milk

  • 1-1 1/2 cups ice

  • 1/2 teaspoon vanilla extract (optional)

  • 1-2 scoops vanilla or chocolate protein powder (optional)

Instructions:

  1. Place all ingredients into a high speed blender. I have a vitamix so it breaks down the beet really well and really quickly. If you have a regular ol blender, no problem, just cut the beet into smaller cubes so your blender can handle it. Blend on high until completely smooth. You can add more ice or milk if the smoothie seems too thin or too thick for your liking. I used a whole small beet. I suggest if you are not a fan of beets, start by adding a quarter or half of a small beet at first. Its a great way to sneak in extra vitamins and nutrients and you really can not even tell it’s there!

Serving size: 2 large glasses or 3-4 small

If you liked this recipe, try these:

Orange Creamsicle Smoothie

Chocolate Caramel and Coconut smoothie, The Samoa

Sweet Potato Pie Smoothie

Vegan Coconut Kimcheese (Kimchi Cheese)

IMG_0797.jpg

I can eat an entire jar of kimchi by myself in a week, and often do.

I can also eat my weight in vegan cheese if given the chance. So for me, mixing the two was a no brainer, and so I introduce to you KIMCHEESE!

I often add sauerkraut to my vegan cheese recipes to give them that cheesy zip, and kimchi works just as well!

This cheese is tangy, spicy, quick and easy, but most importantly it is DELICIOUS! Even my husband who swears he does not like kimchi, inhaled this one!

Vegan cheese making is really so easy, especially quick set agar cheeses like this one. The mix up in minutes and are set in a few hours.

There is not a replacement for the coconut oil in this cheese, however. It is a key ingredient in helping solidify this kimchee vegan cheese. Agar is a vegan gelatin and on its own, the texture is not firm enough for my liking. The coconut milk solidifies once cold and helps get a nice firm texture, and aids in the remelting of the cheese once cooked.

This vegan cheese will shred, slice and melt, so It will work beautifully for snacking, salads, or even the best grilled cheese you may ever eat! If you can not find agar powder locally, check our pantry staples for a link to order on amazon prime!


Ingredients:

  • 1 can of full fat coconut milk or cream

  • 2 tablespoons apple cider vinegar

  • 2 teaspoons miso paste

  • 1 teaspoons of salt

  • 2 tablespoons nutritional yeast

  • 1/4 cup triple refined coconut oil, melted

  • 2 tablespoons plus 1 teaspoon agar powder

  • 3 tablespoons arrow root or tapioca starch

  • 3/4 cups vegan kimchi


Instructions:

  1. In a food processor or high speed blender, add all of the ingredients EXCEPT the milk, agar, and kimchi.

  2. Pulse until everything is all mixed up.

  3. Next, add the milk and agar powder to a medium sauce pan, and bring to a boil. Reduce heat and simmer for about 2 minutes, until mixture thickens to the consistency of a thin pudding.

  4. Add the milk mixture to the ingredients in the food processor and mix for about a minute. The mixture will quickly begin to thicken as the agar begins to solidify at room temperature. Once everything is well mixed, add the kimchi and just pulse a few times to get it all chopped up, and mixed in.

  5. Transfer to the mixture to a few ramekins or small bowls. You should be able to fill 2 or 3 small bowls.

  6. Allow the cheese to harden in the refrigerator uncovered for several hours.

  7. Once the cheese is set, store in an airtight container in the fridge for about a week.

Cheesy Vegan Scalloped Potatoes

IMG_0603.jpg

I love potatoes and I love cheese. So what’s not to love about these super easy cheesy vegan scalloped potatoes.

All you need is a pretty simple vegan cheese sauce, some thinly sliced potatoes, an 8x8 pan, and you are on your way to a veganized classic!

I used a mandolin to slice the potatoes to get them extra thin. You do need the potatoes as thin as you can get them. If you do not have a mandolin you can use the long cutting side of a box grater or a really starp knife.

Basically you cut a pile of thin potatoes, whip up an easy cheese sauce, layer and bake. It’s that easy.

if you are allergic to cashews, you can replace them with sunflower seeds or a mix of sunflower and pumpkin seeds. Just follow the same measurements and instructions for the cashews!

This side dish is warm and comforting and pretty easy to make. Its gluten free, too!

I am all in when it comes to my favorite carb and anything vegan cheese related!


Ingredients :

  • 4 - 5 medium russet potatoes

  • 1 cup cashews soaked in hot water for a few hours

  • 2 cups water

  • 1/4 cup nutritional yeast

  • 1/2 teaspoon turmeric

  • 1/2 teaspoon smoked paprika

  • 1 teaspoon light miso paste

  • 1 tablespoon apple cider vinegar

  • 4 tablespoons tapioca or corn starch

  • 1 teaspoon salt

  • 1/2 cup plant milk (I used almond milk)

  • diced green onions for garnish (optional)


Instructions:

preheat oven to 350 degrees

  1. Wash potatoes, but do not peel. Thinly slice the potatoes using a kitchen mandolin. If you do not have a mandolin you can thinly slice the potatoes using the single blade side of your box grater, or cut them as thinly as possible using a sharp knife. If they are on the thicker side it will just take them longer to bake.

  2. Drain the cashews, adding them and the remaining ingredients,minus the plant milk, to a high speed blender or food processor. Blend on high until the mixture is completely smooth.

  3. Transfer the cheese mixture to a medium sized sauce pan and heat over medium heat. Whisk the mixture continuously until it begins to thicken to the consistency of thick pudding. Once it has thickened, whisk in 1/2 cup of plant milk.

  4. Lightly spray an 8x8 casserole pan with oil. Start by placing a thin layer of potatoes on the bottom, cover in some cheese sauce, then another layer of potatoes, cheese sauce, and continue the pattern until all of the potatoes and cheese have been used. The top layer should be cheese sauce.

  5. Bake for about 45minutes to one hour, or until the potatoes are cooked through. The time may vary depending on how thick you cut the potatoes. If the top seems to be browning before the potatoes are finished, you can cover the pan with some foil for the remainder of the bake.

  6. Once the scalloped potatoes are finished cooking, sprinkle with diced green onions to serve.

IMG_0589.jpg

Vegan Chocolate Peanut Butter Dream Cake

wide.jpg

Chocolate and peanut butter are a classic dessert combo!

I would have sworn when I was a kid that I could have live off of chocolate peanut butter cups.

Now as an adult, I would swear I could live off of this cake.

Creamy peanut butter frosting on top of the perfect vegan chocolate cake. It’s everything you think it would be and probably more. We added a pinch of almond extract to the frosting for an extra nutty kick, and topped the cake with salty roasted peanuts, and shaved vegan chocolate.

Vegan baking is no harder than regular baking, it is all about learning how to replace eggs and dairy. I like to use oat milk when baking because it gives vegan bakes a better brown! I like to also use aquafaba to replace eggs, and sometimes powdered egg replacer or flax eggs. It is all about leaving how to swap a few things out and you will get a cake that is just as good as the non vegan version if not better!!!

We use WHIPPED aquafaba in this cake to replace the eggs. We are measuring the product AFTER it has been whipped so keep this in mind. You do not need 1 1/2 cups of chickpea liquid! You will have leftovers of the whip and it will keep in the fridge and whip back up later for later use! Save the chickpeas and add them to a salad, roast them as a snack, or mash them into hummus!!!

. This cake is a sweet, salty, chocolatey, peanut buttery, vegan dream that no one will ever even guess is vegan!!!!


Ingredients:

  • 2 cups all purpose flour

  • 2 cups sugar

  • 3/4 cup dark cocoa powder

  • 1 1/2 cups aquafaba (chickpea liquid that has been whipped with cream of tarter resembling whipped egg whites)

  • 1 teaspoon baking soda

  • 3 teaspoons baking powder

  • 1 teaspoons salt

  • 1/2 cup neutral oil (I use Grape seed oil)

  • 1 cup brewed coffee

  • 1 cup plant based milk (I like oat milk for baking) plus 1 teaspoon apple cider vinegar

  • 1 teaspoon vanilla extract

Peanut Butter Frosting:

  • 1/2 cup vegan butter

  • 1/2 cup vegan shortening

  • 1/2 cup creamy peanut butter

  • 1 teaspoons vanilla extract

  • 1/2 teaspoon almond extract (optional)

  • 3 cup powdered sugar

  • pinch of salt

  • splash of plant based milk

  • Optional decorations: shaved chocolate, peanuts, chocolate bar pieces


Instructions:

Preheat oven to 350 degrees.

  1. In a large bowl, mix together flour, sugar, cocoa powder, baking powder, baking soda, and salt.

  2. In the bowl of your stand mixer, or another large bowl if using a hand mixer, add the milk, oil, brewed coffee, and vanilla. Slowly pour in the dry ingredients and mix until well combined. Once the batter is all mixed up, slowly fold in the whipped aquafaba using a rubber spatula, just until incorporated. Do not over mix, this deflates the aquafaba, resulting in a less fluffy cake.

  3. Grease and lightly flour two eight inch cake pans and divide the batter evenly between them.

  4. Place the pans on the top rack of your oven and bake for 45 minutes to 1 hour, or until a tooth pick comes out clean when poked in the center of the cakes.

  5. Once cakes are finished baking, place them on a cooling rack to cool completely before frosting.

  6. To prepare the frosting, beat the butter, shortening, and peanut butter together in a stand mixer, or in a large bowl, using your electric hand mixer. Once the mixture is completely creamy, beat in the vanilla and almond extract. Slowly begin to beat in the powdered sugar, and mix until there are no more lumps. Add a tablespoon at a time of plant milk until the frosting is creamy and smooth, and a spreadable consistency. If you accidentally get it too thin, add a little more powdered sugar to thicken it back up.

  7. To even out each cake, take a large sharp knife, and carefully shave off a thin, even layer from the top of each cake. This will insure the cakes stack evenly. Add a few spoonfuls of icing to the top of one cake, and spread it evenly. Take the other cake and turn it upside down on top of the iced cake ( this way the top of your cake is perfectly smooth and flat.) Evenly cover the cake with the remaining frosting, using an icing spatula or butter knife if you do not have an icing spatula.

  8. If you want to decorate the cake, you can shave a vegan chocolate bar on a box grater, and press the shavings into the sides and top of the cake. Sprinkle roasted peanuts around the edge of the cake, and stack some chocolate bar squares in the middle.

  9. Store at room temperature in a covered container.

IMG_0733.jpg

Vegan "Chicken" Southwestern Soup

IMG_0575.jpg

Spicy “chicken” Southwestern soup, topped with avocado…you had me at avocado!

This soup has just the right amount of spice, packed with black beans, corn, and shredded jackfruit, it is hearty and so delicious. Jackfruit is my favorite vegan shredded meat substitute because the texture is spot on and it is so versatile to work with. It is also inexpensive so that is an added bonus

And did I mention how quick and easy it is to throw together, making it perfect for a healthy weeknight dinner! It is also the perfect soup to help open up the ol sinuses when a cold or allergies have you down! I like to kick up the heat with some extra hot sauce but you can keep it mild if spicy isn’t you jam.

Bake up a pan of our Perfect Vegan Cornbread, and you are sure to have a meal that leaves everyone full, warm, and satisfied!


Ingredients:

  • 1 can jackfruit in brine

  • 1 can black beans, drained and rinsed

  • 1 can corn, drained

  • 2 cans diced tomatoes

  • 1 small can green chiles

  • 1 medium onion, diced

  • 4 cups vegetable broth

  • 1 teaspoon cumin powder

  • 1/2 chili powder

  • 1 teaspoon salt

  • 1/2 teaspoon black pepper

  • juice from 1 lime

  • 1/3 cup chopped cilantro plus more for garnish

  • 1 avocado for garnish

  • optional: a few splashes of hot sauce

  • optional: tortilla strips for garnish


Instructions:

  1. Drain jackfruit and finely chop the pieces, or I find it faster and easier to just shred the pieces of fruit between my fingers. If you have never used canned jackfruit before, the pieces are kind of triangular shaped and soft. They easily come apart resembling shredded meat. Be sure to find jackfruit in brine vs jackfruit packed in syrup.

  2. Heat a large pot or dutch oven over medium/hight heat, and add 1 - 2 teaspoons of oil. Add the diced onions, can of green chilies, and the jackfruit to the pot. Let the veggies sauté until the onions become soft.

  3. Add the beans, corn, tomatoes, broth, seasonings, cilantro, and lime juice to the pot. Stir well and lower the heat to low. Cover the soup and let it simmer for about 25 minutes. Taste and add more salt, pepper, or other spices if you feel like you would like more.

  4. While soup is simmering, dice the avocado and some extra cilantro for the garnish.

  5. To serve soup, top with diced avocado, more cilantro, and crispy tortillas strips if you like. You can also stir in extra hot sauce or vegan sour cream.

Serves 4 - 6.

Vegan Sun-dried Tomato and Garlic Cheese ball

IMG_0423.jpg

It’s probably pretty obvious by now that I am a big fan of vegan cheese balls!

I love them because they come together really quickly, and are always a crowd pleaser, no matter the crowd!

Not only are the perfect for parties and gatherings, but we often keep them in the fridge for snacking and bagel spreads!

I am also a big fan of sun-dried tomato and basil, so this combo makes for a really delicious, fresh, and flavorful cheese ball!

The cheese ball mixes up quickly and only needs a few hours to set before it is ready to eat! You an also freeze these cheese ball for later! Just thaw and you are ready to go!


INGREDIENTS:

  • 1 cup soaked cashews (unsalted, unroasted) soaked in hot water several hours then drained.

  • 1/2 cup refined coconut oil

  • 1/2 cup sun-dried tomatoes

  • 1-2 teaspoons minced garlic

  • 2 teaspoons light miso paste

  • 1/2 small onion

  • 1/4 cup nutritional yeast

  • 1 tablespoon apple cider vinegar

  • 1/2 teaspoon salt

  • 1 teaspoon fresh basil, or 1/2 teaspoon dried basil


INSTRUCTIONS:

  1. Cut the onion into quarters, and pulse a few times in your high speed blender, or food processor.

  2. Now, add all of the ingredients, minus the sun-dried tomatoes,to a food processor or high speed blender. Process until completely smooth. You will likely have to scrape the sides down a few times to get all the cashew bits blended.

  3. Add sun dried tomatoes and pulse just a few times until they are minced up.

  4. Line 2 small bowls, or ramekins, with a pieces of plastic wrap. You want a piece big enough that it will hang a good bit over the sides.

  5. Lay some fresh basil leaves in the bottom of the bowl for garnish if you like.

  6. Divide the cheese mixture between the bowls. Take the pieces of plastic wrap that are hanging over the sides, pulling them up, twisting them together at the top.

  7. Put the cheese balls in the fridge for 3-4 hours to firm up before serving. Store leftover in fridge for up to 5 days.

Serve with crackers, veggies, or on a bagel

Orange Creamsicle Smoothie

How lucky we are that citrus season falls during cold and flu season! Fresh, plentiful, citrus is normally widely available and extra affordable during the winter months, making it easy to get all that vitamin C you need to fight off those winter ti…

How lucky we are that citrus season falls during cold and flu season! Fresh, plentiful, citrus is normally widely available and extra affordable during the winter months, making it easy to get all that vitamin C you need to fight off those winter time germs. I love fresh oranges, and living in Florida they are especially plentiful this time of year. So what’s a girl to do other than try think up new, and tasty ways to use up all of these oranges. We drop a whole orange into this smoothie getting all of the benefits of the fruit without all of the extra sugar you can get using bottled orange juice. You can also easily add a scoop of your favorite vegan protein powder for an extra kick of morning protein! So if you love orange creamsicle as much as I do, then this smoothy is definitely one you need to try!! Cheers to bright, healthy, citrus filled mornings!!

Ingredients:

  • 1 large navel orange

  • 1 and 1/2 cups almond or coconut milk

  • 1 and 1/2 cups ice

  • 1/4 cups raw cashews or almonds

  • 3 or 4 date, or you can use a few teaspoons of agave to sweeten

  • 1/2 teaspoon vanila extract

  • optional: 1 scoop vanilla vegan protein powder

Instructions:

  1. Peel the orange and cut into quarters.

  2. Add the orange and all of the remaining ingredients to a blender, and process on high until creamy and smooth. For a thicker smoothie, you can add another half cup of ice.

Serves 2

If you liked this recipe, try these:

Chocolate Peanut Butter Smoothie, The Run-DMC

Chocolate Caramel and Coconut smoothie, The Samoa

Sweet Potato Pie Smoothie

Orange Creamsicle Pancakes

Vegan Gorgonzola Fried Brussels Sprouts

IMG_0535.jpg

We are a house divided where Brussel sprouts are concerned. I personally will never turn one down, but don’t ask my 8 year old to even look at them.

One of my families favorite ways to eat Brussels sprouts is slathered in gorgonzola sauce (or the vegan version of said sauce.) It took me a while to figure out a vegan version of my favorite cheese sauce, but once I did I could not stop making things with it! It is DELICIOUS!

So when I began daydreaming about new Brussels recipes, I knew it had to involve gorgonzola. And of course, I knew I should deep fry them, because I’m from the south, and we will attempt to fry just about anything down south! T

hese turned out better than I even imagined! I served my first batch at our New Years Eve party and there was not a single Brussels sprout left on the plate.

Even friends who declared they detest Brussels sprouts gobbled them up….then again, they are fried sooooooo, thats a game changer!

So not matter if you already love, or (think you) hate Brussels sprouts, try battering them in gooey vegan gorgonzola sauce, deep frying them, then let me know what you think!


Ingredients:

  • 1 pound fresh Brussels sprouts

  • 2/3 cups all purpose flour

  • 8 oz panko breadcrumbs

  • 1 teaspoon salt

  • 1 teaspoons garlic powder

  • 1 batch gorgonzola cheese sauce

  • oil for frying

Gorgonzola cheese sauce:

  • 1/2 cup cashews (I use unroasted, unsalted)

  • 1 cup water (plus more for soaking cashews)

  • 2 tablespoons nutritional yeast

  • 2 tablespoons tapioca or corn starch

  • juice from 1 lemon

  • 2 teaspoons stone ground dijon mustard divided ( the kind with the seeds in it)

  • 2 teaspoons apple cider vinegar

  • 1 teaspoon light miso paste

  • 1/2 teaspoon salt

  • 1/2 cup plant based milk


Instructions:

  1. Wash Brussels sprouts and trim off the ends. Place cleaned sprouts in microwave safe bowl and add 1/2 cups of water. Microwave for 5 minutes. If you do not own a microwave, you can steam the sprouts on the the stove top in a steamer basket until they are tender, but not mushy. Drain water from spouts, rinse in cold water, and allow them to cool.

  2. While sprouts are cooling, prepare the cheese sauce by placing cashews in a microwave safe container. Cover the nuts in water and microwave for 3 minutes. You can also soak them in hot water for 2 - 3 hours if you do not have a microwave. Drain and add the cashews and remaining ingredients EXCEPT THE MILK, and just 1 of the 2 teaspoons of mustard, to a high speed blender or food processor. Blend on high until the mixture is completely liquified.

  3. Transfer cheese mixture to a medium sized pot. Heat on medium heat, whisking continuously until the sauce begins to thicken. This takes a few minutes. You want it to be the consistency of a thin pudding. Pour half of the cheese sauce into a medium sized bowl, and leave the rest in the pot (you will reheat it to make a dipping sauce). Allow the sauce to cool.

  4. Toss the cooled brussels in the 2/3 cups of flour and 1 teaspoon of salt. You just want to coat them in the four. Pour the panko and garlic powder into a shallow dish and stir. To coat the sprouts, dip them first into the cooled cheese sauce that you set aside in a bowl, making sure they are completely coated. Next dip the sprouts into the panko, again making sure they are evenly coated. Place the coated sprouts on a plate.

  5. Fill a medium size pot about half way full with oil, deep enough to cover the Brussels sprouts. Heat the oil over medium hight heat until it is good and hot. You can poke a chopstick into the oil and if tiny bubbles form around it, the oil is ready. Place a wire cooling rack on a paper towel lined cookie sheet on the counter near the pot. This will be used to place the finished sprouts to cool.

  6. Fry a few Brussels spouts at a time just until they are golden brown. This only takes a minute or two. Place finish sprouts on the wire rack to cool.

  7. Once all the sprouts are done frying, add 1/2 cup of plant milk and 1 teaspoon of mustard to the pot with the leftover cheese sauce. Whisk and reheat. You can add a splash of lemon juice to the sauce as well for some extra zip, if you like.

  8. Serve Brussels spouts right away with the gorgonzola dip on the side.

IMG_0540.jpg

Cilantro Avocado Tofu Wraps

IMG_0463.jpg

Easy weeknight dinners are a must in our busy house.

So, I always make sure to have some extra firm tofu in my fridge for quick dinners like these cilantro avocado tofu wraps.

The marinated tofu, creamy avocado, crispy lettuce, and tangy sauce make for a perfectly delicious, healthy filing meal!

These gluten free wraps are packed with plant protein ,and healthy fats to keep you full and fueled!

Feel free to add extra veggies like match stick carrots, radish slices, sliced onion, or anything else you may like.

These wraps are easy, healthy, delicious, and low carb! Perfect!


Ingredients:

  • 1 - 2 heads romaine lettuce

  • 1 block extra firm tofu

  • 1 - 2 avocados

  • 1/2 cup coconut aminos

  • 1 teaspoon agave

  • 1 teaspoon garlic powder

  • 1 teaspoon smoked paprika

  • 1 teaspoon oil (olive or grape seed)

  • juice from 1 lime

  • 1/3 cup chopped cilantro


Smokey lime cream sauce

  • 1/3 cup vegan sour cream, or plain unsweetened vegan yogurt (I use Kite Hill plain yogurt)

  • Juice from 1/2 lime

  • 1 teaspoon garlic powder

  • 1/2 teaspoon smoked paprika

  • salt and pepper to taste


Instructions:

  1. Drain tofu and wrap in a a clean kitchen towel or a few clean paper towels. Place a few cookbooks on top for 10 - 15 minutes to press out as much liquid from the tofu as you can. Once pressed, dice tofu into 1/2 inch cubes.

  2. In a shallow 8x8 dish, whisk together the aminos, oil, agave, garlic, paprika, and lime juice. Add the cubed tofu to the dish and allow it to marinate for 10 - 15 minutes.

  3. While tofu is marinading, wash and pat dry the lettuce, and trim the ends. Slice avocado into thin strips. Wash and chop 1/3 cup of cilantro.

  4. Prepare the smokey lime cream sauce by whisking all of the ingredients together in a small bowl and set aside.

  5. Heat a large skillet on medium heat. Spray with some cooking oil or add a few teaspoons of oil to the pan as it heats. Add the tofu AND the marinade to the pan. Allow the tofu to cook until all of the liquid is absorbed and the tofu has started to brown and get a little crispy around the edges.

  6. To build the wraps, line each lettuce leaf pieces of tofu, a few slices of avocado, drizzle with sauce, and sprinkle with cilantro.

Serves 4 - 6.

Beer Battered Vegan Fried Fish Filets (Fish and Chips)

IMG_0508-2.jpg

Before we went vegan, I could have lived off of fried fish and chips!

Beer battered cod was an all time fave that I never passed up.

Imagine my excitement when I discovered I could batter and fry canned banana blossoms and feel like I was eating one of my favorite foods from years past! I think I probably squealed a little!

The banana blossoms somehow magically recreates the texture of flaky fish fillet. They are really mild in flavor and with the help of some seaweed flakes for a fishy kick, it is remarkable how convincing these blossoms are! I mean seriously, who thought of this to begin with. I need to give them a hug!

I looked high and low for banana blossoms at my local Asian markets with little luck, but easily found them on Amazon! I hear that many Asian markets do in fact carry them, so you may find them locally!

In all honesty I was cautiously optimistic when creating this recipe, for fear of once again being super disappointed by lofty internet food magic claims. Some things just seem too good to be true. But this recipe is not. It is all true and delicious and amazing!

I made sure to include a picture of the inside of one of these fillets so you could see just how convincing it looks. These things look, feel, and taste like fried fish!

Now i’m not swearing this recipe will blow your mind, but it did mine. Suffice to say that banana blossoms are now a staple in my pantry, and fish fry Friday is back in action in our house!


Ingredients:

  • 2 cans of banana blossoms in brine

  • 1 and 1/2 cup all purpose white flour

  • 1 teaspoon salt

  • 1 teaspoon old bay

  • 2 teaspoons dulse flakes

  • 3 teaspoons baking powder

  • 1 can of cold beer, any beer is fine as long as it’s not a dark, thick beer

  • Oil for frying (I used peanut)

Vegan Tartar Sauce:

  • 1/2 cup vegan mayo

  • 1 tablespoon apple cider vinegar

  • 2 teaspoons lemon juice

  • 2 - 3 tablespoons diced dill pickles

  • 1 teaspoon sugar

  • 1 teaspoon dijon mustard

  • salt and pepper to taste

  • optional: 1 - 2 teaspoons capers


Instructions:

  1. Drain cans of banana blossoms and carefully remove the blossoms, laying them out on a paper towel to remove some liquid. They can easily fall apart so be careful. I found that only a few blossoms in each can were fully in tact. I simply took all of the loose leaves from each can and stacked them back together to resemble full blossoms. I have only been able to find one brand of blossoms on Amazon. I am uncertain if this is an issue with all canned banana blossoms, but stacking the leaves back together worked just fine for me.

  2. Transfer the blossoms to a shallow baking dish and sprinkle with the 2 teaspoons of dulce flakes and a dash of salt.

  3. For the batter, whisk together the flour, baking powder, 1 teaspoon salt, old bay, and the entire can of cold beer in a medium sized bowl. The batter will be thick.

  4. To make the tartar sauce, whisk all of the ingredients together in a medium sized bowl and set aside.

  5. Heat a deep skillet with a few inches of oil over medium/ high heat.

  6. While the oil is heating, begin carefully dipping the blossoms into the batter. For any blossoms that you had to reassemble, place them into the batter, and using a spoon, cover the top in batter. This will help keep the blossom in tact vs attempting to dip them. Carefully transfer the blossoms to the hot oil. TIP: if you are not sure if the oil is hot enough, place a chopstick into the oil, if tiny bubbles form around the chopstick, the oil is ready!

  7. Fry each blossom for a minute or two on each side, or until they are golden brown. If they seem to be browning too quickly, reduce your heat a bit. Transfer the finished blossoms to a wire cooling rack that has been placed on top of a paper towel lined cookie sheet.

  8. Serve finished banana blossoms with a few lemon wedges, homemade tarter sauce, french fries, or malt vinegar.

serves 4

IMG_0515.jpg

Vegan Orange Creamsicle Pancakes

IMG_0398-2.jpg

We have 4 kids, so we eat a lot of pancakess in this house. That said, I am always trying to think up new toppings to keep it interesting.

I am not a huge fan of maple syrup on my pancakes so fruit is normally a go to. I also LOVE orange creamsicle flavored anything, so it seemed like a natural answer to my most recent pancake breakfast ponderings!

Ringing in the new year, I am also making a conscience effort to cut as much refined sugar from our diets as I can.

So these pancakes are not only delicious but also pretty healthy! If you have never made a sweet tofu ricotta, I promise you will probably be surprised and delighted by just how tasty it is!

Winter time is also citrus season where we live, and its cara cara orange season! I love using up those beautiful pinkish red, flavorful oranges any way I can! Seriously, if you have never eaten this particular orange, go, search, find them and buy them all! They are soooo delicious!

So whip up a batch of these low sugar, protein packed vegan pancakes and let me know what you think!


INGREDIENTS:

The Pancakes

  • 2 tablespoons agave nectar

  • 3/4 cups white flour

  • 3/4 cups whole wheat or spelt four

  • 2 teaspoons baking powder

  • 1/4 teaspoon salt

  • 1/2 teaspoon cinnamon

  • 1/2 teaspoon vanilla extract

  • 1 1/4 cups plant based milk

  • 1 tablespoon melted vegan butter or coconut oil

  • sliced almonds for garnish ( do not add to the pancake mix)

Orange Syrup

  • 2 large seedless oranges ( I used cara cara navel oranges)

  • 1 cup water

  • 3 tablespoons agave nectar

Sweet Vanilla Ricotta

  • 1 block firm tofu

  • 3 tablespoons maple syrup

  • Juice from 1/2 lemon

  • 1 teaspoon vanilla extract

  • pinch of salt

  • 1 teaspoon cinnamon


COOKING INSTRUCTIONS:

  1. FOR THE ORANGE SYRUP: Peel oranges. Cut oranges into quarters and place in a high speed blender or food processor. Process until the oranges are liquified. In a medium sized pot add the orange, water, and agave. Heat on medium heat, whisking often for about 20 minutes, until the mixture begins to thicken and seems sticky. Set aside to cool.

  2. FOR THE PANCAKES: Whisk all dry ingredients in a large bowl.

  3. Add in the melted butter, plant based milk, vanilla, and stir well.

  4. Heat a large skillet on medium heat. Add a teaspoon of vegan butter or spray the pan with cooking oil. Using a 1/4 cup measuring cup, scoop out batter into the skillet, 2 or 3 pancakes at time.

  5. Let pancakes cook until tiny bubbles begin to form and pop, once this happens they are ready to flip. Cook on the other side for another minute or two, until cooked through.

  6. Repeat, adding more butter or oil to the pan as needed, until all batter is used.

  7. FOR THE RICOTTA: Add all of the ricotta ingredients to a hight speed blender or food processor and blend until the mixture is completely smooth. Taste for sweetness. You can add more maple syrup if it is not sweet enough for you.

  8. Top pancakes with a scoop of vanilla ricotta, drizzle with the oranges syrup, and sprinkle with sliced almonds to serve.


Serves 3 - 4. The pancake recipe can easily be doubled to serve more. The ricotta and syrup will serve more and will not need to be doubled.